Change a ball joint
| Time & Tools | |
| Time: | 1 hour |
|---|---|
| Tools: | Ball joint splitter, spanner, jack |
This procedure details how to change the offside lower front ball joint. The nearside front is an identical procedure and the upper front ball joints follow a similar procedure. The rear ball joint and damper replacement are slightly more complicated as they require a different method to remove the brake calipers.
Safety Notice I did not use a fixed support to prevent the car from dropping if the trolley jack hydraulics failed when performing this procedure. It is far safer to jack up the car and then use an appropriate fixed support that cannot collapse before performing these steps.
Removal
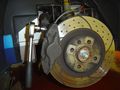
1. Raise car and remove front wheels
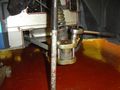
2. Remove front brake caliper

Remove the brake hose clamp first
Remove the brake caliper using an 8mm hex driver or allen key
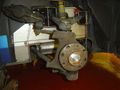
Zip tie the caliper out of the way


- Secure the brake caliper so that it does not get in the way of removing the ball joint. Ensure that the brake line is not under strain and taking the weight of the caliper. You may wish to use a cable tie to secure the caliper out of the way.
3. Remove the brake discs
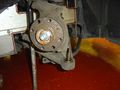
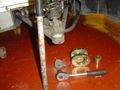
4. Remove the ball joint nut

- Use a 19mm ring/open ended spanner for the lower ball joint. You need to start with the ring end and transfer to the open end after winding the nut half the way up, otherwise the ring spanner will get stuck between the nut and the hub carrier and you won’t be able to remove the nut or the spanner.
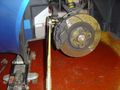
5. Split the ball joint from the hub carrier


- You may wish to use a fork splitter with a few hard hits with a club hammer. Alternatively you could use a scissor splitter.
- When the ball joint is split from the hub carrier move carrier out of the way. You could use a trolley jack handle as a prop for the hub carrier under the track rod end bolt.
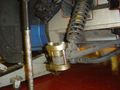
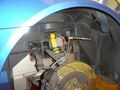
6. Remove ball joint
Make sure that you coat the bolt threads with plenty of copper grease
Maintain even pressure
The ball joint pops out very easily


- Turn the steering wheel to full lock to move the hub carrier out of the way, so you can fit a ball joint removal tool.
- Remove the ball joint rubber dust cover and circlip. This is important because the dust cover and circlip can bind up in the ball joint removal tool and the bolts could snap when you are tightening them.
- Assemble the ball joint removal tool and make sure that you coat the bolt threads with plenty of copper grease. This is an Elise Parts ball joint removal tool.
- Using a 19mm socket/ratchet, tighten the bolts 2 turns each keeping them even
Fitment
7. Grease up new ball joint

- It is a good idea to put new ball joints in the freezer for a day or two. This ensures an easy fit into the wishbone.
- Grease the rubber dust cover so that it does not snag.
8. Squeeze in new ball joint


- Hand fit the new ball joint into the wishbone. It should go in easily if it is frozen as it will be slightly contracted.
- Fit the ball joint assembly tool and hand tighten the bolts making sure everything is evenly spaced.
- Tighten the bolts two turns at a time until the ball joint is seated. The heat created during fitting will defrost the ball joint.
9. Tighten lower ball joint


- With the suspension under compression tighten the lower ball joint nut to 45NM. (Lotus service manual says 55Nm this is for early S1s maybe later cars are different please check)
- If you only have a basic tool kit you will not be able to use a 19mm socket and torque wrench because the hub carrier will be in the way, so you will need to estimate the right amount of tightness using a 19mm ring spanner.
The damper and lower ball joint are now fitted. Note that the caliper is now repositioned to alleviate the straining on the brake pipe.
10. Replace caliper and brake hose
Secure the brake pipe to the top wishbone


- Refit the brake caliper and torque down to 45NM (I don’t use retaining compound on these bolts as they are frequently removed).
Top tips
- It is a good idea to put new ball joints in the freezer for a day or two. This ensures an easy fit into the wishbone.
- Grease the rubber dust cover so that it does not snag.