Difference between revisions of "Fit a HID kit"
(HID installation guide) |
|||
| (15 intermediate revisions by 6 users not shown) | |||
| Line 1: | Line 1: | ||
| − | This guide by Janitor outlines the steps required to fit HID headlights to an S2. | + | This guide by [[http://forums.seloc.org/m/Janitor Janitor]] outlines the steps required to fit [[HID]] headlights to an S2. There are different versions of the kit, but the principles remain pretty much the same. |
| − | The 1st step is to remove the front wheels – clear and easy access is the only way to go. Observe recommended jacking points and safety here. Once wheels are removed, start on the front section of the wheel arch liner. I’m not personally familiar with fixings and methods before the MY06 models, but I think they may differ slightly | + | The 1st step is to remove the front wheels – clear and easy access is the only way to go. Observe recommended [[jacking points]] and safety here. Once wheels are removed, start on the front section of the wheel arch liner. I’m not personally familiar with fixings and methods before the MY06 models, but I think they may differ slightly |
| − | + | == Procedure == | |
| + | '''1. [[Remove the headlamp cover]]''' | ||
| − | + | '''2. Fit new Xenon bulbs''' | |
| − | + | <gallery> | |
| − | + | Image:hid installation 6.jpg|Note how the lugs on the bulb base locate in designated positions on the housing | |
| − | + | </gallery> | |
| − | + | Unplug, unclip and remove the existing dipped headlight bulb and install the HID bulb. I chose to do this first of all so that it’s safely stowed and kept clean whilst you’re sorting the cabling. Due to the lack of easy access, placing the HID tube into the holder is difficult, but be patient and avoid touching the bulb itself with fingers. (It can be cleaned with alcohol & lint-free cloth if accidental contact is made). | |
| − | |||
| − | |||
| − | |||
| − | |||
| − | |||
| − | |||
| − | |||
| − | |||
| − | |||
| − | |||
| − | Unplug, unclip and remove the existing dipped headlight bulb and install the HID bulb. I chose to do this first of all so that it’s safely stowed and kept clean whilst you’re sorting the cabling. Due to the lack of easy access, placing the HID tube into the holder is difficult, but be patient and avoid touching the bulb itself with fingers. (It can be cleaned with alcohol & lint-free cloth if accidental contact is made) | ||
| − | |||
| − | |||
| − | |||
| − | |||
| + | '''3. Trim grommet''' | ||
| + | <gallery> | ||
| + | Image:hid installation 7.jpg | ||
| + | </gallery> | ||
Next up, poke through the rubber grommet from inside (1) and trim the inner edge a little (2) to free things up a little for when it comes to pushing the HID bulb cable connectors through. Take much care here – don’t cut the cables or yourself and remember that your precious paintwork is barely a couple of inches away! | Next up, poke through the rubber grommet from inside (1) and trim the inner edge a little (2) to free things up a little for when it comes to pushing the HID bulb cable connectors through. Take much care here – don’t cut the cables or yourself and remember that your precious paintwork is barely a couple of inches away! | ||
| − | + | '''4. Thread cables''' | |
| + | <gallery> | ||
| + | Image:hid installation 8.jpg | ||
| + | Image:hid installation 9.jpg|New cables & connectors viewed from inside the arch | ||
| + | </gallery> | ||
| + | Thread all the appropriate connectors through the grommet (1) and refitting the grommet is best done by poking the whole thing through the hole in the clam and manipulating back into place from the inside of the arch. Attach the HID unit feeds to the original headlight bulb connectors (2) and tape them up for insulation and a little extra mechanical fastening (3). Tuck excess cable neatly away under the cable entry point away from the bulb housing and the hole for the glass fixing bolt (4). | ||
| + | (Note that the grommet supplied on the replacement HID bulb cables is not needed in this case. Either remove or carefully slide it up to the existing entry grommet as an extra drip-break). | ||
| − | + | '''5. Power on test''' | |
| + | <gallery> | ||
| + | Image:hid installation 11.jpg|The Ballast | ||
| + | </gallery> | ||
| + | Take this opportunity to connect the HID feeds or ‘ballasts’ and run a quick power-up test – there is really only one way this kit can go together (unless you’re trying really hard!) and it beats stripping everything apart again afterwards should something not be quite right! | ||
| − | + | '''6. Secure ballast''' | |
| − | + | <gallery> | |
| − | + | Image:hid installation 10.jpg|Bracket for fixing ballast | |
| − | + | Image:hid installation 12.jpg|Ballast in place | |
| − | + | </gallery> | |
| − | |||
| − | |||
| − | |||
| − | |||
| − | |||
| − | |||
| − | + | Being unsure exactly what is what under there, I found it tricky to locate a safe & secure place into which I felt confident of tapping screws for mounting the ballasts. There are twin oil-coolers on the SportsRacer and not knowing what was behind any other panels, I elected to utilise the supplied bracket and then a ‘known’ fixing. One 10mm socket later and all was firmly attached to one of the light unit mount bolts (not the glass securing bolts!). This is ideal as it is away from all other components and pipes etc whilst not interfering when arch liner is refitted. | |
| + | '''7. Refit sidelight bulbs''' | ||
| + | <gallery> | ||
| + | Image:hid installation 13.jpg | ||
| + | </gallery> | ||
| + | Replacing the sidelight bulbs is dead simple. The holder is fixed into the top side of the main beam light housing and you simply turn the sidelight bulb holder through 90 degrees, substitute the standard bulb with a direct LED replacement and refit. | ||
| − | + | The headlight fuse needs upgrading from 10A to 15A. Although the HIDs actually draw less power, they have a high power draw on startup. [[Fusebox]] under passenger side bonnet panel. | |
| − | [ | + | [[image:Fuses.jpg|thumb|left|Fuses for HID upgrade]] |
| − | + | [[image:s2fusebox.JPG|thumb|left|S2 Fusebox]] | |
| − | + | {{clr}} | |
| − | + | [[Category:DIY]] | |
| + | [[Category:Electrical]] | ||
| + | [[Category:Lotus Elise]] | ||
| + | [[Category:S2]] | ||
| − | + | ==TUTORIAL: Fitting of £60 HID kit by steve1978.== | |
| + | [[http://thumbnails17.imagebam.com/4540/8ee86b45397141.gif]] [[http://thumbnails8.imagebam.com/4540/4adb0045397145.gif]] | ||
| + | Kit consists of: | ||
| + | 2 ballasts | ||
| + | 2 Bulbs | ||
| + | all connections | ||
| + | nuts and bolts | ||
| + | cable ties. | ||
| + | Other kit required. | ||
| + | trolley jack | ||
| + | flat head screw driver | ||
| + | cross head screw driver | ||
| + | electricians tape. | ||
| − | + | Time taken approx 30 mins per light. | |
| − | + | Step1: Remove the wheel | |
| − | + | Step 2: Remove the 3 flat headed larger thumb screws. Now the light lense will come off | |
| + | Step 3: Back under the wheel remove the screws holding the wheel arch lining in place. when complete ease the lining out | ||
| − | + | Step 4: On the top of the liner there is a void. this is where the ballast will be fitted (between the body and the lining), if you look through the bonnet vent you may just be able to see the location of the ballast. | |
| − | + | Step 5: Remove the existing light bulb and insert your new one, you may find it easier to remove the lighting unit, we did (3 cross headed screws on the inside of the arch). feed the cables through the hole and connect them up. there is only one possible way to connect them. | |
| + | Step 6: Insert the liner back in to the wheel arch and connect the lights back to the ballast, now test the lights. if all is working then reassemble | ||
| − | + | Step 7 Stand back and be proud! | |
| − | [ | + | [[http://17.imagebam.com/dl.php?ID=45397141&sec=7658bdc643c587d162bb668fe80a12ff]] |
| − | + | [[http://forums.seloc.org/viewthread.php?tid=232203&page=1]] | |
Latest revision as of 19:38, 13 February 2015
This guide by [Janitor] outlines the steps required to fit HID headlights to an S2. There are different versions of the kit, but the principles remain pretty much the same.
The 1st step is to remove the front wheels – clear and easy access is the only way to go. Observe recommended jacking points and safety here. Once wheels are removed, start on the front section of the wheel arch liner. I’m not personally familiar with fixings and methods before the MY06 models, but I think they may differ slightly
Procedure
2. Fit new Xenon bulbs
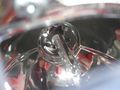
Note how the lugs on the bulb base locate in designated positions on the housing

Unplug, unclip and remove the existing dipped headlight bulb and install the HID bulb. I chose to do this first of all so that it’s safely stowed and kept clean whilst you’re sorting the cabling. Due to the lack of easy access, placing the HID tube into the holder is difficult, but be patient and avoid touching the bulb itself with fingers. (It can be cleaned with alcohol & lint-free cloth if accidental contact is made).
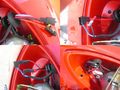
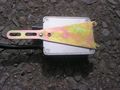
3. Trim grommet
Next up, poke through the rubber grommet from inside (1) and trim the inner edge a little (2) to free things up a little for when it comes to pushing the HID bulb cable connectors through. Take much care here – don’t cut the cables or yourself and remember that your precious paintwork is barely a couple of inches away!
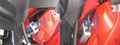
4. Thread cables
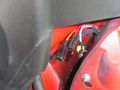
New cables & connectors viewed from inside the arch


Thread all the appropriate connectors through the grommet (1) and refitting the grommet is best done by poking the whole thing through the hole in the clam and manipulating back into place from the inside of the arch. Attach the HID unit feeds to the original headlight bulb connectors (2) and tape them up for insulation and a little extra mechanical fastening (3). Tuck excess cable neatly away under the cable entry point away from the bulb housing and the hole for the glass fixing bolt (4).
(Note that the grommet supplied on the replacement HID bulb cables is not needed in this case. Either remove or carefully slide it up to the existing entry grommet as an extra drip-break).
5. Power on test
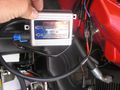
The Ballast

Take this opportunity to connect the HID feeds or ‘ballasts’ and run a quick power-up test – there is really only one way this kit can go together (unless you’re trying really hard!) and it beats stripping everything apart again afterwards should something not be quite right!
6. Secure ballast
Bracket for fixing ballast
Ballast in place

Being unsure exactly what is what under there, I found it tricky to locate a safe & secure place into which I felt confident of tapping screws for mounting the ballasts. There are twin oil-coolers on the SportsRacer and not knowing what was behind any other panels, I elected to utilise the supplied bracket and then a ‘known’ fixing. One 10mm socket later and all was firmly attached to one of the light unit mount bolts (not the glass securing bolts!). This is ideal as it is away from all other components and pipes etc whilst not interfering when arch liner is refitted.
7. Refit sidelight bulbs
Replacing the sidelight bulbs is dead simple. The holder is fixed into the top side of the main beam light housing and you simply turn the sidelight bulb holder through 90 degrees, substitute the standard bulb with a direct LED replacement and refit.
The headlight fuse needs upgrading from 10A to 15A. Although the HIDs actually draw less power, they have a high power draw on startup. Fusebox under passenger side bonnet panel.


TUTORIAL: Fitting of £60 HID kit by steve1978.
![[1]](http://thumbnails17.imagebam.com/4540/8ee86b45397141.gif)
![[2]](http://thumbnails8.imagebam.com/4540/4adb0045397145.gif)
Kit consists of: 2 ballasts 2 Bulbs all connections nuts and bolts cable ties.
Other kit required. trolley jack flat head screw driver cross head screw driver electricians tape.
Time taken approx 30 mins per light.
Step1: Remove the wheel
Step 2: Remove the 3 flat headed larger thumb screws. Now the light lense will come off
Step 3: Back under the wheel remove the screws holding the wheel arch lining in place. when complete ease the lining out
Step 4: On the top of the liner there is a void. this is where the ballast will be fitted (between the body and the lining), if you look through the bonnet vent you may just be able to see the location of the ballast.
Step 5: Remove the existing light bulb and insert your new one, you may find it easier to remove the lighting unit, we did (3 cross headed screws on the inside of the arch). feed the cables through the hole and connect them up. there is only one possible way to connect them.
Step 6: Insert the liner back in to the wheel arch and connect the lights back to the ballast, now test the lights. if all is working then reassemble
Step 7 Stand back and be proud!
[[3]]
[[4]]