S2 Toelink Install
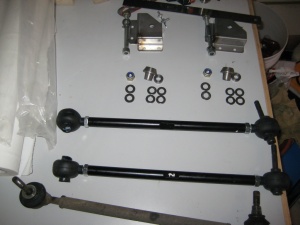
Since the S2 steel hub uniball toe link kit installation instructions are not straightforward I'll share my findings (hbaumhardt) for posterity;
0. Remove mid and rear undertrays, wheel, brake calliper, brake disk, OE toe link (drivers side inboard involves a UJ in your socket set, a lot of blind grovelling around and FFSing).
1. Screw out the new toe link ends, microwave rubber covers for 60 seconds, force end into it, coppaslip thread, screw in with around 4 cm thread showing each end. Squirt lots of grease (e.g. white lithium) into the cover. (Latest Eliseparts kit comes with the covers already fitted).
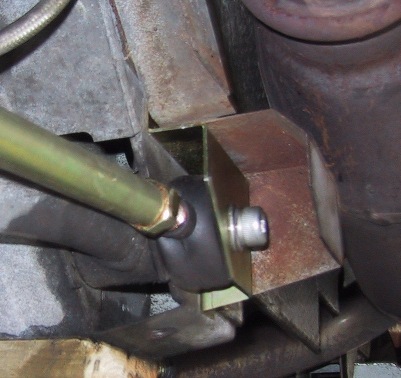
2. Inboard at wishbone from back to front: Long silver bolt - Thin Washer - Shear plate - Conical - Toe link - Conical - FRAME - Thin Washer - Nylock. Torque to 45 lbft (book says 55lbft but if the M10 nycloc nuts you have are marked S R or 8.8 you risk stripping the nut over 45lbft in a bloody hard place to remedy).
3. Whilst there is no need to replace the heat shields in the instructions I decided to mount the heat shields over the shear plates by grinding out the holes on the heat shields [dremel green bit] to line them up. Tapped out the spare holes [M6 tap] and used new M6x16 bolts and washers rather than pop rivets to simplify later messing around. Didn't do 2 of the holes on the pax side as obscured by the CAT and CBA to remove that lot as well.
Correct torque is 45NM not 45 Lb/ft. 45Nm is 33Lb/ft.
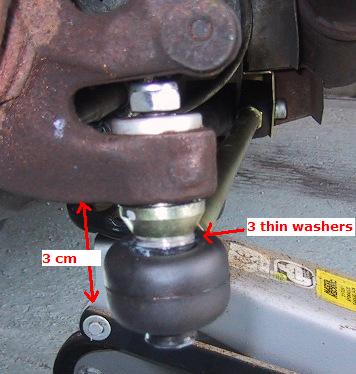
3. Hub carrier Uprights from bottom to top: Shorter black bolt - Conical - Toe link - Conical - 4 1mm think bump washers - big gold cone - UPRIGHT - Thin Washer - Nylock. Torque to 45lbft (book says 55 lbft but the threads were stripping over 45 due lower grade nylocs).
Had to file down the casting ridges [8 inch file] on the bottom of the upright to help the cone sit snug. Got worried about the amount of material being removed to get flat so left it sitting about 1mm proud.
4. Refit brake calliper, brake disk, wheel. Have a cuppa and do the other side.
5. With wheels back on and on the ground, strap something long and straight to the wheel horizontally (spirit level and broomstick are great), set the toe to straight ahead neutral by eye to get you to a geo rig see http://wiki.seloc.org/index.php/Geo_Setups
JOB IS DONE
That took about 8 hours of trial-and error. With the right stuff and these steps I reckon 3 to 4 hours max (that's an estimate, not a quote).
Non standard stuff you may need;
15mm long socket for original nuts (due length of bolt protruding)
17mm long socket for new nuts (due length of bolt protruding)
8" Flat Metal File (for uprights)
M6 thread tap (shear plate mounts)
8 M6x16 Hex Head Set Screw and washers (shear plate mounts)
Metal cutting/grinding bit (heat shield holes)
Extra M10 Nylock nut (in case you try for 55lbft and strip them)
Grease (for balljoints)


