Difference between revisions of "Track rod end"
Digimap2000 (talk | contribs) |
Digimap2000 (talk | contribs) |
||
| (One intermediate revision by the same user not shown) | |||
| Line 6: | Line 6: | ||
'''Removal''' | '''Removal''' | ||
| − | + | Start by marking the top of the tie rod so you can reposition it perfectly when reassembling. | |
| − | + | Loosen the locknuts on the steering tie rod whilst the track rod end is still attached at the steering arm, this will stop it flopping around. A couple of spanners are all that's needed to back off the two locknuts one at a time. | |
| − | Now put the locknut back on a few turns and tap with rubber mallet to release the joint. Remove the track rod counting the exact number of turns. | + | With the tie rod lock nuts released tackle the ball joint connecting it to the steering arm. Give the exposed thread below the nut a quick spray with lube. If you're really lucky the nut will undo all the way with no drama, more likely it'll go a few turns then start spinning the ball joint inside it's housing. Don't attempt any of the pry bar techniques on you tube, don't try jacking onto anything, the easy technique is a ratchet strap around the track rod end and lower wishbone. Doesn't have to be all that tight to stop the joint spinning and you can remove the locknut. |
| + | |||
| + | Now put the locknut back on a few turns and tap with rubber mallet to release the joint. Remove the track rod end counting the exact number of turns. The locknuts are left on the tie rod if you are simply changing the track rod ends. If you are fitting new steering rack gators then you will need to remove the lock nuts to allow the new gaiter to slide over the tie rod. The tie rod can rotate in the steering rack to allow fine adjustment of the wheel tracking, to remove the locknuts you might need to hold the tie rod firmly with molegrips. | ||
'''Refitting''' | '''Refitting''' | ||
| − | + | Rotate the tie rod so your mark is upwards, then screw the track rod end back onto the tie rod with the same number of turns as it took to come off. This should put it back onto the car close enough to the exact position it started. You can always get the tracking checked when you are done if worried about wheel alignment. Doesn't need a full geo, just wheel alignment. | |
| − | Reconnect the track rod end | + | Reconnect the track rod end down through the steering arm, you might need the ratchet strap again to stop the joint spinning. |
| − | Nip up the lock nuts against the | + | Nip up the tie rod lock nuts against the the track rod end. |
Latest revision as of 21:33, 8 May 2016
Track rod end
Removal
Start by marking the top of the tie rod so you can reposition it perfectly when reassembling.
Loosen the locknuts on the steering tie rod whilst the track rod end is still attached at the steering arm, this will stop it flopping around. A couple of spanners are all that's needed to back off the two locknuts one at a time.
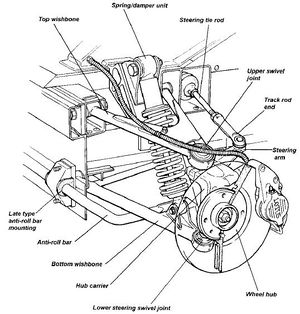
With the tie rod lock nuts released tackle the ball joint connecting it to the steering arm. Give the exposed thread below the nut a quick spray with lube. If you're really lucky the nut will undo all the way with no drama, more likely it'll go a few turns then start spinning the ball joint inside it's housing. Don't attempt any of the pry bar techniques on you tube, don't try jacking onto anything, the easy technique is a ratchet strap around the track rod end and lower wishbone. Doesn't have to be all that tight to stop the joint spinning and you can remove the locknut.
Now put the locknut back on a few turns and tap with rubber mallet to release the joint. Remove the track rod end counting the exact number of turns. The locknuts are left on the tie rod if you are simply changing the track rod ends. If you are fitting new steering rack gators then you will need to remove the lock nuts to allow the new gaiter to slide over the tie rod. The tie rod can rotate in the steering rack to allow fine adjustment of the wheel tracking, to remove the locknuts you might need to hold the tie rod firmly with molegrips.
Refitting
Rotate the tie rod so your mark is upwards, then screw the track rod end back onto the tie rod with the same number of turns as it took to come off. This should put it back onto the car close enough to the exact position it started. You can always get the tracking checked when you are done if worried about wheel alignment. Doesn't need a full geo, just wheel alignment.
Reconnect the track rod end down through the steering arm, you might need the ratchet strap again to stop the joint spinning.
Nip up the tie rod lock nuts against the the track rod end.
