Difference between revisions of "Window adjustment"
m (→S2 Window Adjustment: add adjustment screw rotation direction) |
|||
| (4 intermediate revisions by 2 users not shown) | |||
| Line 1: | Line 1: | ||
| + | |||
| + | == WARNING - TURNING THE S2 REAR ADJUSTER IN TOO FAR CAN CRACK THE DOOR SKIN!!! == | ||
| + | |||
| + | |||
===S1 Window Adjustment=== | ===S1 Window Adjustment=== | ||
| Line 14: | Line 18: | ||
In the picture above the red arrows indicate the adjusters for window tilt towards/away from the roof. They adjust the bottom of the window runners inwards/outwards, thus causing the top of the window to adjust out/in from the roof. These can be adjusted without removing the door card. Clockwise turns press the window tighter against the seal when up. | In the picture above the red arrows indicate the adjusters for window tilt towards/away from the roof. They adjust the bottom of the window runners inwards/outwards, thus causing the top of the window to adjust out/in from the roof. These can be adjusted without removing the door card. Clockwise turns press the window tighter against the seal when up. | ||
| + | |||
| + | Important note: take great care not to over-tighten this screw as there are a number of examples of owners finding the screw has pushed through the door skin and caused cracking on the outside paintwork! | ||
<br><br><br> | <br><br><br> | ||
If you want to adjust the height of the window at the front/back of the window then the door card must be removed. Undo the fasteners indicated by the green arrows in the above picture. The lower mid and rear sections of the card are held on by velcro, and just pull away after the other fasteners are removed. Replace the window winder, as you'll probably need to move the window up and down whilst adjusting. | If you want to adjust the height of the window at the front/back of the window then the door card must be removed. Undo the fasteners indicated by the green arrows in the above picture. The lower mid and rear sections of the card are held on by velcro, and just pull away after the other fasteners are removed. Replace the window winder, as you'll probably need to move the window up and down whilst adjusting. | ||
| Line 34: | Line 40: | ||
To adjust the stop, use a 10 mm spanner to release the lock nut. This is best done with the window fully up as the stop will be held tight by the window mechanism. | To adjust the stop, use a 10 mm spanner to release the lock nut. This is best done with the window fully up as the stop will be held tight by the window mechanism. | ||
Once the lock nut is released, wind the window down a little and using fingers, screw the stop in or out as required. Once correctly adjusted, nip up the lock nut. | Once the lock nut is released, wind the window down a little and using fingers, screw the stop in or out as required. Once correctly adjusted, nip up the lock nut. | ||
| + | |||
| + | More adjustments can be made on electric window variants, see website of Sand's Mechanical Museum: http://www.sandsmuseum.com/cars/elise/experience/maintenance/windowfix/windowfix.html | ||
[[Category:Interior]] | [[Category:Interior]] | ||
Latest revision as of 11:05, 12 November 2018
WARNING - TURNING THE S2 REAR ADJUSTER IN TOO FAR CAN CRACK THE DOOR SKIN!!!
S1 Window Adjustment
S2 Window Adjustment
The S2 windows can need adjusting now and then.
First of all ensure the softtop or hardtop is fitted correctly.
The following pictures and details are for a 2001 Elise - may be different for more recent or US models.
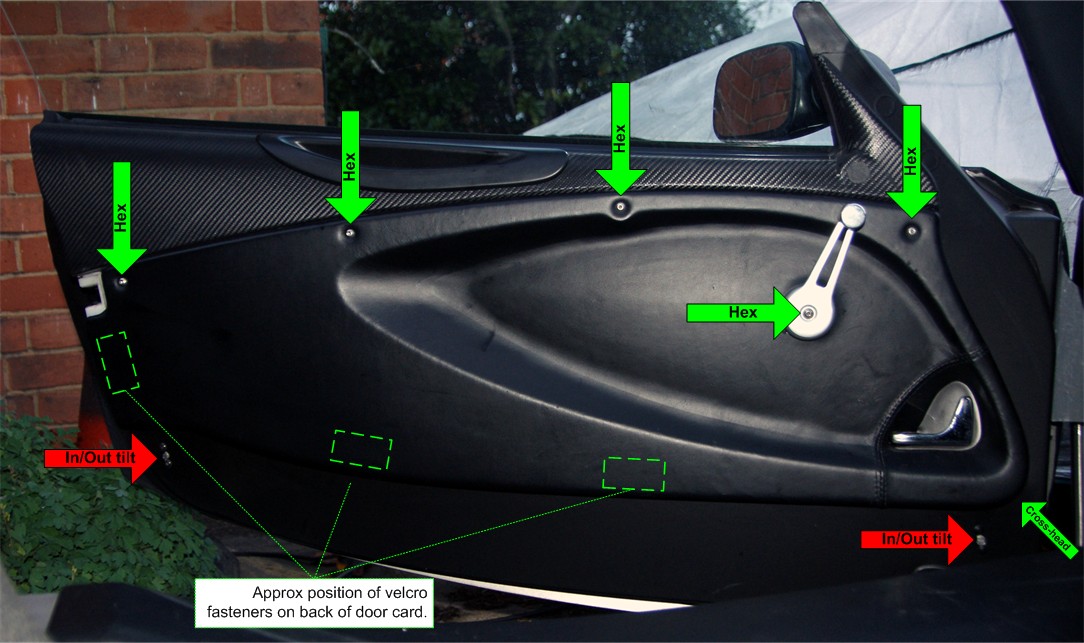
In the picture above the red arrows indicate the adjusters for window tilt towards/away from the roof. They adjust the bottom of the window runners inwards/outwards, thus causing the top of the window to adjust out/in from the roof. These can be adjusted without removing the door card. Clockwise turns press the window tighter against the seal when up.
Important note: take great care not to over-tighten this screw as there are a number of examples of owners finding the screw has pushed through the door skin and caused cracking on the outside paintwork!
If you want to adjust the height of the window at the front/back of the window then the door card must be removed. Undo the fasteners indicated by the green arrows in the above picture. The lower mid and rear sections of the card are held on by velcro, and just pull away after the other fasteners are removed. Replace the window winder, as you'll probably need to move the window up and down whilst adjusting.
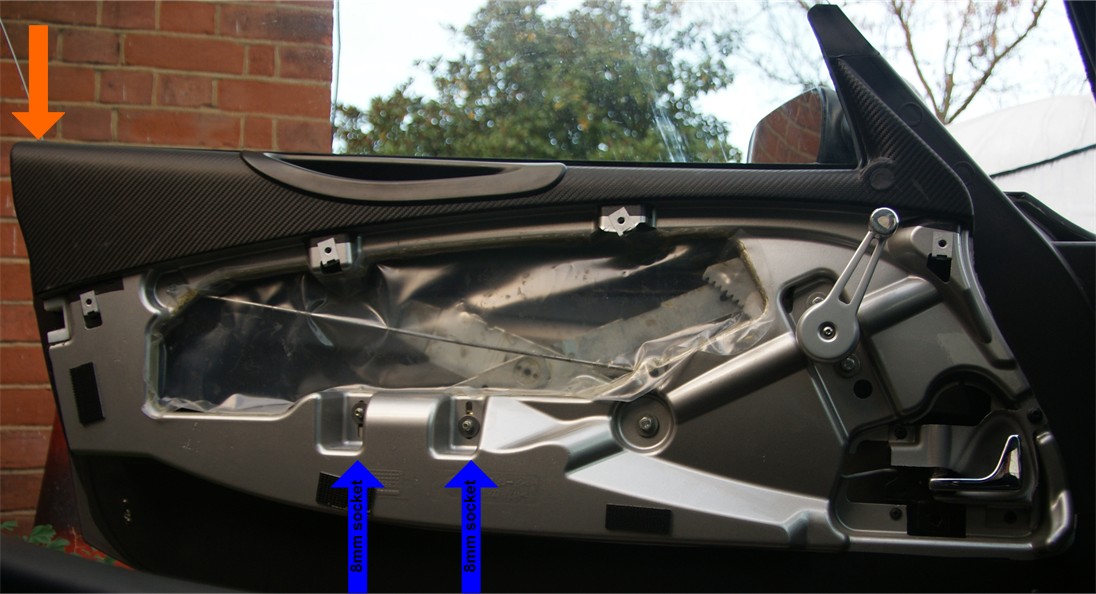
In the picture above the blue arrows indicate the adjusters for window height and tilt. Loosen them both a little with an 8mm socket, and move them up and down to adjust height and tilt of the window.
There is apparently an adjuster at the position marked by the orange arrow to move the window forwards/backwards, but I am unable to locate it on my car. Perhaps the upper trim needs to be removed.
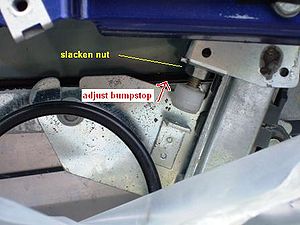
Cars with electric windows are a little different. Glass height is determined by the position of an adjustable stop which is accessible behind the plastic membrane at the top of the access aperture. To adjust the stop, use a 10 mm spanner to release the lock nut. This is best done with the window fully up as the stop will be held tight by the window mechanism. Once the lock nut is released, wind the window down a little and using fingers, screw the stop in or out as required. Once correctly adjusted, nip up the lock nut.
More adjustments can be made on electric window variants, see website of Sand's Mechanical Museum: http://www.sandsmuseum.com/cars/elise/experience/maintenance/windowfix/windowfix.html
