Difference between revisions of "Door Hinge, Replace Bush"
| (8 intermediate revisions by 3 users not shown) | |||
| Line 1: | Line 1: | ||
The hinge is attached to the door beam and to the chassis | The hinge is attached to the door beam and to the chassis | ||
| − | [[ | + | [[File:Door Hinge 1.JPG|400px]] |
If your door is dropping and lifting onto the door pin when you close, its more than likely that the plastic bearing is worn. There is a steel top hat (rotor) bush which sits inside a very thin plastic top hat bearing. It is the plastic part that wears and it is more likely on the drivers door as its obviously used more often. | If your door is dropping and lifting onto the door pin when you close, its more than likely that the plastic bearing is worn. There is a steel top hat (rotor) bush which sits inside a very thin plastic top hat bearing. It is the plastic part that wears and it is more likely on the drivers door as its obviously used more often. | ||
| − | [[ | + | [[File:Door Hinge 2.JPG|400px]] |
You can test if the hinge is worn by opening the door and trying to lift the door at the handle end and see what up/down movement there is. Try this with the door wide open and with it nearly closed. On mine there was lot more movement at one position than the other (can't remember which though). Compare any movement with the passenger side which gets a lot less wear and should be "as new" with little movement at the hinge | You can test if the hinge is worn by opening the door and trying to lift the door at the handle end and see what up/down movement there is. Try this with the door wide open and with it nearly closed. On mine there was lot more movement at one position than the other (can't remember which though). Compare any movement with the passenger side which gets a lot less wear and should be "as new" with little movement at the hinge | ||
| + | Each hinge has 2 rotor bushes and 2 plastic bearings. Each is held in place by a Cap Headed (allen) Bolt from the top and from the bottom. The bearing and rotor are a couple of £ from Lotus. | ||
| + | The bearings can be changed relatively easily without removing the clam shell by use a 45mm length of hex bar (cut from an 8mm Allen key) and an 8mm ratchet ring spanner. Having removed the bolt the rotor bush lifts out leaving the plastic bearing which needs to be levered out. | ||
| + | These are the parts from Lotus. | ||
| − | + | [[File:Door Hinge 3.JPG|400px]] | |
| − | |||
| − | |||
| − | [[ | ||
The part numbers are | The part numbers are | ||
| − | Plastic Bearing, Door Hinge, Part No A111U6025F | + | Plastic Bearing, Door Hinge, Part No A111U6025F<br /> |
Bush, Door Hinge, Part No A111U0057F | Bush, Door Hinge, Part No A111U0057F | ||
| Line 27: | Line 27: | ||
This is a photo of my old hinge mechanism (notice the wear on the aluminium by the door spring plate on a 40K mile car !!! (Shiney bit in centre). 2-3mm is worn off . And the gunk on the bottom of the hinge is the powdered remains) | This is a photo of my old hinge mechanism (notice the wear on the aluminium by the door spring plate on a 40K mile car !!! (Shiney bit in centre). 2-3mm is worn off . And the gunk on the bottom of the hinge is the powdered remains) | ||
| − | [[image:wornhinge.jpg|thumb|left]] | + | [[image:wornhinge.jpg|thumb|left]] |
| + | |||
| + | New bearings and bushes took minutes to fit. If fitting with clam removed, keep the door closed and remove/replace top and bottom bushes one at a time and the door will not move. If fitting without removing the clam, open door fully and support while changing the bushes one at a time. It might be necessary to jiggle the door slightly to get the bolt to align when re-fitting. | ||
| + | Fix the hinge bearing/bush then adjust the door to the correct closing height using the 4 bolts attaching the hinge to the chassis (you can see the slotted holes in the 1st diagram above that are there to allow this). My door shuts with a nice solid click now. | ||
| − | + | CHOPPER. | |
| − | + | [[Category:Lotus Elise]] | |
| + | [[Category:S1]] | ||
| + | [[Category:S2]] | ||
| + | [[Category:Body]] | ||
Latest revision as of 19:50, 8 June 2020
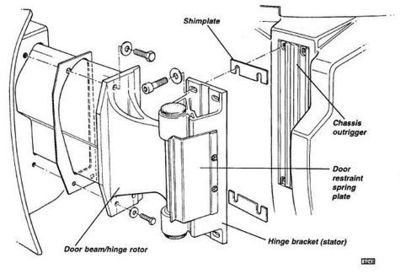
The hinge is attached to the door beam and to the chassis
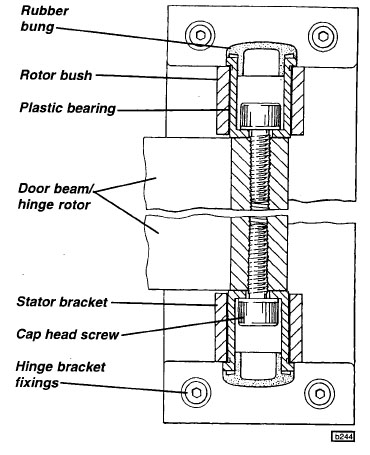
If your door is dropping and lifting onto the door pin when you close, its more than likely that the plastic bearing is worn. There is a steel top hat (rotor) bush which sits inside a very thin plastic top hat bearing. It is the plastic part that wears and it is more likely on the drivers door as its obviously used more often.
You can test if the hinge is worn by opening the door and trying to lift the door at the handle end and see what up/down movement there is. Try this with the door wide open and with it nearly closed. On mine there was lot more movement at one position than the other (can't remember which though). Compare any movement with the passenger side which gets a lot less wear and should be "as new" with little movement at the hinge
Each hinge has 2 rotor bushes and 2 plastic bearings. Each is held in place by a Cap Headed (allen) Bolt from the top and from the bottom. The bearing and rotor are a couple of £ from Lotus.
The bearings can be changed relatively easily without removing the clam shell by use a 45mm length of hex bar (cut from an 8mm Allen key) and an 8mm ratchet ring spanner. Having removed the bolt the rotor bush lifts out leaving the plastic bearing which needs to be levered out.
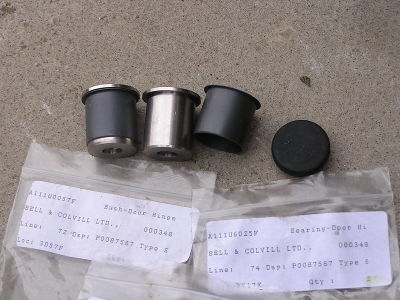
These are the parts from Lotus.
The part numbers are
Plastic Bearing, Door Hinge, Part No A111U6025F
Bush, Door Hinge, Part No A111U0057F
(Although I changed both Plastic Bearing and Rotor Bush,you could probably get away with only swapping the plastic bearing as this is the part that takes all the door load).
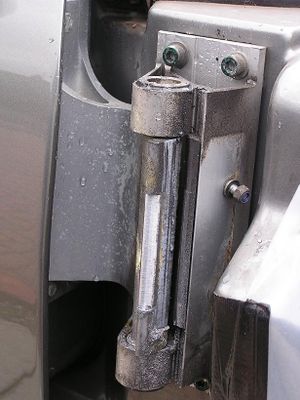
This is a photo of my old hinge mechanism (notice the wear on the aluminium by the door spring plate on a 40K mile car !!! (Shiney bit in centre). 2-3mm is worn off . And the gunk on the bottom of the hinge is the powdered remains)
New bearings and bushes took minutes to fit. If fitting with clam removed, keep the door closed and remove/replace top and bottom bushes one at a time and the door will not move. If fitting without removing the clam, open door fully and support while changing the bushes one at a time. It might be necessary to jiggle the door slightly to get the bolt to align when re-fitting.
Fix the hinge bearing/bush then adjust the door to the correct closing height using the 4 bolts attaching the hinge to the chassis (you can see the slotted holes in the 1st diagram above that are there to allow this). My door shuts with a nice solid click now.
CHOPPER.


