Difference between revisions of "Alternator"
| (17 intermediate revisions by 8 users not shown) | |||
| Line 61: | Line 61: | ||
#Extract alternator from above | #Extract alternator from above | ||
| − | *Removing the undertray offers no advantage. | + | *Removing the undertray offers no advantage although removing the boot lid is helpful. |
| + | |||
| + | |||
| + | A few notes from having done this recently to a 111S - clem2k3 | ||
| + | |||
| + | #I didn't have to remove the heat shield on my car, the 13mm nut and plug were accessible from the wheelarch. | ||
| + | #The alternator had a small tensioning bolt in it (pushing against the tensioning bracket) that was seized and snapped. Replacement alternator (XPart unit from eliseparts 2023) didn't have a thread so I didn't replace it. | ||
| + | #The alternator did fit through the wheelarch hole so I didn't have to remove the cam cover. | ||
| + | #The biggest one: I needed quite a lot of leverage to get the bolts undone (I used cracking off bar on the top one) so I think it would have been improved by removing the middle undertray to get some space to swing a longer ratchet/bar. As it stands I did remove the rear undertray/diffuser and used this extra access to push on the alternator to tension it while an assistant did up the bolts. I think it would have been overall quicker to remove the undertrays despite the fact it seems to be 1000 bolts to do this. | ||
| + | |||
| + | |||
| + | Hi Guys, | ||
| + | |||
| + | Make sure that if your battery light comes on, before dismantling the alternator from the car etc, check the live wire from the starter motor to the alternator. | ||
| + | It sits underneath the inlet manifold and if original contains a fuse & a brown sleeve. | ||
| + | |||
| + | Mine broke through corrosion from water leaks, if it breaks your battery wont charge at all leading to a lot of head scratching. | ||
| + | |||
| + | Lotusboy90 | ||
| + | |||
| + | Thanks for the information. Due to a bad connection of the car's lugs on the battery terminals, this fuse link cable burned out. | ||
==Removal from Air Con Cars== | ==Removal from Air Con Cars== | ||
| − | I find it best to remove the engine cover to gain direct access from directly above the alternator. | + | I find it best to remove the engine cover to gain direct access from directly above the alternator. Get the gas removed from the system before you touch the pipes. |
#Release the tension in the auxillary belt by slackening the pulley tension bolt (remove the belt). The pulley sits inbetween the engine and compressor. | #Release the tension in the auxillary belt by slackening the pulley tension bolt (remove the belt). The pulley sits inbetween the engine and compressor. | ||
#Undo the nut attaching the smaller rubber aircon pipe to the sill pipe in the wheel arch. This will allow you access to the larger pipe. | #Undo the nut attaching the smaller rubber aircon pipe to the sill pipe in the wheel arch. This will allow you access to the larger pipe. | ||
| Line 109: | Line 129: | ||
http://www.eliseparts.com/shop/index.php?main_page=product_info&products_id=289 | http://www.eliseparts.com/shop/index.php?main_page=product_info&products_id=289 | ||
| − | http://www.elise-shop.com/ | + | http://www.elise-shop.com/thermal-management-c-43_106.html |
Material can be bought here :- | Material can be bought here :- | ||
| Line 134: | Line 154: | ||
*Bosch - OE part | *Bosch - OE part | ||
*02 111s BOSCH 0124225011 | *02 111s BOSCH 0124225011 | ||
| − | + | *Denso DAN014/YLE101520 | |
== Alternator Re-build == | == Alternator Re-build == | ||
| Line 161: | Line 181: | ||
[[Image:alternator3.jpg|thumb|left|Click to make bigger]] | [[Image:alternator3.jpg|thumb|left|Click to make bigger]] | ||
{{clr}} | {{clr}} | ||
| + | |||
6. Measure the bearing using a vernier. Mine was 35mmOD, 17mmID by 10mm -- SKF 6003. | 6. Measure the bearing using a vernier. Mine was 35mmOD, 17mmID by 10mm -- SKF 6003. | ||
| Line 174: | Line 195: | ||
[[Image:alternator4.jpg|thumb|left|Click to make bigger]] | [[Image:alternator4.jpg|thumb|left|Click to make bigger]] | ||
{{clr}} | {{clr}} | ||
| + | |||
| + | |||
| + | EDIT by Dobbo. There is another bearing at the pulley end. No sense in just doing one whilst it's off the car and in bits. The pulley nut is 24mm. You'll need an impact wrench to undo it, or find a way to clamp it in a vice without damaging the pulley. I used several layers of very heavy duty tape and clamping it very tightly. There's also 4 screws to undo. Once the nut is off, there's a washer and you'll need to drift the rotor out of the bearing. Take care not to drop it when if comes free. The bearing remains in the alternator chassis and will also need drifting out. I used the same 24mm socket that I used for the pulley nut. | ||
| + | |||
9. Refit to the car, reconnect the wiring and tension the belt as above. | 9. Refit to the car, reconnect the wiring and tension the belt as above. | ||
Latest revision as of 10:05, 3 July 2023
Alternator
Electrical pack replacement.
If you have a problem with the brushes or the electrical pack in general, a new part can be bought from WOODAUTO. (www.woodauto.com). To order, you will need to call them.
My alternator on a S1 Elise stopped working, so I removed it from the car. Took the electrical pack off, and saw the tails from the brushes were no longer connected to their connections, corrosion was the reason.
The electrical pack off mine had ref. RTM152b. On the Woods website, this came up but their ref. is VRG36884 RMI. This item cost £24 plus VAT. All in all, posted to my door cost me £30.00 with VAT.
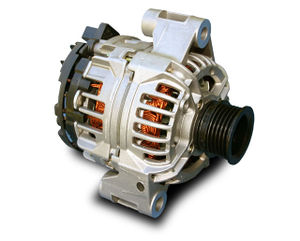
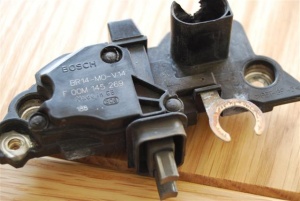
Refer to the current guild for a photo of the electical pack. It is the black part which has been removed from the alternater. No major rebuild at all if this is the problem.
Time take, 1hr.
Information added by Britspeed off Seloc.
Alternator Problem Diagnosis
Common failures:
Regulator & Rectifier failure:
Battery lights flash on dash, headlights flash on when trying to start. When checking the voltage across the battery terminals readings are usually less then 12v, or can be open circuit and go high voltage 18v. This can have a detrimental affect on the battery - boils the acid/fluid if too high. Easiest solution - Remove the alternator and get checked by auto electrician.
The battery warning light on dash and flashing headlights can also be caused by a flat battery. There is a clicking as the solenoid etc click over but the engine will not start.
Bearing Failure for S2 111s and other model with 4-2-1 exhaust:
Due to the additional width of the 4-2-1 pipes, failure of the rear bearing is not uncommon. The heat from the pipes cooks the grease until the bearing runs dry and very loud. Noise produced sounds like metal grinding against metal.
Please add your Info, Just click EDIT
Removal
Should take about 1hr:
- Disconnect the battery
- Remove offside rear wheel and wheel arch liner
- Remove plastic cam cover - three 8mm screws
- Remove any exhaust manifold heat shield
- Remove main (largest) wire from alternator 13mm nut. You can't remove the control wire (clip on connector) yet as the heat shield is in the way. Leave this for now.
- Remove 15mm tension bolt
- Remove 15mm top bolt
- Pry alternator from bracket. Start with small flat head screwdriver and gradually move to larger size as the alternator moves out.
- Disconnect control wire plug and remove belt from pully
- Extract alternator from above
- Removing the undertray offers no advantage although removing the boot lid is helpful.
A few notes from having done this recently to a 111S - clem2k3
- I didn't have to remove the heat shield on my car, the 13mm nut and plug were accessible from the wheelarch.
- The alternator had a small tensioning bolt in it (pushing against the tensioning bracket) that was seized and snapped. Replacement alternator (XPart unit from eliseparts 2023) didn't have a thread so I didn't replace it.
- The alternator did fit through the wheelarch hole so I didn't have to remove the cam cover.
- The biggest one: I needed quite a lot of leverage to get the bolts undone (I used cracking off bar on the top one) so I think it would have been improved by removing the middle undertray to get some space to swing a longer ratchet/bar. As it stands I did remove the rear undertray/diffuser and used this extra access to push on the alternator to tension it while an assistant did up the bolts. I think it would have been overall quicker to remove the undertrays despite the fact it seems to be 1000 bolts to do this.
Hi Guys,
Make sure that if your battery light comes on, before dismantling the alternator from the car etc, check the live wire from the starter motor to the alternator. It sits underneath the inlet manifold and if original contains a fuse & a brown sleeve.
Mine broke through corrosion from water leaks, if it breaks your battery wont charge at all leading to a lot of head scratching.
Lotusboy90
Thanks for the information. Due to a bad connection of the car's lugs on the battery terminals, this fuse link cable burned out.
Removal from Air Con Cars
I find it best to remove the engine cover to gain direct access from directly above the alternator. Get the gas removed from the system before you touch the pipes.
- Release the tension in the auxillary belt by slackening the pulley tension bolt (remove the belt). The pulley sits inbetween the engine and compressor.
- Undo the nut attaching the smaller rubber aircon pipe to the sill pipe in the wheel arch. This will allow you access to the larger pipe.
- Remove the top alternator bolt and the bracket holding the air con pipes together.
- Slacken the bottom alternator bolt through the wheel arch. This should allow you to pivot the alternator away from the top alternator bracket.
- Remove the top bracket.
- Use the appropriate allen key to remove the bolt holding the large air con pipe on to the compressor. You can access the bolt through the wheel arch.
- From above either slacken (or remove)the smaller air con pipe going to the compressor.
- Using a ratchet spanner or similar, access the bottom alternator bolt from above (I found it best to stand in the cockpit!) Use a 1/4 inch ratchet with extension to access the back bolt.
- Extract alternator from above.
Regulator
Very common for these to fail. Can be replaced for about £60.
Alternator belt
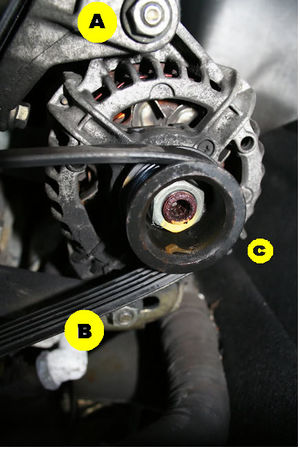
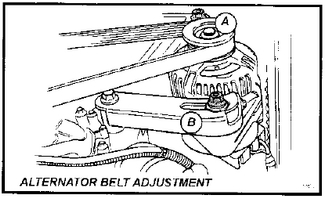
You can change the alternator belt by taking off the rear drivers side wheel and plastic inner arch mud guard. Removing the undertray will give no advantage. You will just need a good socket set, though you can get to A and B easily enough with a 15mm spanner.
Loosen 'A' pivot bolt and 'B' tensioner bolt, to allow the alternator to 'swing'.
'C' on the diagram is the tensioner of the belt, loosen this to remove the belt. The tensioner bolt is the 8mm bolt on the end of the arm. It slots into the end of the arm and allows the adjustment. Difficult to see when peering in, but easy enough to locate.
The MG Rover part number for a belt for the S1 is PQS100840 and costs about £10.50 including VAT. - This part number may be correct if you're going to a Rover dealer, but UniPart gave me a different belt when I asked for that number, the correct belt was UniPart number GMV50738 - AL...Ease 27/08/09
Tension belt to the following on S2: For heater cars - one way deflection of 6-8mm under moderate finger pressure For AC cars - as previous but 9-10mm
Alternator Heat Protection
Heat-shield fabrics claim to reflect up to 90% of the heat radiated by the exhaust and can function at temperatures unto 2000 degrees Fahrenheit.
The potential downside is that the critical components are also thermally insulated from the inside and could therefore suffer from internally generated heat, ie too much protection could make matter worse.
http://www.eliseparts.com/shop/index.php?main_page=product_info&products_id=289
http://www.elise-shop.com/thermal-management-c-43_106.html
Material can be bought here :-
http://www.merlinmotorsport.co.uk/advanced_search_result.php?keywords=heat
There are option to improve the standard of the existing manifold shielding or to wrap the exhaust. Both of which may just push the heat elsewhere and cause problems further down the line.
Please add your Info, Just click EDIT
Sourcing Replacement
It is not recommended to purchase Chinese manufactured pattern replacement alternators for the Elise, such as those commonly advertised on eBay. They are not built to withstand sustained high revs and are guaranteed to fail prematurely. These include:
- Unipoint (ALT-4212)
Known good models include:
- Magneti Marelli (63321239)
- Bosch - OE part
- 02 111s BOSCH 0124225011
- Denso DAN014/YLE101520
Alternator Re-build
Should your alternator bearing pack up and you don't want to buy a new one (£165) or exchange (£120-140) or repair (£40), then you can always fix it yourself.
Doing this may stop you from being able to exchange an alternator at a later date, if you have any worries stop now.
1. Remove the alternator from the car as described above, access can only be achieved through the wheel arch, with the drivers rear wheel removed. Good luck getting it out between the engine mount and the fuel filler pipes, stick with it!
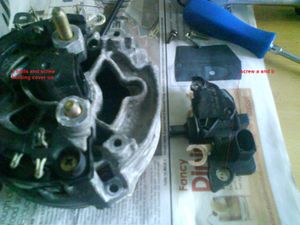
2. Once you've got the alternator on the bench remove the 2 nuts and the 1 screw holding the plastic cover on and remove, then undo the 3 screws (a&b + c not shown!) holding the electrical parts on - remove sideway and slide out with the commutators attached.
3. Undo the 4 long bolts, I used a screw driver with a hex shaft and drove it round with a spanner.
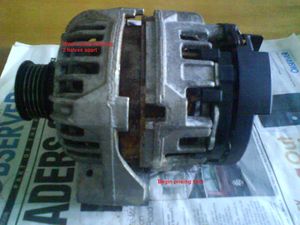
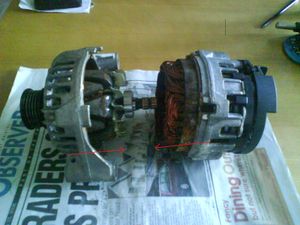
4. Using a sturdy flat blade screw drive prise the 2 halves of the body apart. This takes time and you have to work methodically work round from one side to another.
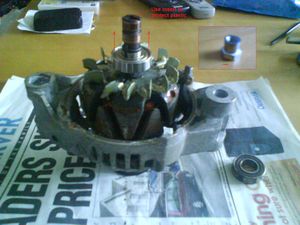
5. Using a 2 or 3 leg puller pull the bearing off the shaft. I used a small hollow nut to protect the plastic shroud on the shaft, so that the centre of the puller pushed against metal instead of plastic.
6. Measure the bearing using a vernier. Mine was 35mmOD, 17mmID by 10mm -- SKF 6003.
Go here
Enter you bearing dimensions and obtain a product code. Then take that code over to eBay and see if you can find a 99p replacement! You could go for an uprated high temperature bearing but make sure the rpm rating is up to the job.
7. Refit the new bearing by either using a deep socket and drift or make a press from a jack, some wood and wedge under something heavy.
8. Align the 2 halves of the alternator and refit the 4 long bolts, tighten each one a 1/4 turn until tight. Refit the electronics in the reverse of disassemble, making sure to push the commutator back in first.
EDIT by Dobbo. There is another bearing at the pulley end. No sense in just doing one whilst it's off the car and in bits. The pulley nut is 24mm. You'll need an impact wrench to undo it, or find a way to clamp it in a vice without damaging the pulley. I used several layers of very heavy duty tape and clamping it very tightly. There's also 4 screws to undo. Once the nut is off, there's a washer and you'll need to drift the rotor out of the bearing. Take care not to drop it when if comes free. The bearing remains in the alternator chassis and will also need drifting out. I used the same 24mm socket that I used for the pulley nut.
9. Refit to the car, reconnect the wiring and tension the belt as above.
Alternator parts supplier
http://www.woodauto.com/Unit.aspx?Man=BOSCH&Ref=0124225011
Alternator Pulley Information
Assume tickover at 900 rpm for the warning light to go out.
Standard pulley diameter 48mm, light goes out at 900 rpm, equivalents are
57mm needs 996 rpm
67mm needs 1183 rpm
80mm needs 1503 rpm
Belt sizes are 5pk 738, next size up is 5pk 778 (Gates)
