Difference between revisions of "Stack"
m (→S1 Stack Glass) |
|||
| (2 intermediate revisions by 2 users not shown) | |||
| Line 9: | Line 9: | ||
http://www.213performance.co.uk/stack-product-service-and-repair | http://www.213performance.co.uk/stack-product-service-and-repair | ||
| − | A rebuild (which included removing and refitting the glass) and two new motors was | + | A rebuild (which included removing and refitting the glass) and two new motors was £230 + VAT + £11 P&P (in 2019). It also came back looking better than new! |
===Resetting=== | ===Resetting=== | ||
| Line 68: | Line 68: | ||
(As of Oct 25, 2008, STACK no longer sell the replacement Glass) but elise-shop.com started to sell the glasses. You can find them here: [http://www.elise-shop.com/stack-replacement-glass-elise-s1-exige-s1-p-354087.html ..here..] | (As of Oct 25, 2008, STACK no longer sell the replacement Glass) but elise-shop.com started to sell the glasses. You can find them here: [http://www.elise-shop.com/stack-replacement-glass-elise-s1-exige-s1-p-354087.html ..here..] | ||
| + | |||
| + | According to 213Performance (details above) the Stack instruments had a glass front until around the middle of 1998, with an acrylic front from then on. 213Performance only have the acrylic fronts, but can swap an earlier glass-fronted unit for an acrylic front and claim it is very difficult to spot the difference. The acrylic fronts apparently suffered less from the grey 'surround' peeling or delaminating. 213Performance also offer a complete diagnostic service and although cannot get all parts claim to be 100% in the 100 or so repairs carried out to date (October 2019). | ||
===Dimensions S1 Stack Glass=== | ===Dimensions S1 Stack Glass=== | ||
Latest revision as of 14:30, 15 October 2019
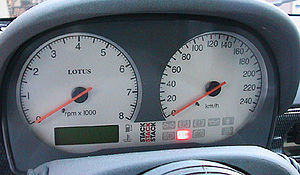
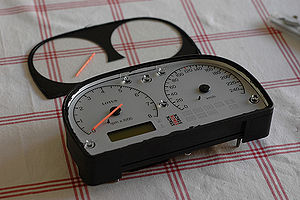
The Instrument binnacle in the Elise is made by a company called 'Stack' and therefore is referred to as 'Stack unit' or just 'Stack'. Late Elise have replaced the Stack with a Shurlok unit.
Repair
S1 Stack units can now be repaired by 213 Performance in Bicester:
http://www.213performance.co.uk/stack-product-service-and-repair
A rebuild (which included removing and refitting the glass) and two new motors was £230 + VAT + £11 P&P (in 2019). It also came back looking better than new!
Resetting
I recently acquired a GPS and was very shocked to see that my speedo was over-reading by about 10 mph when compared to the GPS. On searching the Tech forum, I realised that this is quite common, and can be simply rectified by resetting the Stack unit as follows:
- Turn off the ignition
- Open the driver's door (yes, really!)
- Press and hold the trip-meter reset button
- Whilst still holding the reset button turn the key in the ignition to the second position (just before the engine turns)
The Stack will then wind both needles back to below the zero position, and the LCD will show the software revision number. Once it's gone through the motions your speedo should then read true!
From my research, this seems to work on all versions of the Elise, including those with Stack and Shurlok instruments.
Stack Unit - removing unit
To remove the stack unit it is necessary to first remove the steering column surround which consists of removing its 5?? screws. NOTE: be careful as the odometer reset switch is attached to the surround and it may be possible to damage the two delicate wires connecting it.
Once the steering column surround is removed you should see two 10 or 12mm bolts. Once these are removed the unit should become free apart from the wiring harness connected at the rear. NOTE: be careful at this stage as it is possible to damage the wiring harness if excess weight or force is placed on the cabling
To gain better access to the plug at the rear I removed the cowl surrounding the unit using a small socket set with a universal joint to remove the 4 small nuts. NOTE: It is probably a good idea to try to mark the unit somehow first as the cowl is fitted with elongated holes to allow fine positioning of the cowl surrounding the unit.
The plug at the rear has an upper and lower blue retaining clip. These were relatively easily removed (however be careful they don't fall inside the dash like mine did ;)) The plug itself however was VERY difficult to remove and I had to proceed with patience continuously gently wriggling it until it beame free. This took a long time but eventually worked.
The unit should now be free to remove from the vehicle. To remount the unit I simply reversed the above sequence.
Stack unit - removing glass
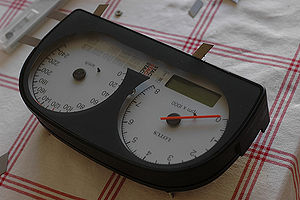
To remove the perspex window of the stack unit it should first be removed from the vehicle using the above procedure.
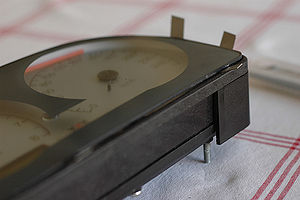
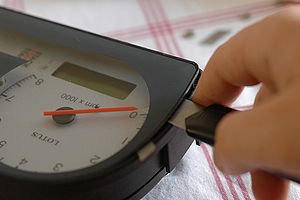
The glass is held in place using a black bath sealant type substance and this should be scraped away as best as possible. I, very gently, used a stanley knife blade to separate the perspex window from the plastic surrounding lip. This is a job that should be done very carefully and slowly otherwise there will be obvious damage to the unit. I did this over a period of days as not to become too frustrated with it. When I started to get frustrated with it I went off and had a beer and tried again the next day....not a job to do if you're in a rush!
Once I was satisfied that I had removed as much of the black sealant as I could I gently started to insert broken stanley blade segments into the gap and really gently try to lever the perspex out of the unit. I started along the bottom edge and in the bottom corners in case I made any marks on the unit as these areas are somewhat hidden by the steering column surround . NOTE: stanley blades are bloody sharp and you could very easily cut yourself. Don't say I didn't warn you!
Once I had managed to lift a corner I continued to separate the black sealant at the back of the perspex. I then added another segment of broken stanley blade to keep it lifted and slowly worked my way round the edge. Be careful not to lever the perspex too much or it might break and i'm not so sure how easy or cheap it would be to get a replacement.
To refit the glass I managed to find some black bath sealant at my local DIY shop. I first cleaned all of the surfaces as best as I could and then pushed the glass back in place. I then sparingly squeezed some of the sealant around the edge of the glass clearing away the excess immediatlely. I decided not to put any sealant behind the glass as the glass already seemed a reasonably tight fit and just in case i had to do the same job next week, It is a Lotus after all! I just put enough around the edge to seal it so that moisture, condensation etc shouldn't be able to get in.
My best advice is to take your time with this job. It's a bit long but i think the slower you do it the less likely you are to damage the unit. Good luck!
S1 Stack Glass
If you need to replace the Glass(Lens) on your S1's Stack, you can get this (already painted of couse) directly from Stack for £50.00 ex vat and shipping.
Contact: sales@stackinc.com or sharon.drew@stackltd.com
(As of Oct 25, 2008, STACK no longer sell the replacement Glass) but elise-shop.com started to sell the glasses. You can find them here: ..here..
According to 213Performance (details above) the Stack instruments had a glass front until around the middle of 1998, with an acrylic front from then on. 213Performance only have the acrylic fronts, but can swap an earlier glass-fronted unit for an acrylic front and claim it is very difficult to spot the difference. The acrylic fronts apparently suffered less from the grey 'surround' peeling or delaminating. 213Performance also offer a complete diagnostic service and although cannot get all parts claim to be 100% in the 100 or so repairs carried out to date (October 2019).
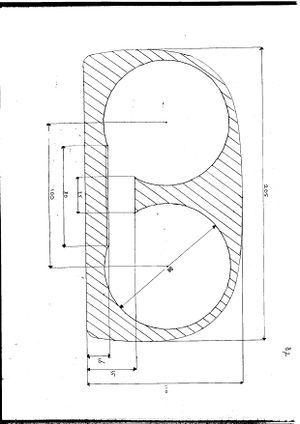
Dimensions S1 Stack Glass
If you want to make yourself a lightweight perspex version of the Stack glass, here are the dimensions
Return to Zero
There appears to be an undocumented software feature in the stack firmware which returns the odometer value back to zero. A very handy feature indeed but unfortunately the procedure required to perform this functionality is currently unknown..
