Difference between revisions of "Windscreen washer mod"
m |
m |
||
| (16 intermediate revisions by 8 users not shown) | |||
| Line 4: | Line 4: | ||
The mod is totally easy, but it took me best part of an hour to get the necessary detail out of the forum search. I'll re-post here: | The mod is totally easy, but it took me best part of an hour to get the necessary detail out of the forum search. I'll re-post here: | ||
| − | # Nip to your friendly neighbourhood Peugeot parts desk, and ask for Peugeot part number 643861 (Bin A6C5) - a "Spray Ramp". It costs about | + | # Nip to your friendly neighbourhood Peugeot parts desk, and ask for Peugeot part number 643861 (Bin A6C5)For LHD cars the number is 643860. - a "Spray Ramp". It costs about £11.50 inc. VAT (06-01-2010). It comes with ample tubing already attached. Ample to do the job. Some people have used a similar TVR part, but this costs £12 and your nearest TVR dealer is probably further away than your nearest Peugeot dealer. Alternatively, check the [[Windscreen wipers]] page for details of the Valeo VM15 replacement wiper. |
# Get hold of some small black cable ties and an adjustable spanner. Some black electrical tape is also handy. | # Get hold of some small black cable ties and an adjustable spanner. Some black electrical tape is also handy. | ||
# Remove the washer bottle from the front service compartment. Follow the hose with your fingers, and remove it from the plastic T section. Also remove the plastic T section. | # Remove the washer bottle from the front service compartment. Follow the hose with your fingers, and remove it from the plastic T section. Also remove the plastic T section. | ||
# On the outside of the service compartment, remove the sleeve from around one of your existing window washer nozzles. Then use the spanner to remove the washer nozzle. I found that I didn't need to get a spanner to the nut on the underside, holding it with my fingers was sufficient. Removing the existing washer jet allows the mod to be completed without drilling a hole in your car, making the mod totally reversible. | # On the outside of the service compartment, remove the sleeve from around one of your existing window washer nozzles. Then use the spanner to remove the washer nozzle. I found that I didn't need to get a spanner to the nut on the underside, holding it with my fingers was sufficient. Removing the existing washer jet allows the mod to be completed without drilling a hole in your car, making the mod totally reversible. | ||
| − | # Post the black tube from the Peugeot part through the nozzle hole, and connect it to the hose from the washer bottle. At this point | + | # Post the black tube from the Peugeot part through the nozzle hole, and connect it to the hose from the washer bottle. The Peugeot tube fits snuggly inside the washer pipe where the T piece was inserted. At this point the joint can be sealed effectively with some amalgum tape (preffered) or some good insulating tape. I tested the spray ramp to be sure I knew how it worked and how best to mount it. There is a hole on the end of the ramp which is easy to direct too wide - fun when a cyclist passes you, but not fun when you have the roof off! |
# Cable-tie & tape the spray ramp to your wiper arm/blade, making sure the holes point forward. Test again, then return the washer bottle to the service compartment and shut the lid. | # Cable-tie & tape the spray ramp to your wiper arm/blade, making sure the holes point forward. Test again, then return the washer bottle to the service compartment and shut the lid. | ||
| − | # Job done. Takes about | + | # Job done. Takes about 30 mins. |
For even more spraying fun, you could even use 2 spray ramps and resurrect the T piece, but I found this was not necessary. | For even more spraying fun, you could even use 2 spray ramps and resurrect the T piece, but I found this was not necessary. | ||
| Line 28: | Line 28: | ||
| − | [[Image:washbar.jpg|thumb|100px| | + | [[Image:washbar.jpg|thumb|100px|left|Citroen Wash Bar]] You can also use the washbar from a Citroen BX |
"Citroen part no. N93780 bx washer jet spray bar" | "Citroen part no. N93780 bx washer jet spray bar" | ||
And on the S2, the hose to supply the new bar can fit through without any cutting or drilling of holes. - there's a gap large enough under the clam just behind the base of the wiper. | And on the S2, the hose to supply the new bar can fit through without any cutting or drilling of holes. - there's a gap large enough under the clam just behind the base of the wiper. | ||
| + | Spray bar Wiper | ||
| + | |||
| + | |||
| + | |||
| + | |||
| + | |||
| + | '''ALSO''' | ||
| + | |||
| + | Now I always got the impression that the Espace wiper with integrated spray bar was a special part only available online (couldn't be arsed) or at Renault (ditto). | ||
| + | |||
| + | However at a local motorfactors I asked for a 24" single blade with, if possible, a spray bar. And was handed a very nice Champion X60W which fits the Espace and things like the Mercedes Sprinter van. He also sold me 2 metres of suitable tubing which was the exact amount needed to route to the water bottle without drilling holes or removing the original spray units. | ||
| + | |||
| + | Three cable ties later it was done very neatly. | ||
| + | |||
| + | The point is this wiper type is widely available although not at Halfords. | ||
| + | |||
| + | [[The Cost]] | ||
| + | |||
| + | Wiper 15 pounds, | ||
| + | Tubing 2 pounds, | ||
| + | Cable ties pennies. | ||
| + | |||
| + | You need the S2 wiper arm which is about 15 pounds from Lotus. | ||
| + | |||
| + | The 'spray bar' is a little plastic strip about 2.5 inches long and is very neat. | ||
| + | |||
| + | '''For Later S2 cars''' | ||
| + | |||
| + | I've just completed this mod on my 111R, using a Valeo VM15 wiper blade. | ||
| + | |||
| + | This is a simple job, but a little different to the job described here. | ||
| + | |||
| + | # take both front access panels off | ||
| + | # unmount the fusebox to give yourself room to work - make sure you don't drop the polythene spacers - you'll never find them again if you do! | ||
| + | # look & feel for the pipe to the washer sprays - it's black & quite fat | ||
| + | # because the washer bottle is at the back of the car, you'll feel that it goes through a small non return valve (NRV) before going on to the jets - disconnect the pipe from the washer jet side of the NRV | ||
| + | # fit the wiper blade | ||
| + | # route some pipe from the NRV out to the blade - there's space to do this very neatly without drilling, cutting, or even removing the existing jets | ||
| + | # cable tie everything in place | ||
| + | # put everything back together | ||
| + | |||
| + | |||
| + | ---- | ||
| + | |||
| + | |||
| + | If you want to take it easy you can always use the Elise Shop wiper with integrated spraybar. Here is how I did it on my 2005 S2 111S: | ||
| + | |||
| + | Start: an Elise with a very dirty windscreen. Mark the position of the original wiper with a piece of tape. In my case this wasn't necessary, since the window was very dirty. | ||
| + | [[Image:Wiper-spraybar2.JPG|Windscreen and original wiper]] | ||
| + | |||
| + | Take both front panels off and remove the old wiper. You can use a small crowbar to lift the wiper from the spline, but a screwdriver and a piece of wood will do just as well. Don't touch the windscreen though! | ||
| + | [[Image:Wiper-spraybar3.JPG|Front panels off]] | ||
| + | |||
| + | Locate the little hose to the washer nozzles: black and with a no-return valve / connector in them | ||
| + | [[Image:Wiper-spraybar4.JPG|Look for the no-return valve / connector]] | ||
| + | |||
| + | In my case there is no room to feed the hose through, therefore I had to drill a hole (just like it is said in the manual). I protected the paint with some gaffer tape. First I made a hole with a 3mm drill and after that I used a 9,5mm drill to make the hole as you can see in the pictur. | ||
| + | [[Image:Wiper-spraybar5.JPG|Hole for the hose]] | ||
| + | |||
| + | Fiddle the grommet through the hole (this is a part of the delivery) | ||
| + | [[Image:Wiper-spraybar6.JPG|Fitted grommet]] | ||
| + | |||
| + | Fit the new wiper (with integrated spraybar and feed the new hose through the grommet. In the picture you'll find the new hose from the wiper and the old hose. These have to be connected. Since the new hose is a bit narrower than the old one, it's a tight fit. | ||
| + | [[Image:Wiper-spraybar7.JPG|The new hose and the old hose coming from the pump]] | ||
| + | |||
| + | The hose should look like this | ||
| + | [[Image:Wiper-spraybar8.JPG|New hose feeding through grommet]] | ||
| + | |||
| + | Test it! If it works OK and you've made sure the wipermotor doesn't catch the hose, close the front panels. | ||
| + | [[Image:Wiper-spraybar9.JPG|Bad picture of the end result. Looks nice and tidy]] | ||
| + | |||
| + | |||
| + | --[[User:Friso|Friso]] 16:16, 15 December 2010 (UTC) | ||
== External links == | == External links == | ||
| − | http://www. | + | http://www.scottishelises.com/phpbb/viewtopic.php?t=851 |
| + | |||
| + | |||
[[Category:DIY]] | [[Category:DIY]] | ||
| + | [[Category:Lotus Elise]] | ||
| + | [[Category:S1]] | ||
| + | [[Category:S2]] | ||
Latest revision as of 13:53, 6 February 2012
| Time & Tools | |
| Time: | 10 mins |
|---|---|
| Tools: | Zip ties, electrical tape, adjustable spanner |
The "Peugeot windscreen washer mod" is great for anyone who drives their car on bad weather days but likes to remain able to see out of the front.
The mod is totally easy, but it took me best part of an hour to get the necessary detail out of the forum search. I'll re-post here:
- Nip to your friendly neighbourhood Peugeot parts desk, and ask for Peugeot part number 643861 (Bin A6C5)For LHD cars the number is 643860. - a "Spray Ramp". It costs about £11.50 inc. VAT (06-01-2010). It comes with ample tubing already attached. Ample to do the job. Some people have used a similar TVR part, but this costs £12 and your nearest TVR dealer is probably further away than your nearest Peugeot dealer. Alternatively, check the Windscreen wipers page for details of the Valeo VM15 replacement wiper.
- Get hold of some small black cable ties and an adjustable spanner. Some black electrical tape is also handy.
- Remove the washer bottle from the front service compartment. Follow the hose with your fingers, and remove it from the plastic T section. Also remove the plastic T section.
- On the outside of the service compartment, remove the sleeve from around one of your existing window washer nozzles. Then use the spanner to remove the washer nozzle. I found that I didn't need to get a spanner to the nut on the underside, holding it with my fingers was sufficient. Removing the existing washer jet allows the mod to be completed without drilling a hole in your car, making the mod totally reversible.
- Post the black tube from the Peugeot part through the nozzle hole, and connect it to the hose from the washer bottle. The Peugeot tube fits snuggly inside the washer pipe where the T piece was inserted. At this point the joint can be sealed effectively with some amalgum tape (preffered) or some good insulating tape. I tested the spray ramp to be sure I knew how it worked and how best to mount it. There is a hole on the end of the ramp which is easy to direct too wide - fun when a cyclist passes you, but not fun when you have the roof off!
- Cable-tie & tape the spray ramp to your wiper arm/blade, making sure the holes point forward. Test again, then return the washer bottle to the service compartment and shut the lid.
- Job done. Takes about 30 mins.
For even more spraying fun, you could even use 2 spray ramps and resurrect the T piece, but I found this was not necessary.
You can also use the washbar from a Citroen BX
"Citroen part no. N93780 bx washer jet spray bar" And on the S2, the hose to supply the new bar can fit through without any cutting or drilling of holes. - there's a gap large enough under the clam just behind the base of the wiper.
Spray bar Wiper
ALSO
Now I always got the impression that the Espace wiper with integrated spray bar was a special part only available online (couldn't be arsed) or at Renault (ditto).
However at a local motorfactors I asked for a 24" single blade with, if possible, a spray bar. And was handed a very nice Champion X60W which fits the Espace and things like the Mercedes Sprinter van. He also sold me 2 metres of suitable tubing which was the exact amount needed to route to the water bottle without drilling holes or removing the original spray units.
Three cable ties later it was done very neatly.
The point is this wiper type is widely available although not at Halfords.
Wiper 15 pounds, Tubing 2 pounds, Cable ties pennies.
You need the S2 wiper arm which is about 15 pounds from Lotus.
The 'spray bar' is a little plastic strip about 2.5 inches long and is very neat.
For Later S2 cars
I've just completed this mod on my 111R, using a Valeo VM15 wiper blade.
This is a simple job, but a little different to the job described here.
- take both front access panels off
- unmount the fusebox to give yourself room to work - make sure you don't drop the polythene spacers - you'll never find them again if you do!
- look & feel for the pipe to the washer sprays - it's black & quite fat
- because the washer bottle is at the back of the car, you'll feel that it goes through a small non return valve (NRV) before going on to the jets - disconnect the pipe from the washer jet side of the NRV
- fit the wiper blade
- route some pipe from the NRV out to the blade - there's space to do this very neatly without drilling, cutting, or even removing the existing jets
- cable tie everything in place
- put everything back together
If you want to take it easy you can always use the Elise Shop wiper with integrated spraybar. Here is how I did it on my 2005 S2 111S:
Start: an Elise with a very dirty windscreen. Mark the position of the original wiper with a piece of tape. In my case this wasn't necessary, since the window was very dirty.
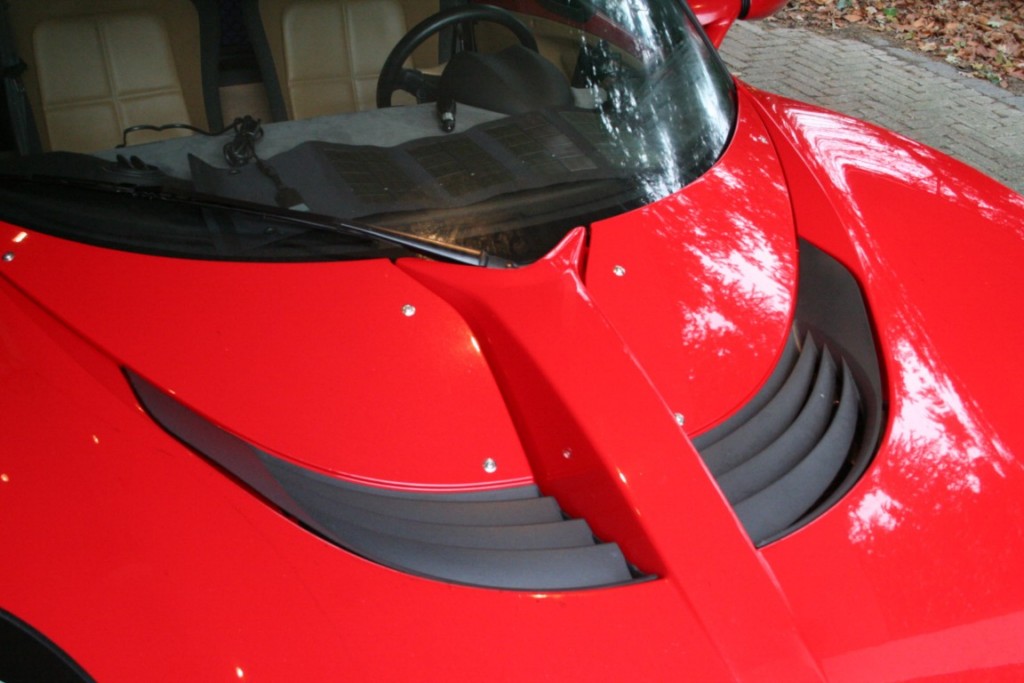
Take both front panels off and remove the old wiper. You can use a small crowbar to lift the wiper from the spline, but a screwdriver and a piece of wood will do just as well. Don't touch the windscreen though!
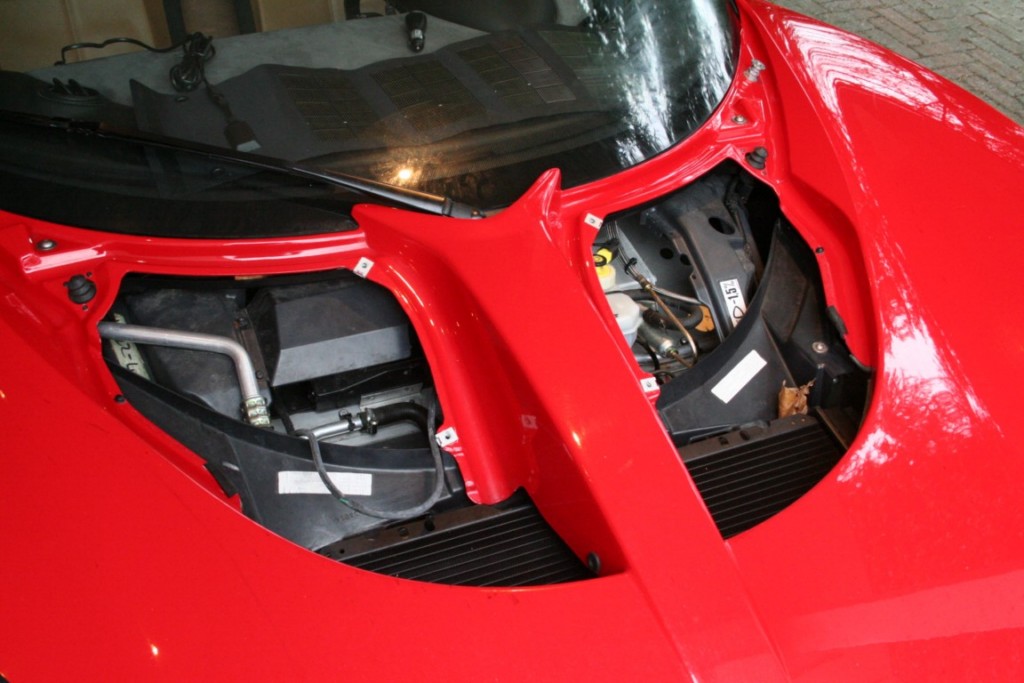
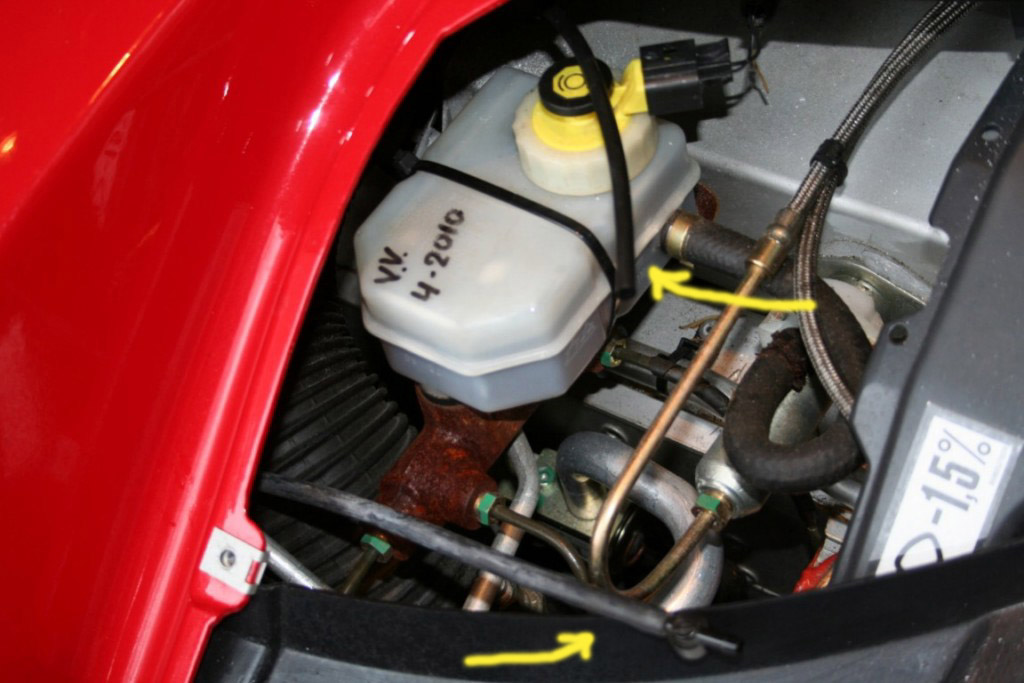
Locate the little hose to the washer nozzles: black and with a no-return valve / connector in them
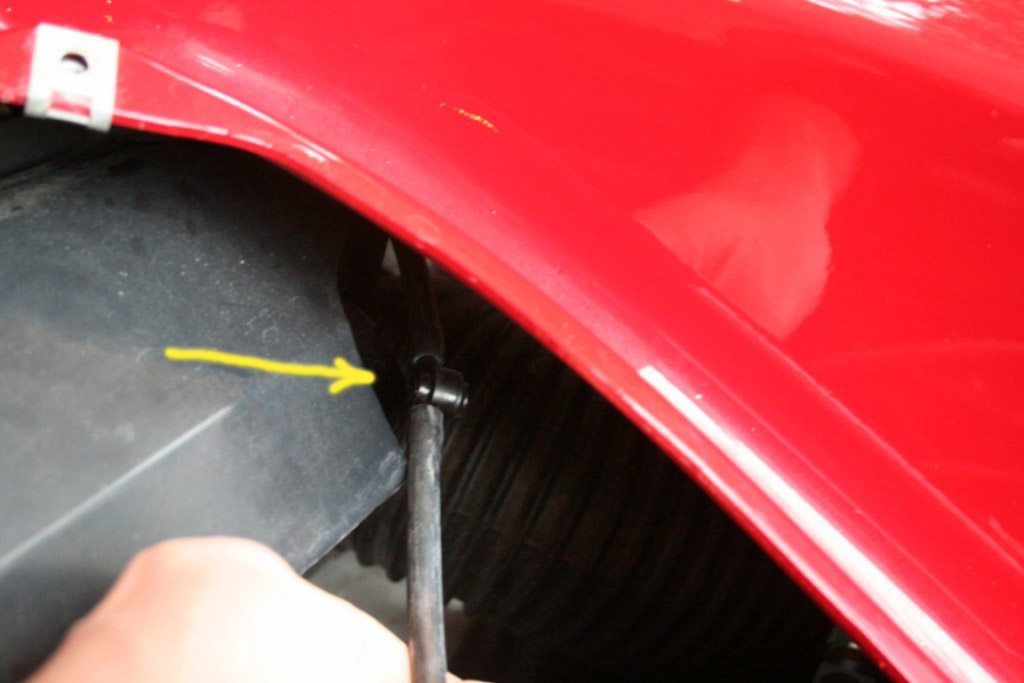
In my case there is no room to feed the hose through, therefore I had to drill a hole (just like it is said in the manual). I protected the paint with some gaffer tape. First I made a hole with a 3mm drill and after that I used a 9,5mm drill to make the hole as you can see in the pictur.
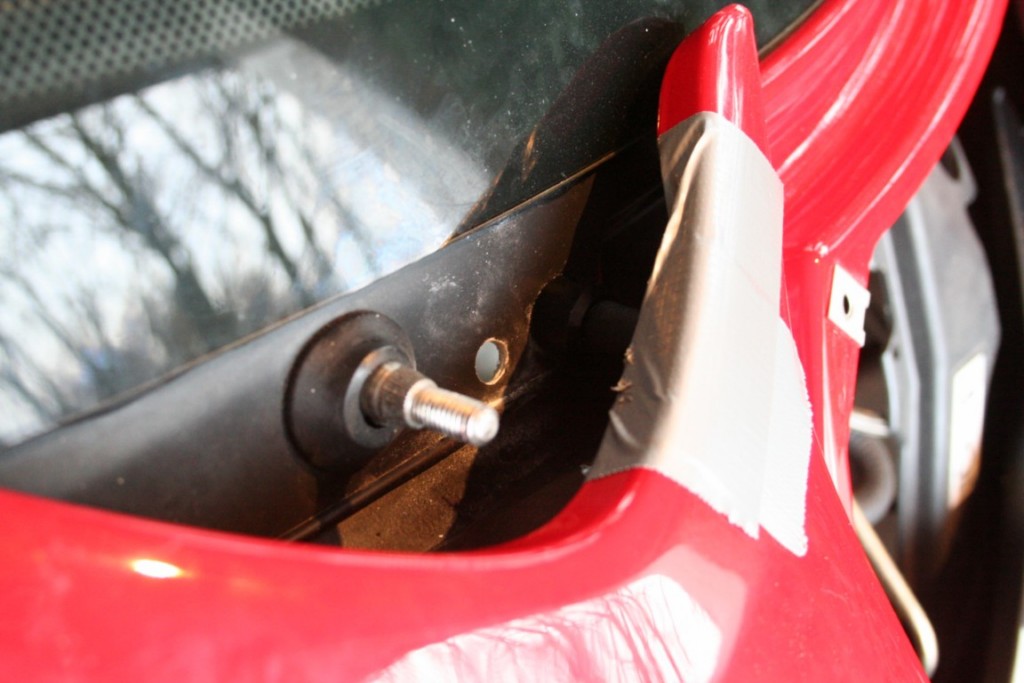
Fiddle the grommet through the hole (this is a part of the delivery)
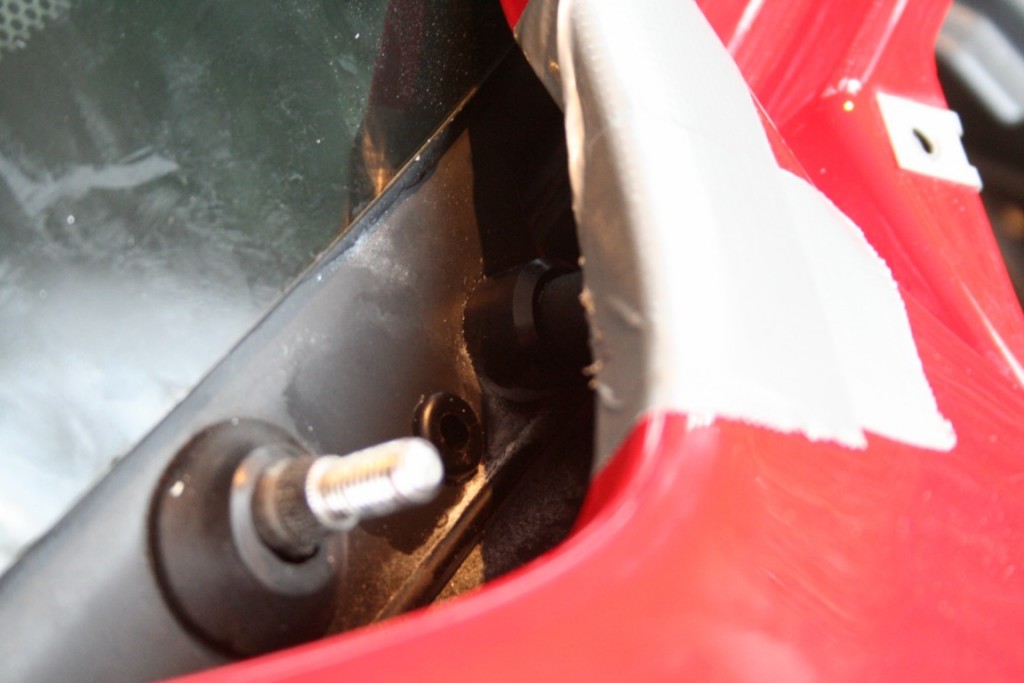
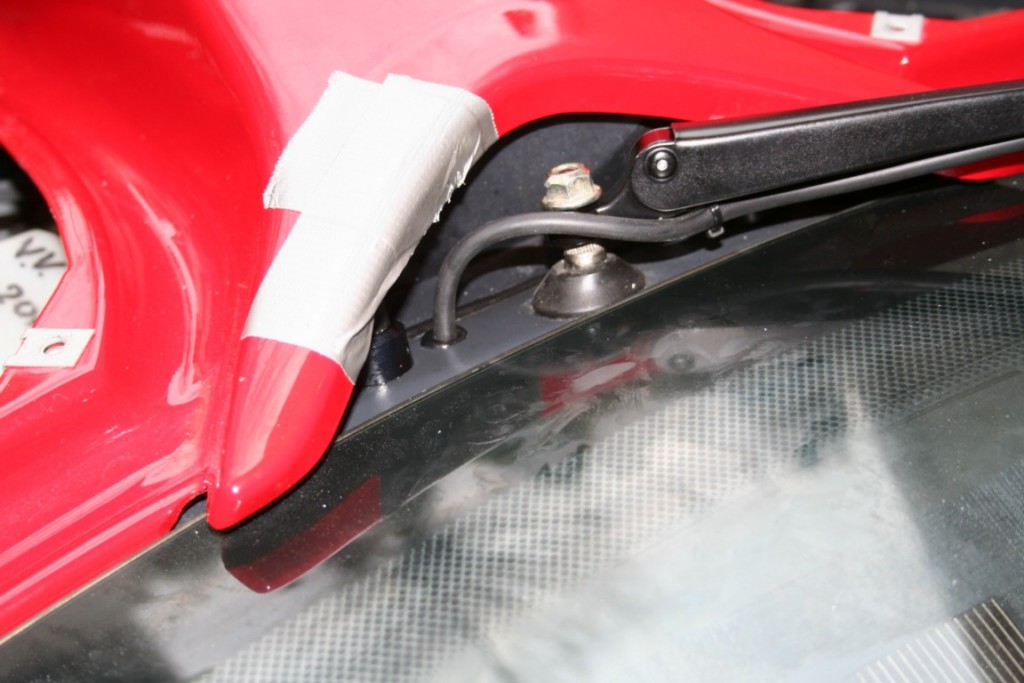
Fit the new wiper (with integrated spraybar and feed the new hose through the grommet. In the picture you'll find the new hose from the wiper and the old hose. These have to be connected. Since the new hose is a bit narrower than the old one, it's a tight fit.
The hose should look like this
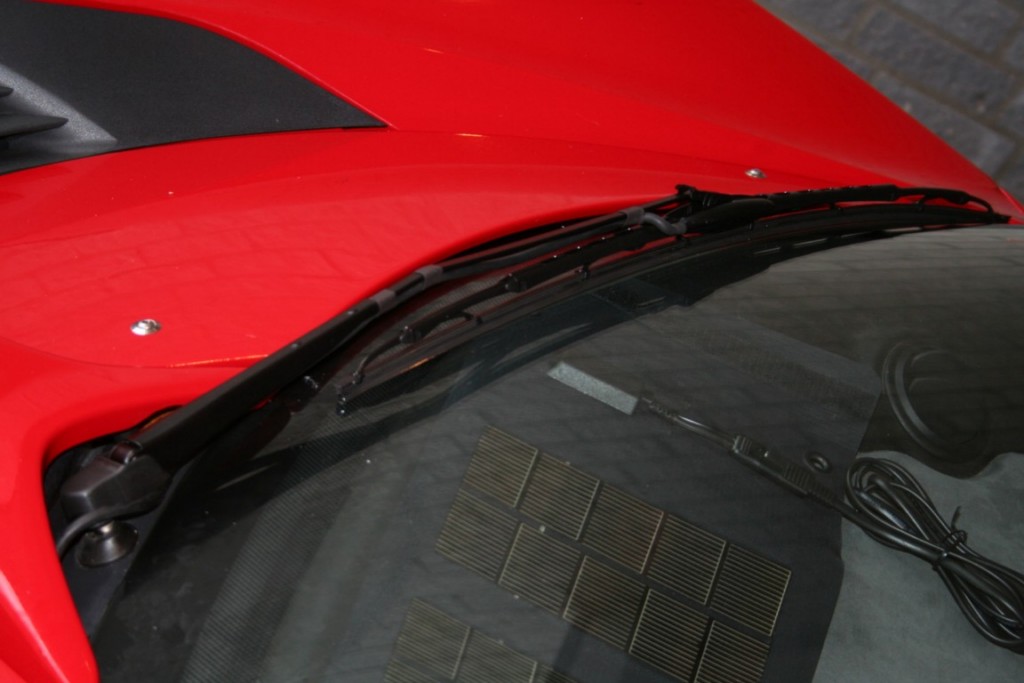
Test it! If it works OK and you've made sure the wipermotor doesn't catch the hose, close the front panels.
--Friso 16:16, 15 December 2010 (UTC)


