Difference between revisions of "Indicators"
m |
|||
| (6 intermediate revisions by 3 users not shown) | |||
| Line 10: | Line 10: | ||
R\H: B117M0017F | R\H: B117M0017F | ||
| − | and they are | + | and they are £151.51 inc VAT |
| + | The indicator release clip is accessed through a small hole in the clam in the corner of the grill appature, 10 o'clock of the driving lamp if fitted. The hole is visible in the second photo. | ||
| + | |||
| + | A medium sized flat blade screw driver is best used to release the clip. | ||
| − | The | + | The clips can break on the S2 indicators making them 'pop' out, and your indicator unit will need replacing or restraining in some way. |
| + | |||
| + | |||
| + | '''3D Printed Clip''' | ||
| + | |||
| + | To avoid replacing the entire lamp, you can source/print a replacement clip element courtesy of SELOCer COL111R: | ||
| + | |||
| + | Thread: https://forums.seloc.org/viewthread.php?tid=447910 | ||
| + | |||
| + | Thingiverse link (with STL file): https://www.thingiverse.com/thing:2837864 | ||
| + | |||
| + | Printing via Shapeways in Nylon/versatile plastic works out at around £3 per clip, plus shipping. | ||
| − | *Drill a hole in what's left of bottom indicator tab and then feed a length of nylon shock cord through it. | + | You’ll need an M3 bolt and nut to secure the clip to the ‘stump’ of the mounting clip on the lamp. |
| + | |||
| + | |||
| + | '''Bungee Cord fix''' | ||
| + | |||
| + | Alternatively, and like SELOC member [http://forums.seloc.org/m/dobbin Dobbin], you can use this handy trick (though this is less convenient on an S2 Exige where the grill makes access far harder): | ||
| + | |||
| + | *Drill a hole in what's left of the bottom indicator tab and then feed a length of nylon shock cord through it. | ||
[[Image:cord1.jpg|thumb|left|Hole Drilled, Cord Through.]] | [[Image:cord1.jpg|thumb|left|Hole Drilled, Cord Through.]] | ||
{{clr}} | {{clr}} | ||
| − | *Both ends fed around the driving light and | + | *Both ends fed around the driving light and passed through one of those springy toggles you get on jackets. |
[http://shop.acesupplies.co.uk/acatalog/Webbing_and_Cord_Fittings.html Toggles] | [http://shop.acesupplies.co.uk/acatalog/Webbing_and_Cord_Fittings.html Toggles] | ||
[[Image:toggle.jpg]] | [[Image:toggle.jpg]] | ||
| Line 29: | Line 50: | ||
{{clr}} | {{clr}} | ||
| − | *Once the indicator is | + | *Once the indicator is popped back in you can then pull the cord as tight as you like. |
[[Image:cord3.jpg|thumb|left|Pulling The Cord Tight Around The Driving Light.]] | [[Image:cord3.jpg|thumb|left|Pulling The Cord Tight Around The Driving Light.]] | ||
{{clr}} | {{clr}} | ||
| − | *You can just see the nylon cord, | + | *You can just see the nylon cord, you can usually tuck it well out of the way. |
| − | [[Image:cord4.jpg|thumb|left| | + | [[Image:cord4.jpg|thumb|left|Job's A Carrot.]] |
{{clr}} | {{clr}} | ||
| + | |||
| + | ===See Also=== | ||
| + | |||
| + | [http://www.sandsmuseum.com/cars/elise/experience/maintenance/indicatorlens/indicatorlens.html Sandsmusem external link] | ||
| + | |||
| + | |||
| + | [[Category:Body]] | ||
| + | [[Category:Lotus Elise]] | ||
| + | [[Category:S2]] | ||
Latest revision as of 09:14, 15 October 2019
Indicators
S2 Indicators
Lotus Part Numbers:
L\H: B117M0018F
R\H: B117M0017F
and they are £151.51 inc VAT
The indicator release clip is accessed through a small hole in the clam in the corner of the grill appature, 10 o'clock of the driving lamp if fitted. The hole is visible in the second photo.
A medium sized flat blade screw driver is best used to release the clip.
The clips can break on the S2 indicators making them 'pop' out, and your indicator unit will need replacing or restraining in some way.
3D Printed Clip
To avoid replacing the entire lamp, you can source/print a replacement clip element courtesy of SELOCer COL111R:
Thread: https://forums.seloc.org/viewthread.php?tid=447910
Thingiverse link (with STL file): https://www.thingiverse.com/thing:2837864
Printing via Shapeways in Nylon/versatile plastic works out at around £3 per clip, plus shipping.
You’ll need an M3 bolt and nut to secure the clip to the ‘stump’ of the mounting clip on the lamp.
Bungee Cord fix
Alternatively, and like SELOC member Dobbin, you can use this handy trick (though this is less convenient on an S2 Exige where the grill makes access far harder):
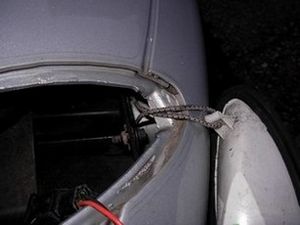
- Drill a hole in what's left of the bottom indicator tab and then feed a length of nylon shock cord through it.
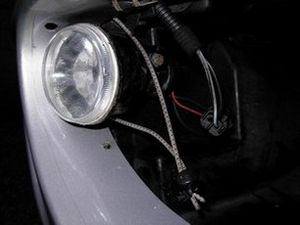
- Both ends fed around the driving light and passed through one of those springy toggles you get on jackets.
Then tied together with a cable tie around the driving light.
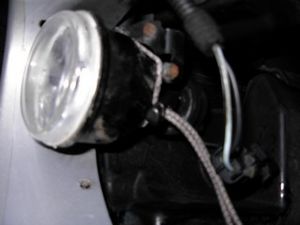
- Once the indicator is popped back in you can then pull the cord as tight as you like.
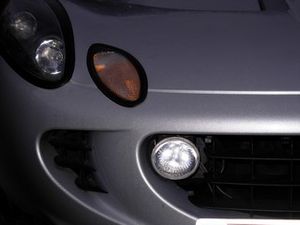
- You can just see the nylon cord, you can usually tuck it well out of the way.


