Difference between revisions of "Fixing a broken roof cable"
| (5 intermediate revisions by 3 users not shown) | |||
| Line 10: | Line 10: | ||
( mine cost around £32 ) | ( mine cost around £32 ) | ||
| − | [[Image: | + | [[Image:Cable.jpg]] |
| Line 32: | Line 32: | ||
You will need to thread some strong string through the seam. | You will need to thread some strong string through the seam. | ||
| − | I | + | I used the Carbon Fibre Struts from my kite ( binded with gaffer tape ) and a bit of string attached to it, so i could get the string through. |
| − | Once through tie the string to the end of the new cable and slowly ease through the seam. | + | Once through, tie the string to the end of the new cable and slowly ease through the seam. |
By the way.. this is a PIG of a job.. so do it slowly until the cable is fully through. | By the way.. this is a PIG of a job.. so do it slowly until the cable is fully through. | ||
| − | DO NOT BIND THE OLD CABLE WITH THE NEW ONE WITH A BIT OF GAFFER TAPE... in my case this | + | DO NOT BIND THE OLD CABLE WITH THE NEW ONE WITH A BIT OF GAFFER TAPE...( Gaffer tape is great stuff.. but not that fantastic ) in my case this lead to the gaffer tape breaking half way through and leaving a wedge of tape in the middle of the seam ( See Picture on NOT how to do it ). |
| − | lead to the gaffer tape breaking half way through and leaving a wedge of tape in the middle | ||
| − | of the seam ( See Picture on NOT how to do it ). | ||
String is your friend, use a good knott and progressively pull through and you will be fine. | String is your friend, use a good knott and progressively pull through and you will be fine. | ||
| − | [[Image: | + | [[Image:Bad_practice.jpg]] |
| + | |||
| + | I used a slightly different approach, helped by Lotus putting an adjuster back into the cable. On my new ones (bought May 2022), it's at the end not in the middle as with the original fitment. | ||
| + | |||
| + | I couldn't get the plate with the allen key hole into the cable channel in my soft top - the channel was too narrow. This meant, I couldn't use the old cable to pull the new one through. So, removed the old cable completely and then unscrewed the adjuster from the end of the new cable. | ||
| + | |||
| + | [[Image:adjuster_unscrewed.jpg]] | ||
| + | |||
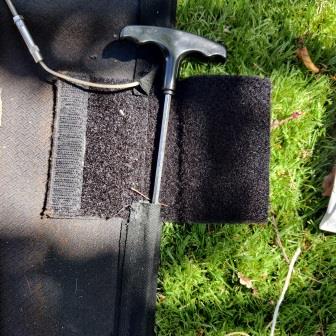
| + | To keep the channel open, I pushed a long bicycle allen key in from the other end, but you could use a dowel, a kite strut (as above) etc. | ||
| + | |||
| + | [[Image:long_allen.jpg]] | ||
| + | |||
| + | I was able to get the cable into the channel but then found that the rubber collar was binding on the fabric. I wrapped the end of the cable and the collar in parcel tape, which was the smoothest and shiniest thing to hand. This worked really well and allowed the cable and the collar to slide through the channel easily. Just keep the end of the allen key as close to the end of the cable so the channel doesn't collapse. | ||
| + | |||
| + | [[Image:parcel_tape.jpg]] | ||
| + | |||
| + | Once the cable is through, re-attach the plate to the adjuster. | ||
4. Tighten the Bolts with the Allen Keys make sure that the bolts are facing towards you. | 4. Tighten the Bolts with the Allen Keys make sure that the bolts are facing towards you. | ||
All Done, Stick the Fabric by the roof bars back down with glue and re-apply the roof to the car ! | All Done, Stick the Fabric by the roof bars back down with glue and re-apply the roof to the car ! | ||
| + | |||
| + | [[Category:Lotus Elise]] | ||
| + | [[Category:S2]] | ||
| + | [[Category:Body]] | ||
Latest revision as of 15:11, 14 May 2022
Hello All,
Over a period of time the cable which keeps the front of your soft top roof attached can corrode and break. It took five years for mine to do this, but depending how you store your car it could happen before or after this time.
Step 1
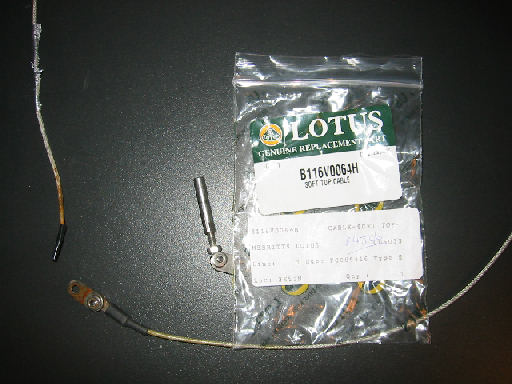
Order the following part from your local Lotus Dealership : B116V0064H ( mine cost around £32 )
Step 2
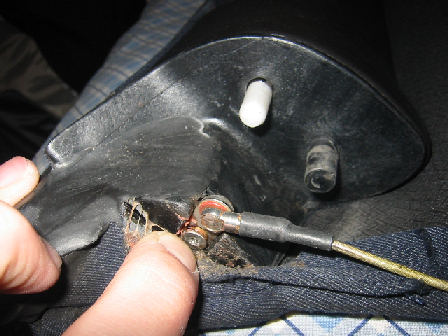
Undo the old broken cable ( see picture ) you will need to open up the glued fabric around the side supports and use a small allen key to release. Turn the key anti-clockwise.
Step 3
Insert the new Cable.. The original cables had adjustable tensioners, now unfortunately these are non-adjustable, so find the smallest end and insert it into the drivers side gap, there are two ways of doing this..
(i) Use your original broken cable and tie string around that and the new cable, use pliers to keep the seam taught and drag through slowly until the small new cable has come through the other side.
(ii) if you old cable has broken in the middle you will need to remove this altogether. You will need to thread some strong string through the seam.
I used the Carbon Fibre Struts from my kite ( binded with gaffer tape ) and a bit of string attached to it, so i could get the string through.
Once through, tie the string to the end of the new cable and slowly ease through the seam.
By the way.. this is a PIG of a job.. so do it slowly until the cable is fully through.
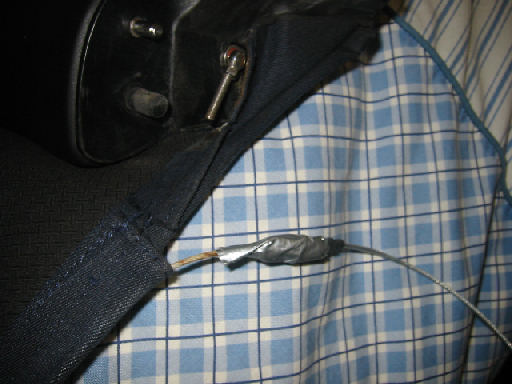
DO NOT BIND THE OLD CABLE WITH THE NEW ONE WITH A BIT OF GAFFER TAPE...( Gaffer tape is great stuff.. but not that fantastic ) in my case this lead to the gaffer tape breaking half way through and leaving a wedge of tape in the middle of the seam ( See Picture on NOT how to do it ).
String is your friend, use a good knott and progressively pull through and you will be fine.
I used a slightly different approach, helped by Lotus putting an adjuster back into the cable. On my new ones (bought May 2022), it's at the end not in the middle as with the original fitment.
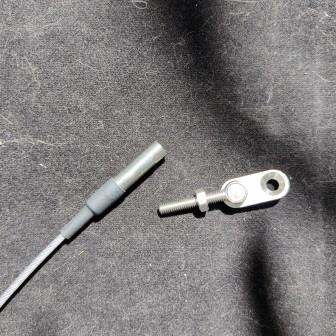
I couldn't get the plate with the allen key hole into the cable channel in my soft top - the channel was too narrow. This meant, I couldn't use the old cable to pull the new one through. So, removed the old cable completely and then unscrewed the adjuster from the end of the new cable.
To keep the channel open, I pushed a long bicycle allen key in from the other end, but you could use a dowel, a kite strut (as above) etc.
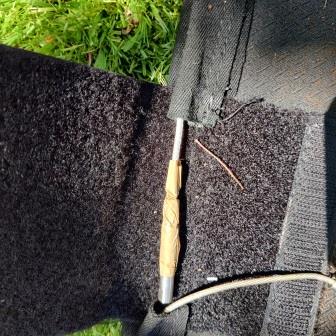
I was able to get the cable into the channel but then found that the rubber collar was binding on the fabric. I wrapped the end of the cable and the collar in parcel tape, which was the smoothest and shiniest thing to hand. This worked really well and allowed the cable and the collar to slide through the channel easily. Just keep the end of the allen key as close to the end of the cable so the channel doesn't collapse.
Once the cable is through, re-attach the plate to the adjuster.
4. Tighten the Bolts with the Allen Keys make sure that the bolts are facing towards you.
All Done, Stick the Fabric by the roof bars back down with glue and re-apply the roof to the car !
