Difference between revisions of "Brakepad, rear change"
(Created page with "1. Jack up the car and remove the rear wheel 2. You'll need a thin screwdiver/bar or preferably a pin punch to knock out the pad retaining pin. Insert in small hole in rear of c...") |
Lithopsian (talk | contribs) (add Brakes catagory) |
||
| (23 intermediate revisions by 2 users not shown) | |||
| Line 1: | Line 1: | ||
| − | + | This is the procedure for changing rear pads on an S1 Elise. (Its the same caliper on the K series S2 models and most likely still in use on the Tonka Toy engined cars) | |
| − | |||
| − | + | 1. Jack up the car and remove the rear wheel. Use axle stands. | |
| − | |||
| − | + | I'm not much for Health and Safety but I would NEVER work on a car with only a jack supporting it. As a minimum, place the removed wheel under the car to prevent the car hitting the ground/your head should the jack slip | |
| − | + | 2. Release the handbrake | |
| − | + | 3. Remove the pad retaining pin. You willl need a thin screwdiver/bar or preferably a pin punch to knock out the retaining pin. Insert the punch in the small hole in rear of caliper and knock the retaining pin towards the outside. The hole is much smaller at the back than the one you see at the front | |
| − | |||
| − | + | ***BE CAREFUL YOU DO NOT LOSE THE SMALL ANTI-RATTLE SPRING (Bendy wire bit straddling disc). It may ping out as you knock the pin past it | |
| − | |||
| − | + | [[File:Rear Brake Pin Pushed Out.JPG|thumb|none|Retaining Pin]] | |
| − | + | 4. With the pin removed, knock the outer pad inward to release. | |
| − | + | [[File:Outside Pad Removal.JPG|thumb|none|Outer Pad Removal]] | |
| − | + | 5. To get to the rear pad you require to remove the disc. Its not held on by anything other than the road wheel clamping it against the hub. The disc is likely to be stuck to the hub by road gunk/corrosion. Wire brush the end of the hub where it sticks through the disc. | |
| − | + | If it still will not move, use a large piece of wood, a soft faced hammer or a metal hammer with a wood block between hammer and disc. | |
| − | + | From the rear. Strike the top and bottom of the disc alternate blows (as you rotate the disc) and the disc will start moving off the hub. | |
| − | |||
| − | + | ***DO NOT HIT THE DISC DIRECTLY WITH A METAL HAMMER. Brake discs are brittle and will crack. | |
| − | |||
| − | + | [[File:Remove Disc.JPG|thumb|none|Removing the Disc]] | |
| + | 6. Remove the rear pad. Its not held in with anything once the disc is removed | ||
| − | + | [[File:Removing Rear Pad.JPG|thumb|none|Removing the Rear Pad]] | |
| + | |||
| + | 7. Use a set of thin nosed pliers to push in (hard) while rotating clockwise, to screw the caliper piston back in. | ||
| + | |||
| + | Straight ended pliers will allow you to push with your body weight. | ||
| + | |||
| + | |||
| + | ***BE CAREFUL THAT YOU DO NOT SLIP OFF THE PISTON WITH THE PLIERS AND PUT A HOLE IN THE RUBBER DUST GAITOR--- EASILY DONE | ||
| + | |||
| + | |||
| + | (Caliper windback tools are available if you don't fancy using pliers) | ||
| + | |||
| + | If you are fitting new pads then release the cap from the fluid reservoir and use a turkey baster to suck out some fluid. | ||
| + | |||
| + | |||
| + | ****DO NOT TAKE OUT SO MUCH THAT AIR GETS INTO THE SYSTEM VIA THE RESERVIOR PIPEWORK | ||
| + | |||
| + | |||
| + | Screw in the caliper/check level/remove fluid if needed /screw in some more/repeat if in doubt | ||
| + | |||
| + | [[File:Screw Back Piston.JPG|thumb|none|Screw Back Piston]] | ||
| + | |||
| + | 8. Apply a thin smear of copper grease to the back of the pads. Look at the contact points on the back of the pads and only apply the grease on these points | ||
| + | |||
| + | [[File:P1010138.JPG|thumb|none|Copper Grease Applied]] | ||
| + | |||
| + | 9. To aid refitting, its worth cleaning the retaiing pin with some sandpaper and greasing lightly with copper grease | ||
| + | |||
| + | [[File:P1010142.JPG|thumb|none|Retaining Pin]] | ||
| + | |||
| + | 10. Replace the rear pad. | ||
| + | |||
| + | 11. Carefully clean the back of disc and mating surface on the hub face. Anything caught between disc and hub face will prevent the disc fromsitting square on the hub, running true and cause vibration on braking. | ||
| + | |||
| + | Now refit the brake disc to the | ||
| + | |||
| + | |||
| + | ***ENSURE THE DISC IS FITTING FULLY AGAINST THE HUB AND NOT HELD OFF BY THE INNER PAD - should be OK is you've screwed the piston right in | ||
| + | |||
| + | |||
| + | 12. Slip the outer pad into place. | ||
| + | |||
| + | Refit the retaining pin and the anti-rattle spring clip. | ||
| + | |||
| + | |||
| + | ***MAKE SURE THE SPRING WASHER (small ring) AT THE END OF THE RETAINING PIN IS FULLY PUSHED INTO THE CALIPER TO ENSURE THE PIN IS SECURELY HELD (Shown still sticking out in this photo) | ||
| + | |||
| + | |||
| + | [[File:Reassemble.JPG|thumb|none|Reassembly]] | ||
| + | |||
| + | 13. Refit the road wheel | ||
| + | |||
| + | 14. | ||
| + | |||
| + | |||
| + | ***IMPORTANT. Before driving anywhere. Press the brake pedal a few times to take up any gap between pad and disc....or you'll get a suprise the first junction you come to - VOE :-( | ||
| + | |||
| + | |||
| + | Additional Notes | ||
| + | |||
| + | Some brake pads are supplied with stick-on anti-squeel pads. Some folk don't fit them as it adds a small amount of spongyness to the brake feel (the pad has to compress before the pad actually moves). Personal choice. Probably important if you are racing and need 100% brake control/are a driving God.... other folk fit just happy the brakes don't squeel | ||
| + | |||
| + | |||
| + | An alternative on the method detailed above that requires a bit more work is to removing one of the rear caliper reatining bolts and tilt the caliper back on the other. If you use this method you need to apply some threadlock on the caliper bolt when you re-bolt the caliper to its mount | ||
| + | |||
| + | [[Category:S1]] | ||
| + | [[Category:Brakes]] | ||
Latest revision as of 20:23, 18 January 2019
This is the procedure for changing rear pads on an S1 Elise. (Its the same caliper on the K series S2 models and most likely still in use on the Tonka Toy engined cars)
1. Jack up the car and remove the rear wheel. Use axle stands.
I'm not much for Health and Safety but I would NEVER work on a car with only a jack supporting it. As a minimum, place the removed wheel under the car to prevent the car hitting the ground/your head should the jack slip
2. Release the handbrake
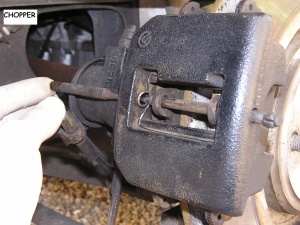
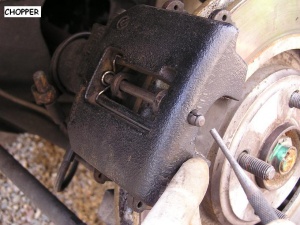
3. Remove the pad retaining pin. You willl need a thin screwdiver/bar or preferably a pin punch to knock out the retaining pin. Insert the punch in the small hole in rear of caliper and knock the retaining pin towards the outside. The hole is much smaller at the back than the one you see at the front
- BE CAREFUL YOU DO NOT LOSE THE SMALL ANTI-RATTLE SPRING (Bendy wire bit straddling disc). It may ping out as you knock the pin past it
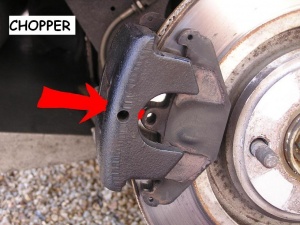
4. With the pin removed, knock the outer pad inward to release.
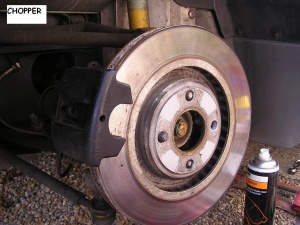
5. To get to the rear pad you require to remove the disc. Its not held on by anything other than the road wheel clamping it against the hub. The disc is likely to be stuck to the hub by road gunk/corrosion. Wire brush the end of the hub where it sticks through the disc.
If it still will not move, use a large piece of wood, a soft faced hammer or a metal hammer with a wood block between hammer and disc.
From the rear. Strike the top and bottom of the disc alternate blows (as you rotate the disc) and the disc will start moving off the hub.
- DO NOT HIT THE DISC DIRECTLY WITH A METAL HAMMER. Brake discs are brittle and will crack.
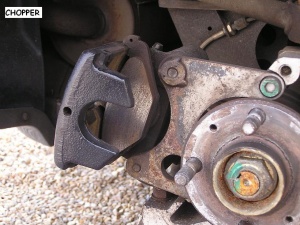
6. Remove the rear pad. Its not held in with anything once the disc is removed
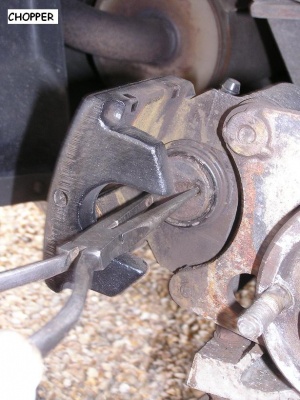
7. Use a set of thin nosed pliers to push in (hard) while rotating clockwise, to screw the caliper piston back in.
Straight ended pliers will allow you to push with your body weight.
- BE CAREFUL THAT YOU DO NOT SLIP OFF THE PISTON WITH THE PLIERS AND PUT A HOLE IN THE RUBBER DUST GAITOR--- EASILY DONE
(Caliper windback tools are available if you don't fancy using pliers)
If you are fitting new pads then release the cap from the fluid reservoir and use a turkey baster to suck out some fluid.
- DO NOT TAKE OUT SO MUCH THAT AIR GETS INTO THE SYSTEM VIA THE RESERVIOR PIPEWORK
Screw in the caliper/check level/remove fluid if needed /screw in some more/repeat if in doubt
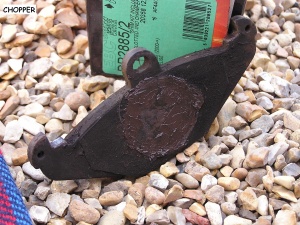
8. Apply a thin smear of copper grease to the back of the pads. Look at the contact points on the back of the pads and only apply the grease on these points
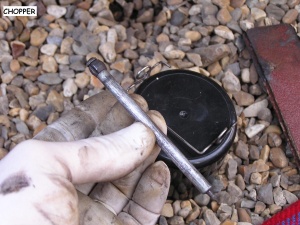
9. To aid refitting, its worth cleaning the retaiing pin with some sandpaper and greasing lightly with copper grease
10. Replace the rear pad.
11. Carefully clean the back of disc and mating surface on the hub face. Anything caught between disc and hub face will prevent the disc fromsitting square on the hub, running true and cause vibration on braking.
Now refit the brake disc to the
- ENSURE THE DISC IS FITTING FULLY AGAINST THE HUB AND NOT HELD OFF BY THE INNER PAD - should be OK is you've screwed the piston right in
12. Slip the outer pad into place.
Refit the retaining pin and the anti-rattle spring clip.
- MAKE SURE THE SPRING WASHER (small ring) AT THE END OF THE RETAINING PIN IS FULLY PUSHED INTO THE CALIPER TO ENSURE THE PIN IS SECURELY HELD (Shown still sticking out in this photo)
13. Refit the road wheel
14.
- IMPORTANT. Before driving anywhere. Press the brake pedal a few times to take up any gap between pad and disc....or you'll get a suprise the first junction you come to - VOE :-(
Additional Notes
Some brake pads are supplied with stick-on anti-squeel pads. Some folk don't fit them as it adds a small amount of spongyness to the brake feel (the pad has to compress before the pad actually moves). Personal choice. Probably important if you are racing and need 100% brake control/are a driving God.... other folk fit just happy the brakes don't squeel
An alternative on the method detailed above that requires a bit more work is to removing one of the rear caliper reatining bolts and tilt the caliper back on the other. If you use this method you need to apply some threadlock on the caliper bolt when you re-bolt the caliper to its mount
