Difference between revisions of "Footwell Corrosion"
(→Links) |
Lithopsian (talk | contribs) (→Painting: latest Frost POR15 Starter Kit url) |
||
| (2 intermediate revisions by one other user not shown) | |||
| Line 10: | Line 10: | ||
Although this may sound bad, and while the floor panel is bonded in as part of the aluminium chassis around which the Elise is based, the floor panel itself is not a load bearing panel and even heavy corrosion can be repaired without necessitating a replacement chassis. | Although this may sound bad, and while the floor panel is bonded in as part of the aluminium chassis around which the Elise is based, the floor panel itself is not a load bearing panel and even heavy corrosion can be repaired without necessitating a replacement chassis. | ||
| + | |||
| + | If your car is fitted with the rubber footwell mats it is strongly recommended to remove them immediately so that the floor condition can be assessed. | ||
=Mat Removal= | =Mat Removal= | ||
| − | If | + | Remove the original floor mats which are stuck down with double sided tape around the edges. |
| + | |||
| + | If possible find a loose edge and use this to pull the floor mat up, or use a Stanley knife to cut the mat in the centre - although if doing this be careful not to score the floor underneath. Do not try and lever the mat up against the kick plate at the front edge as a screwdriver or similar will mark the soft aluminium of the kick plate. | ||
| + | |||
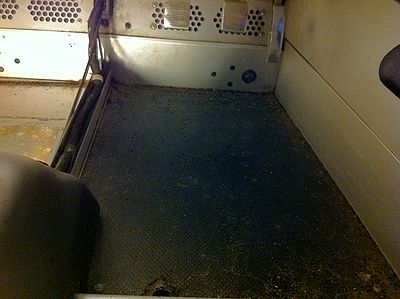
| + | You can then see the extent of the corrosion, the white powder is where its starting to get bad & the black parts are were the anodizing has just been eaten away. There will probably be a few lumps where the worst corrosion is because it tends to pile up like a mole hill. | ||
| + | |||
| + | [[Image:M111 - Footwell Treatment - Step 1.jpg|thumb|center|400px]] | ||
| + | |||
| + | =Cleaning= | ||
| + | |||
| + | Give it a good clean up with a stiff brush and vacuum up the dust. | ||
| + | |||
| + | Next I used some alloy wheel cleaner which is basically detergent / acid mix & a stiff brush to scrub off as much of the of the remaining oxidized ally as possible, this does take quite a bit of time & effort to do, you will start to see how badly the corrosion has set in. Also I would advise working in a very well ventilated place or wearing a mask because the acid fumes can get a bit strong! | ||
| + | |||
| + | When I had got as much off as I could I then washed it all out with plenty of clean water to remove any traces of the acid, if this is left it will start to corrode the panel & any splashes on other parts of the chassis will leave a dull stain. | ||
| + | |||
| + | To remove all the corrosion from the pitting I used my Dremel with a stainless steel wire brush, this is also quite time consuming but has to be done very thoroughly to remove all the active corrosion. | ||
| + | |||
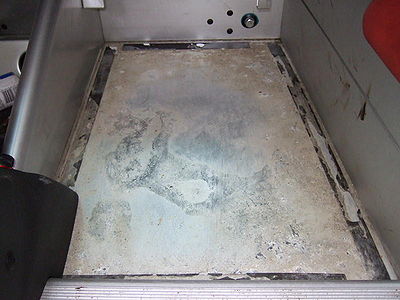
| + | You can see how bad it is once its all been cleaned away. What looks like a small spec of dust could be a deep hole once its cleaned up. | ||
| + | |||
| + | [[Image:M111 - Footwell Treatment - Step 2.jpg|thumb|center|400px]] | ||
| + | |||
| + | =Treatments= | ||
| + | |||
| + | After cleaning the floor and removing any corrosion there are several options for how to treat the problem, depending on the severity of the corrosion and intended use of the car. | ||
| + | |||
| + | ==Corrosion Prevention== | ||
| + | |||
| + | If corrosion is minimal then apply a coating of [http://elise-shop.com/acf50-anti-corrosion-chassis-protection-p-502120.html ACF50] to inhibit corrosion and fit breathable fabric floor mats. Be sure to lift the floor mats regularly to clean and wipe up any moisture and reapply the ACF50 every 12 to 18 months. | ||
| + | |||
| + | This approach is not always the best from an aesthetics stance and requires on going maintenance, but is the easiest to carry out. | ||
| + | |||
| + | ==Fill and Paint== | ||
| + | |||
| + | Useful if the floor has suffered minor corrosion with minimal pitting and you want to have the floor visible. This gives a cleaner, near factory finish for a reasonable cost and a few hours work. | ||
| + | |||
| + | ===Filling=== | ||
| + | |||
| + | Remove the remains of the double sided tape from around the edge of the floor. I used a hot air gun, glue remover (solvent) and a razor blade scraper. | ||
| + | |||
| + | I made sure the floor pan was completely dry by leaving a small heater under the floor pan, this is important because you don't want to trap any moisture. | ||
| + | |||
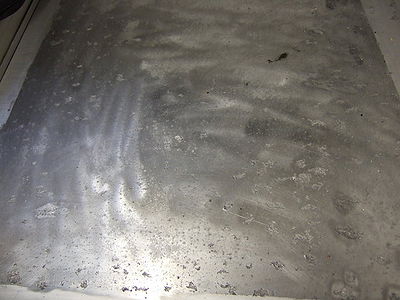
| + | The pitting was then filled with some chemical metal which is just an epoxy type glue available from most DIY shops. I did this by scraping it in with a Stanley knife blade to leave a nice level finish. There was only 2 very small holes so I stuck some tape to the underside which stopped the glue from going all the way through, it can hardly be seen from the underneath. | ||
| + | |||
| + | [[Image:M111 - Footwell Treatment - Step 3.jpg|thumb|center|400px]] | ||
| + | |||
| + | ===Painting=== | ||
| + | |||
| + | To paint fully prepare and paint the floor you may want to pick up a [https://www.frost.co.uk/black-por15-por-starter-kit.html POR15 Starter Kit], which contains appropriate marine cleaner, metal ready primer, and POR15 paint. | ||
| + | |||
| + | The floor needs a good clean with a solvent panel wipe to remove any dirt or oils that would react with the paint, you could probably use brake cleaner for this. | ||
| + | |||
| + | Most paints wont stick to aluminium very well so use the metal ready or a special primer is required. This is called an etch primer and contains acid to help it key into the surface. Some primers are a 2 part paint so needed to be mixed with an activator. | ||
| + | |||
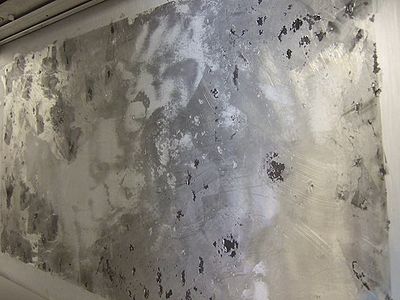
| + | I applied 2 coats of primer with about half an hour gap between using a small foam roller to get a nice even & smooth finish. I would not recommend using aerosols because the over spay would go everywhere. | ||
| + | |||
| + | [[Image:M111 - Footwell Treatment - Step 4.jpg|thumb|center|400px]] | ||
| + | |||
| + | After being left to dry the prime needed to be lightly sanded with a fine Scotch Pad or Wet & Dry, then cleaned well with some panel wipe to remove any dust or dirt. If you were really fussy & wanted a perfect finish more coats of primer could have been put on giving a thicker coating which would allow the primer to be wet sanded to a perfect smooth surface for the paint. The final paint finish depends on the preparation. | ||
| + | |||
| + | The silver paint was then mixed up with a small amount of thinners and applied in the same way as the primer. | ||
| + | |||
| + | I gave it 3 coats this time and it seems to have covered well. Because of the cold weather I left a small heater under the car to help the paint dry. | ||
| + | |||
| + | If the time and effort is put in a perfect finish like the outside of a car can be achieved if that's what your after. | ||
| + | |||
| + | The main thing is the corrosion has been stopped so I shouldn't have any more problems with it. | ||
| + | |||
| + | [[Image:M111 - Footwell Treatment - Step 5.jpg|thumb|center|400px]] | ||
| + | |||
| + | ==Secondary Floor Panels== | ||
| + | |||
| + | The secondary floor panel set was developed by Lotus as part of the recall for the footwell corrosion and used to cover up the floor in severe cases. | ||
| + | |||
| + | This method is particularly useful if holes have developed in the original floor. | ||
| + | |||
| + | ===Official Lotus fitting guide=== | ||
| + | |||
| + | Parts Required (as necessary)<br /> | ||
| + | Part Number & Qty:<br /> | ||
| + | Secondary Floor Panel Set A117A0235S, 1<br /> | ||
| + | Betaclean 3900 Degreaser A100B6008V, 1 litre<br /> | ||
| + | Betaprime 1707 A+B A111B6374V, 2 x 160ml<br /> | ||
| + | Betaprime 5404 Primer A082B6337V, 1 x 250 ml<br /> | ||
| + | Felt Applicator, Betaprime A000Z9088F, 4<br /> | ||
| + | Betamate 2800 Adhesive B111B6159V, 2 x 80ml<br /> | ||
| + | Mixer Nozzle, Betaseal adhesive A000Z9114F, 2<br /> | ||
| + | Silastic RTV732, secondary floor panel A036E6027V, 1 x 310ml<br /> | ||
| + | Carpet Set, RHD, black A117V0733S, 1<br /> | ||
| + | Carpet Set, LHD, black A117V0734S, 1<br /> | ||
| + | Carpet Fixing Stud, lower A117U6009F, 4<br /> | ||
| + | Carpet Fixing Stud, upper A117U6008F, 4<br /> | ||
| + | Velcro Strip, hook, self adhesive A111V6020V, 0.5m<br /> | ||
| + | |||
| + | Tool Required: Applicator Gun, floor adhesive A117T0010S*, 1<br /> | ||
| + | (*This tool will be mandatorily issued to all dealers and need not be ordered) | ||
| + | |||
| + | '''1.''' Remove the footwell divider panel and (if fitted) carpet retainer studs. Release all loose oxide from the footwell floors using a stiff nylon brush. Clean all loose material and debris using a vacuum cleaner. If any perforations are found, drill or file the holes to ensure that all corroded material is removed from the perforation site. Remove any burrs or sharp edges.<br /><br /> | ||
| + | |||
| + | '''2.''' Dry fit the secondary floor panels, noting that the driver's side panel needs to be flexed to clear the gearchange mechanism. Trim panel edges if necessary to allow satisfactory fit. Note that any cut edges should be cleaned and primed during steps (3) and (4).<br /><br /> | ||
| + | |||
| + | '''3.''' Degrease the footwell floors and underside of the secondary panels using Betaclean 3900.<br /><br /> | ||
| + | |||
| + | '''4.''' Mix the two parts of the Betaprime 1707, and paint the whole of the footwell top surfaces and underside of the two secondary floor panels, using the felt applicator. Allow 30 minutes drying time.<br /><br /> | ||
| + | |||
| + | '''5.''' Using Betaprime 5404, paint over the Betaprime 1707 on the footwell top surfaces and underside of the two secondary floor panels. Allow 15 minutes drying time. Then, for best results, continue immediately with step 6.<br /><br /> | ||
| + | |||
| + | '''6.''' Cut the adhesive mixer nozzle to provide a 5 - 6mm aperture, fit onto the Betaseal 2800 twin pack cartridge, and insert into the applicator gun. Extrude sufficient adhesive onto a paper towel to acheive a consistently coloured black bead.<br /><br /> | ||
| + | |||
| + | '''7.''' Addressing a single footwell floor, apply adhesive directly to any floor perforations to fully seal each hole. Then carefully apply a bead of adhesive around the periphery of the footwell floor, leaving a gap of about 10mm to the edge. Apply a further bead of adhesive in a zig-zag pattern as shown in the drawing overleaf. Note that the adhesive has only an 8 minute 'open' time before the secondary floor panel must be fitted.<br /><br /> | ||
| − | + | '''8.''' Place the secondary floor panel into the footwell and apply even pressure to spread the adhesive. Ensure the panel is level and correctly aligned before applying sand bag weighting at front and rear for a minimum period of one hour. Check the underside of the footwell to ensure that adhesive is extruded through any perforations and smooth the material across the hole. Wipe off any excess. Clean any excess adhesive from interior alloy surfaces using Betaclean 3900.<br /><br /> | |
| − | + | '''9.''' Fit a new mixer nozzle before repeating steps (5) to (8) for the second footwell.<br /><br /> | |
| − | + | '''10.''' After a minimum period of 1 hour, apply a fillet of Silastic RTV 732 (A036E6027V) around the edge of each secondary floor panel ensuring that the joint is completely sealed. Smooth the sealant with a spatula for a neat finish.<br /><br /> | |
| − | + | '''11.''' When the Silastic is cured (allow 1 hour), refit footwell divider panel and passenger footrest.<br /><br /> | |
| − | + | '''12.''' Position the carpet studs using the new carpet as a template, and stick to the floor using a suitable locally sourced proprietary adhesive (e.g. Sikaflex). Stick half the length of Velcro strip to the front of each footwell approx. 20mm from the front edge, or from the passenger footrest.<br /><br /> | |
| − | + | '''13.''' Fit a pair of new 'breathable' footwell carpets using two fixing studs for each carpet. If applicable, trim the passenger carpet to suit the type of footrest fitted. If the customer wishes to fit any additional floor covering on top of the new breathable carpet, ensure this is properly restrained using either the carpet studs, or some other secure device.<br /><br /> | |
| − | + | '''14.''' Ensure that the customer is made aware that the footwell carpets should be lifted periodically and the floor cleaned and wiped dry. | |
=Links= | =Links= | ||
| + | http://forums.seloc.org/p/3004015<br /> | ||
http://forums.seloc.org/viewthread.php?tid=318085<br /> | http://forums.seloc.org/viewthread.php?tid=318085<br /> | ||
http://hazelnet.org/corrosion/index.htm | http://hazelnet.org/corrosion/index.htm | ||
Latest revision as of 12:21, 10 January 2018
Issue
Footwell corrosion is an issue which can affect S1 and early S2 Elises fitted with the bonded down rubber floor mats.
The non-breathable rubber floor mats can cause moisture and salts to become trapped against the floor which can then react with and corrode the aluminium floor.
The severity of this reaction can vary, from minor cosmetic marking of the floor to pitting, or at worse corroding through the floor panel.
Although this may sound bad, and while the floor panel is bonded in as part of the aluminium chassis around which the Elise is based, the floor panel itself is not a load bearing panel and even heavy corrosion can be repaired without necessitating a replacement chassis.
If your car is fitted with the rubber footwell mats it is strongly recommended to remove them immediately so that the floor condition can be assessed.
Mat Removal
Remove the original floor mats which are stuck down with double sided tape around the edges.
If possible find a loose edge and use this to pull the floor mat up, or use a Stanley knife to cut the mat in the centre - although if doing this be careful not to score the floor underneath. Do not try and lever the mat up against the kick plate at the front edge as a screwdriver or similar will mark the soft aluminium of the kick plate.
You can then see the extent of the corrosion, the white powder is where its starting to get bad & the black parts are were the anodizing has just been eaten away. There will probably be a few lumps where the worst corrosion is because it tends to pile up like a mole hill.
Cleaning
Give it a good clean up with a stiff brush and vacuum up the dust.
Next I used some alloy wheel cleaner which is basically detergent / acid mix & a stiff brush to scrub off as much of the of the remaining oxidized ally as possible, this does take quite a bit of time & effort to do, you will start to see how badly the corrosion has set in. Also I would advise working in a very well ventilated place or wearing a mask because the acid fumes can get a bit strong!
When I had got as much off as I could I then washed it all out with plenty of clean water to remove any traces of the acid, if this is left it will start to corrode the panel & any splashes on other parts of the chassis will leave a dull stain.
To remove all the corrosion from the pitting I used my Dremel with a stainless steel wire brush, this is also quite time consuming but has to be done very thoroughly to remove all the active corrosion.
You can see how bad it is once its all been cleaned away. What looks like a small spec of dust could be a deep hole once its cleaned up.
Treatments
After cleaning the floor and removing any corrosion there are several options for how to treat the problem, depending on the severity of the corrosion and intended use of the car.
Corrosion Prevention
If corrosion is minimal then apply a coating of ACF50 to inhibit corrosion and fit breathable fabric floor mats. Be sure to lift the floor mats regularly to clean and wipe up any moisture and reapply the ACF50 every 12 to 18 months.
This approach is not always the best from an aesthetics stance and requires on going maintenance, but is the easiest to carry out.
Fill and Paint
Useful if the floor has suffered minor corrosion with minimal pitting and you want to have the floor visible. This gives a cleaner, near factory finish for a reasonable cost and a few hours work.
Filling
Remove the remains of the double sided tape from around the edge of the floor. I used a hot air gun, glue remover (solvent) and a razor blade scraper.
I made sure the floor pan was completely dry by leaving a small heater under the floor pan, this is important because you don't want to trap any moisture.
The pitting was then filled with some chemical metal which is just an epoxy type glue available from most DIY shops. I did this by scraping it in with a Stanley knife blade to leave a nice level finish. There was only 2 very small holes so I stuck some tape to the underside which stopped the glue from going all the way through, it can hardly be seen from the underneath.
Painting
To paint fully prepare and paint the floor you may want to pick up a POR15 Starter Kit, which contains appropriate marine cleaner, metal ready primer, and POR15 paint.
The floor needs a good clean with a solvent panel wipe to remove any dirt or oils that would react with the paint, you could probably use brake cleaner for this.
Most paints wont stick to aluminium very well so use the metal ready or a special primer is required. This is called an etch primer and contains acid to help it key into the surface. Some primers are a 2 part paint so needed to be mixed with an activator.
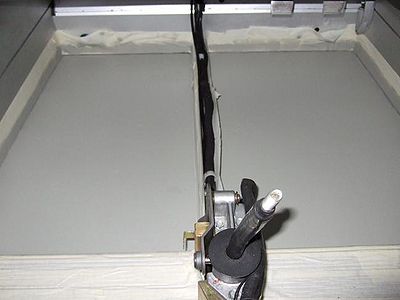
I applied 2 coats of primer with about half an hour gap between using a small foam roller to get a nice even & smooth finish. I would not recommend using aerosols because the over spay would go everywhere.
After being left to dry the prime needed to be lightly sanded with a fine Scotch Pad or Wet & Dry, then cleaned well with some panel wipe to remove any dust or dirt. If you were really fussy & wanted a perfect finish more coats of primer could have been put on giving a thicker coating which would allow the primer to be wet sanded to a perfect smooth surface for the paint. The final paint finish depends on the preparation.
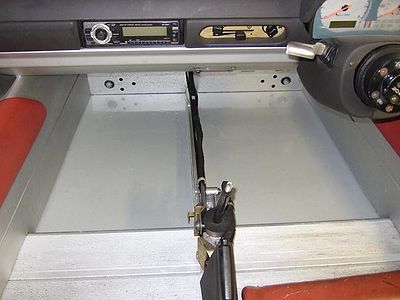
The silver paint was then mixed up with a small amount of thinners and applied in the same way as the primer.
I gave it 3 coats this time and it seems to have covered well. Because of the cold weather I left a small heater under the car to help the paint dry.
If the time and effort is put in a perfect finish like the outside of a car can be achieved if that's what your after.
The main thing is the corrosion has been stopped so I shouldn't have any more problems with it.
Secondary Floor Panels
The secondary floor panel set was developed by Lotus as part of the recall for the footwell corrosion and used to cover up the floor in severe cases.
This method is particularly useful if holes have developed in the original floor.
Official Lotus fitting guide
Parts Required (as necessary)
Part Number & Qty:
Secondary Floor Panel Set A117A0235S, 1
Betaclean 3900 Degreaser A100B6008V, 1 litre
Betaprime 1707 A+B A111B6374V, 2 x 160ml
Betaprime 5404 Primer A082B6337V, 1 x 250 ml
Felt Applicator, Betaprime A000Z9088F, 4
Betamate 2800 Adhesive B111B6159V, 2 x 80ml
Mixer Nozzle, Betaseal adhesive A000Z9114F, 2
Silastic RTV732, secondary floor panel A036E6027V, 1 x 310ml
Carpet Set, RHD, black A117V0733S, 1
Carpet Set, LHD, black A117V0734S, 1
Carpet Fixing Stud, lower A117U6009F, 4
Carpet Fixing Stud, upper A117U6008F, 4
Velcro Strip, hook, self adhesive A111V6020V, 0.5m
Tool Required: Applicator Gun, floor adhesive A117T0010S*, 1
(*This tool will be mandatorily issued to all dealers and need not be ordered)
1. Remove the footwell divider panel and (if fitted) carpet retainer studs. Release all loose oxide from the footwell floors using a stiff nylon brush. Clean all loose material and debris using a vacuum cleaner. If any perforations are found, drill or file the holes to ensure that all corroded material is removed from the perforation site. Remove any burrs or sharp edges.
2. Dry fit the secondary floor panels, noting that the driver's side panel needs to be flexed to clear the gearchange mechanism. Trim panel edges if necessary to allow satisfactory fit. Note that any cut edges should be cleaned and primed during steps (3) and (4).
3. Degrease the footwell floors and underside of the secondary panels using Betaclean 3900.
4. Mix the two parts of the Betaprime 1707, and paint the whole of the footwell top surfaces and underside of the two secondary floor panels, using the felt applicator. Allow 30 minutes drying time.
5. Using Betaprime 5404, paint over the Betaprime 1707 on the footwell top surfaces and underside of the two secondary floor panels. Allow 15 minutes drying time. Then, for best results, continue immediately with step 6.
6. Cut the adhesive mixer nozzle to provide a 5 - 6mm aperture, fit onto the Betaseal 2800 twin pack cartridge, and insert into the applicator gun. Extrude sufficient adhesive onto a paper towel to acheive a consistently coloured black bead.
7. Addressing a single footwell floor, apply adhesive directly to any floor perforations to fully seal each hole. Then carefully apply a bead of adhesive around the periphery of the footwell floor, leaving a gap of about 10mm to the edge. Apply a further bead of adhesive in a zig-zag pattern as shown in the drawing overleaf. Note that the adhesive has only an 8 minute 'open' time before the secondary floor panel must be fitted.
8. Place the secondary floor panel into the footwell and apply even pressure to spread the adhesive. Ensure the panel is level and correctly aligned before applying sand bag weighting at front and rear for a minimum period of one hour. Check the underside of the footwell to ensure that adhesive is extruded through any perforations and smooth the material across the hole. Wipe off any excess. Clean any excess adhesive from interior alloy surfaces using Betaclean 3900.
9. Fit a new mixer nozzle before repeating steps (5) to (8) for the second footwell.
10. After a minimum period of 1 hour, apply a fillet of Silastic RTV 732 (A036E6027V) around the edge of each secondary floor panel ensuring that the joint is completely sealed. Smooth the sealant with a spatula for a neat finish.
11. When the Silastic is cured (allow 1 hour), refit footwell divider panel and passenger footrest.
12. Position the carpet studs using the new carpet as a template, and stick to the floor using a suitable locally sourced proprietary adhesive (e.g. Sikaflex). Stick half the length of Velcro strip to the front of each footwell approx. 20mm from the front edge, or from the passenger footrest.
13. Fit a pair of new 'breathable' footwell carpets using two fixing studs for each carpet. If applicable, trim the passenger carpet to suit the type of footrest fitted. If the customer wishes to fit any additional floor covering on top of the new breathable carpet, ensure this is properly restrained using either the carpet studs, or some other secure device.
14. Ensure that the customer is made aware that the footwell carpets should be lifted periodically and the floor cleaned and wiped dry.
Links
http://forums.seloc.org/p/3004015
http://forums.seloc.org/viewthread.php?tid=318085
http://hazelnet.org/corrosion/index.htm
