Difference between revisions of "Radio Installation"
m |
m |
||
| Line 5: | Line 5: | ||
===ISO Connector=== | ===ISO Connector=== | ||
| − | [[File:DSC00746.JPG|thumb|left]] | + | [[File:DSC00746.JPG|thumb|left|Standard ISO Connector, note not all terminals connected.]] |
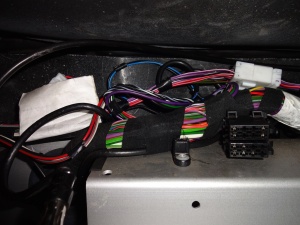
The S1 elise has a standard ISO radio connector. It provides a single pair of speakers (rears), a fixed 12V supply (critical to retain clock settings etc), ignition switched 12V (so it turns on when you turn the key), and 12V feed when lights are switched on (for auto-dimming the display). There is plenty of length on the cable to bring the connector right out of the dash but it might need untwisting form the main loom. Oddly the switched live is switched into the main ignition position on the key and not the accessory position. The wiring is conventional (i.e. not VW reversed) but check that the switched and backup powers are in the right place as some connectors allow these to be reversed. | The S1 elise has a standard ISO radio connector. It provides a single pair of speakers (rears), a fixed 12V supply (critical to retain clock settings etc), ignition switched 12V (so it turns on when you turn the key), and 12V feed when lights are switched on (for auto-dimming the display). There is plenty of length on the cable to bring the connector right out of the dash but it might need untwisting form the main loom. Oddly the switched live is switched into the main ignition position on the key and not the accessory position. The wiring is conventional (i.e. not VW reversed) but check that the switched and backup powers are in the right place as some connectors allow these to be reversed. | ||
| + | {{clr}} | ||
===Handbrake Sensor=== | ===Handbrake Sensor=== | ||
| Line 18: | Line 19: | ||
===Fit the Fitting sleeve LAST=== | ===Fit the Fitting sleeve LAST=== | ||
| − | [[File:DSC00748.JPG|thumb|left]] | + | [[File:DSC00748.JPG|thumb|left|Gap in Bulkhead gives access to grommets.]] |
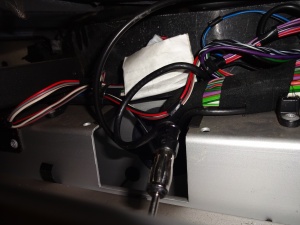
You'll find it much easier to do all the wiring with the fitting sleeve removed. This gives enough access to get a hand into the dash to access the loom and just about enough access to get into the bulkhead to pass wires through the existing grommets. Once you've fitted the outer fitting sleeve it's impossible to get at the grommets. | You'll find it much easier to do all the wiring with the fitting sleeve removed. This gives enough access to get a hand into the dash to access the loom and just about enough access to get into the bulkhead to pass wires through the existing grommets. Once you've fitted the outer fitting sleeve it's impossible to get at the grommets. | ||
| + | {{clr}} | ||
===Support the Radio=== | ===Support the Radio=== | ||
| − | [[File:DSC00751.JPG|thumb|left]] | + | [[File:DSC00751.JPG|thumb|left|Sleeved bolt (yellow) supports rear of head unit.]] |
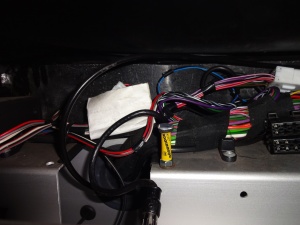
Most installation guides suggest that the alloy sleeve is sufficient to hold the radio in place. That's true in so far that it stays in place but it puts a lot of strain on the thin aluminium dash panel and the radio will almost certainly rattle.If it's a high quality head unit then it may have some weight and will probably damage something eventually. Be creative, I used a two inch bolt through one of the holes in the bulkhead threaded to stand at the correct height to support the back of the radio. Small circle of sound deadening on the head of the bottle so it doesn't rattle. | Most installation guides suggest that the alloy sleeve is sufficient to hold the radio in place. That's true in so far that it stays in place but it puts a lot of strain on the thin aluminium dash panel and the radio will almost certainly rattle.If it's a high quality head unit then it may have some weight and will probably damage something eventually. Be creative, I used a two inch bolt through one of the holes in the bulkhead threaded to stand at the correct height to support the back of the radio. Small circle of sound deadening on the head of the bottle so it doesn't rattle. | ||
| + | {{clr}} | ||
===Magnet on a Stick=== | ===Magnet on a Stick=== | ||
Revision as of 18:12, 26 December 2015
These notes are intended to help with installation of a single DIN radio into an S1 elise.
Radio Size
A standard single DIN radio will fit. A slide out larger screen will foul the dash so can't be fitted. If you think a double DIN will fit then you should get help from a professional fitter.
ISO Connector
The S1 elise has a standard ISO radio connector. It provides a single pair of speakers (rears), a fixed 12V supply (critical to retain clock settings etc), ignition switched 12V (so it turns on when you turn the key), and 12V feed when lights are switched on (for auto-dimming the display). There is plenty of length on the cable to bring the connector right out of the dash but it might need untwisting form the main loom. Oddly the switched live is switched into the main ignition position on the key and not the accessory position. The wiring is conventional (i.e. not VW reversed) but check that the switched and backup powers are in the right place as some connectors allow these to be reversed.
Handbrake Sensor
If your new radio has video then it will likely have a handbrake sensor. This prevents the unit from displaying moving images unless the handbrake is on (its the law in some countries). I'd suggest fitting it in the UK to avoid difficult conversations with insurance companies. On the elise this wire connects to the spade connector nearest the floor on the parking brake microswitch. Best approach is to mod the spade connection to take both wires rather than scotch locks or wire cutting. To reach this you need to remove the centre console. To hide the wire you will probably also have to remove the cable tunnel which separates the footwells. Access to the microswitch is easier if you undo and remove the front mounting bolt so it rotates upwards on the remaining rear bolt. I chose to replace the bolt with an allen headed equivalent which makes it a lot easier tighten as the locknuts are quite stiff.
Bluetooth Microphone
Personally I don't like cables all over the place so I put mine under the dash. It is completely hidden and works well enough to make calls when stationary.
Front vs Rear Speakers
The two factory fitted speakers (behind the seats) are connected to the "rear" speakers on the ISO connector. The "front" speaker connections are not wired. Good or bad design aside, if your radio has four or more outputs then you will naturally get something connected (rear to rear). If your radio has two speakers outputs then make sure they go to the rear's in the ISO plug. IMPORTANT, if your radio has a bluetooth phone module then there is a good chance that the phone conversation only comes out of the front speakers as the rear passengers don't need to hear your call. Some radios (kenwood?) allow you to configure this, others (pioneer?) don't. So if you fit a four speaker radio to an S1 elise without modification then your music will work but the phone audio probably won't. To remedy this you have to pull the pins from the ISO connector and swap the front and rear speakers making sure to keep left and right the same. Following the wiring diagram in the installation instructions for your head unit. Swap the wires on the plug on the radio adapter NOT on the elise loom, it's easier, way less confusing, and keeps the car original. Do this BEFORE you wire up the handbrake sensor so it can be done outside of the car in better light etc.
Fit the Fitting sleeve LAST
You'll find it much easier to do all the wiring with the fitting sleeve removed. This gives enough access to get a hand into the dash to access the loom and just about enough access to get into the bulkhead to pass wires through the existing grommets. Once you've fitted the outer fitting sleeve it's impossible to get at the grommets.
Support the Radio
Most installation guides suggest that the alloy sleeve is sufficient to hold the radio in place. That's true in so far that it stays in place but it puts a lot of strain on the thin aluminium dash panel and the radio will almost certainly rattle.If it's a high quality head unit then it may have some weight and will probably damage something eventually. Be creative, I used a two inch bolt through one of the holes in the bulkhead threaded to stand at the correct height to support the back of the radio. Small circle of sound deadening on the head of the bottle so it doesn't rattle.
Magnet on a Stick
You will drop bits into the dash, easily removed with a telescopic torch/magnet affair. Impossible with just fingers.


