Difference between revisions of "Toe alignment using straight edges"
EliseS1 man (talk | contribs) |
EliseS1 man (talk | contribs) |
||
| Line 78: | Line 78: | ||
(3.1→3.2)∙485/381 = <u>3.9 → 4.1 mm</u> | (3.1→3.2)∙485/381 = <u>3.9 → 4.1 mm</u> | ||
| + | Note the white 4 mm plastic block between rear sidewall and straight edge used for checking gap. | ||
[[File:Front_left.jpg]] | [[File:Front_left.jpg]] | ||
| Line 84: | Line 85: | ||
(0.4→0.6)∙510/406 = <u>0.5 → 0.8 mm</u> | (0.4→0.6)∙510/406 = <u>0.5 → 0.8 mm</u> | ||
| + | Note the white ½ mm plastic foil between rear sidewall and straight edge used for checking gap. | ||
[[File:Toe_rear.jpg]] | [[File:Toe_rear.jpg]] | ||
| + | |||
| + | Now the task of checking toe on wheels front and rear is reduced to putting two straight edges along the tyre sidewalls each side and measure gap from rearmost tyre wall to straight edge. So if one has a gap of front 3.9 to 4.1 mm and rear 0.5 to 0.8 mm one is good to go. | ||
| + | |||
| + | Tip 1: Pieces of plastic foil or plastic blocks used for supporting thermo glass in window frames are available in the required thicknesses and are handy and tyre friendly when measuring toe gaps. | ||
| + | Tip 2: Tyre side walls do not always run true. Repeat the gap measurements four times with the car pushed forward ¼ of a wheel revolution in between measurements and take the average of your readings. | ||
| + | |||
| + | Hope you will enjoy the described cheap and adequately precise geo tool! | ||
Revision as of 21:08, 18 April 2020
A simple method for checking front and rear toe alignment
To enjoy the benefit of a Lotus' suspension and its cornering ability it is important that the wheels actually point in the direction that Lotus intended.
The "string method" for checking toe settings is well known and described in this forum.
However I have found that using straight edges can be a little easier to set up and handle if you add a few easy measurements and calculations.
What you will need are these simple tools:
1. Two 4 meter long builders straight edges
2. Four 5 liter sprinkler fluid bottles
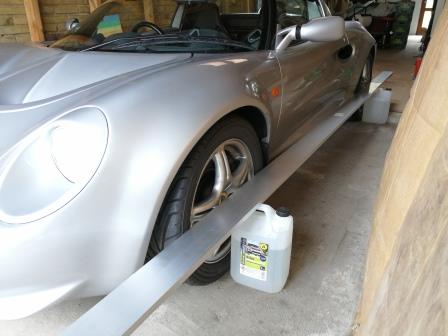
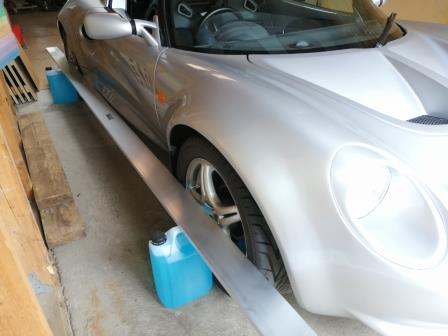
And the setup is simple too, like this:
The sprinkler bottles are placed up against each wheel. The straight edges are placed lying down on top of the sprinkler bottles and the straight edges touches the sidewall of the tyres. The ends of the straight edges should overhang the front and the rear of the car.
Common 5 liter sprinkler fluid bottles are ideal as they are suitably heavy when filled with fluid, they are level on top and their height conveniently matches the center height of the wheels.
Any material for the straight edges can be used as long as they are straight and don’t bend. It is easy to check edges against one another; turn them round and recheck, they should not show any gaps or twists. Builders straight edges can be bought from builder’s material markets and there are lots to pick from on the internet. I used SVALK aluminum extrusions of 18 x 100 mm, but any sensible straight and stiff ones will do.
Placed against the tyre sidewalls the straight edges are not parallel and do actually toe-in a little. So we will have to quantify the amount of toe-in of the straight edges which of course will be our references.
An Elise S1 is used as an example.
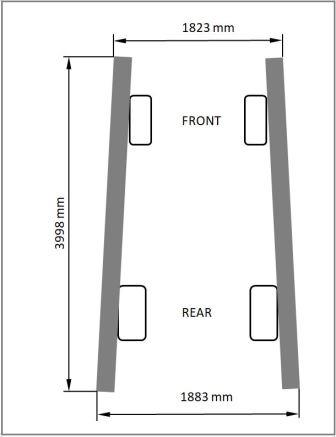
The distance between the straight edges front and rear is measured as well as the length of the straight edges. From the drawing below you can see the measurements obtained from a car with standard rims and standard tyre dimensions.
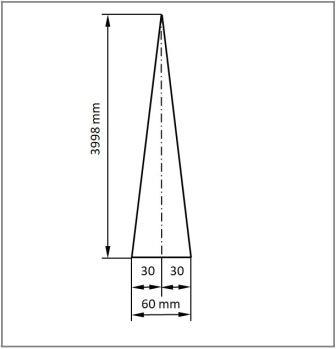
The amount of total toe-in of the straight edges can now be calculated to: 1883-1823=60 mm
So in relation to the car centerline each straight edge has an individual toe-in of: 60/2=30 mm
The toe-in of each straight edge can therefore be calculated to: 30/3998=1/133 mm ⁄ mm
This means that for every mm you go forward along the straight it goes inwards by 1/133 mm.
This is useful when we check the alignment with the straight edges against the requirements set up by Lotus for the toe of the rear and front wheels:
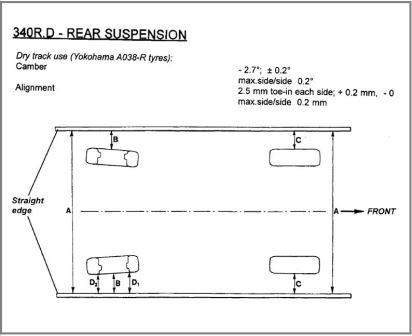
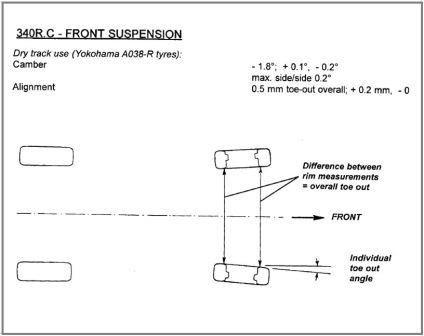
The 340R-settings for track use are according to Lotus service notes:
So we have
Rear: 2.5 mm toe-in each side; + 0.2, - 0 measured on a 16” rim. Front: 0.5 mm toe-out overall; +0.2, - 0 measured on the 15” rim.
which translates to individual wheel settings of
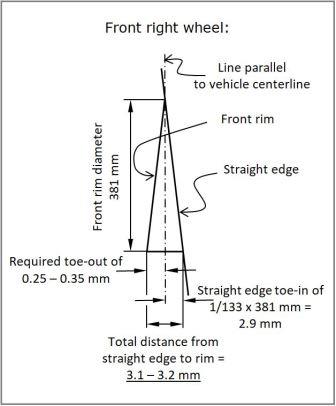
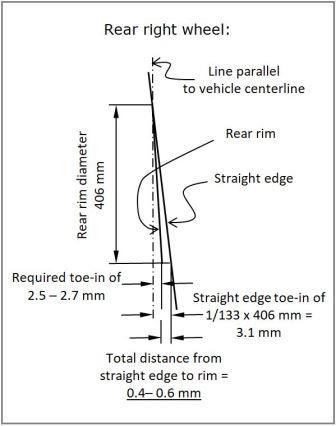
Rear: From 2.5 mm to 2.7 mm toe-in each side measured on a 406 mm diameter rim. Front: From 0.25 mm to 0.35 mm toe-out each side on a 381 mm diameter rim.
Toe measured on rim diameter:
Locally at each wheel rim we have this situation in relation to the straight edge each side:
Toe measured on tyre wall diameter:
As the straight edges touch the tyre sidewalls front and rear it is convenient to reduce the task to check the gap from the tyre sidewall to the straight edge. That requires a translation of the required distances measured at rim diameter to distance measured on tyre sidewall diameter:
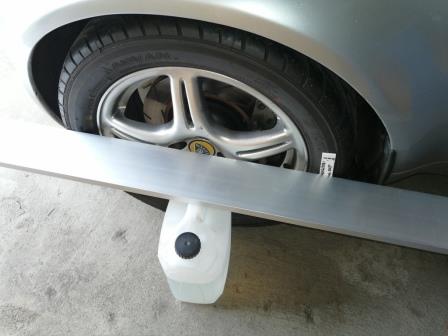
Front: Gap to straight edge measured on rearmost sidewall of 485 mm diameter: (3.1→3.2)∙485/381 = 3.9 → 4.1 mm
Note the white 4 mm plastic block between rear sidewall and straight edge used for checking gap.
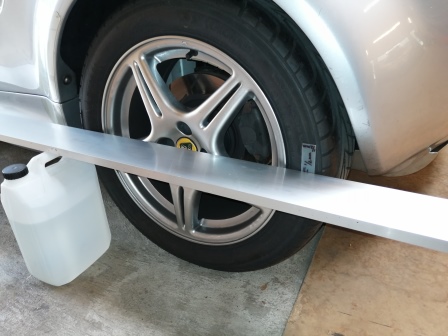
Rear: Gap to straight edge measured on rearmost sidewall of 510 mm diameter: (0.4→0.6)∙510/406 = 0.5 → 0.8 mm
Note the white ½ mm plastic foil between rear sidewall and straight edge used for checking gap.
Now the task of checking toe on wheels front and rear is reduced to putting two straight edges along the tyre sidewalls each side and measure gap from rearmost tyre wall to straight edge. So if one has a gap of front 3.9 to 4.1 mm and rear 0.5 to 0.8 mm one is good to go.
Tip 1: Pieces of plastic foil or plastic blocks used for supporting thermo glass in window frames are available in the required thicknesses and are handy and tyre friendly when measuring toe gaps. Tip 2: Tyre side walls do not always run true. Repeat the gap measurements four times with the car pushed forward ¼ of a wheel revolution in between measurements and take the average of your readings.
Hope you will enjoy the described cheap and adequately precise geo tool!
