Replace the radiator & cooling fans: Difference between revisions
No edit summary |
No edit summary |
||
| Line 15: | Line 15: | ||
'''4. Release the tie wraps, and unplug the rad. fan harness connector(s)''' | '''4. Release the tie wraps, and unplug the rad. fan harness connector(s)''' | ||
The procedure documented in the Lotus service notes describes removing the mounting panel to replace the radiator. I did not find this necessary and was able to remove the radiator with the mounting panel in place. | |||
'''5. Release the single fixing at the bottom of each side extension securing the mounting panel to the bottom flange of the crash structure''' | '''5. Release the single fixing at the bottom of each side extension securing the mounting panel to the bottom flange of the crash structure''' | ||
*Step not taken. | |||
'''6. Release the three fixings securing the back edge of the mounting panel to the vertical flange on the crash structure, and three fixings along the front edge of the panel''' | '''6. Release the three fixings securing the back edge of the mounting panel to the vertical flange on the crash structure, and three fixings along the front edge of the panel''' | ||
*Step not taken. | |||
'''7. Release the four fixings securing the radiator to the mounting panel, and withdraw the panel from the radiator''' | '''7. Release the four fixings securing the radiator to the mounting panel, and withdraw the panel from the radiator''' | ||
Revision as of 21:27, 3 September 2006
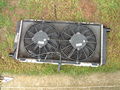
The aluminium cored radiator is positioned horizontally on top of the composite 'crash structure' in the front service compartment. A composite moulding is used to mount the radiator, and also, via extensions at each side, to provide a mounting point for the inside front of the clamshell wheelarch. The radiator must be removed for access to the cooling fan(s).
2. Drain the coolant and disconnect the feed and return hoses from the radiator
- You don't need to drain the whole cooling system, better to just undo the inlet and outlet hoses and catch the coolant in a bucket.
-
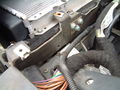
 Looking down onto the inlet pipe where bleed screw is located (MY04 Elise!)

3. Release the two fixings securing each water shield to the top rear edge of the radiator mounting panel, and withdraw both shields
-
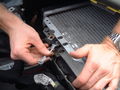
 This photo shows the water shield removed

4. Release the tie wraps, and unplug the rad. fan harness connector(s)
The procedure documented in the Lotus service notes describes removing the mounting panel to replace the radiator. I did not find this necessary and was able to remove the radiator with the mounting panel in place.
5. Release the single fixing at the bottom of each side extension securing the mounting panel to the bottom flange of the crash structure
- Step not taken.
6. Release the three fixings securing the back edge of the mounting panel to the vertical flange on the crash structure, and three fixings along the front edge of the panel
- Step not taken.
7. Release the four fixings securing the radiator to the mounting panel, and withdraw the panel from the radiator
-
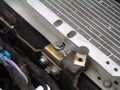 One of the brackets holding the radiator to the mounting panel
 -
 10mm spanner for this job


- The mounting panel can be left in place and the radiator withdrawn instead. This way makes the removal of the complete wireing harness unnecessary.
8. Withdraw the radiator and colling fan assembly. On AC cars, lift the radiator/condenser assembly only sufficiently to release the cooling fans or radiator as required, without disconnecting the refrigerant circuit
-
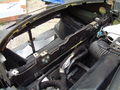 Car void of radiator!

- So as above, the radiator can be removed with the fans still attached.
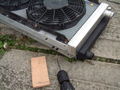
9. Release the fan motor from the radiator by removing the four nuts securing the fan shroud to the mounting brackets rivetted to the radiator frame. Withdraw the fan harness through the mounting panel grommet
-
 Underside of radiator with fan tray attached
 -
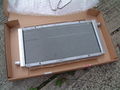 New Eliseparts hi-pressure radiator with aluminium side tanks
 -
 The new radiator has to be drilled to attach the fan tray and moutning assembly
 -
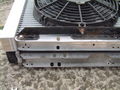 New radiator sitting on top of the old OEM rad for aligning the holes needed whilt drilling


- Here the fan tray can be seen attached to the underside of the radiator.
- The replacement Eliseparts radiator had to be drilled in order to take the fan tray assemble and mounting brackets.
10. Remove the four screws securing the radiator to the mounting panel
11. Refit the radiator in reverse order to removal and refill with coolant and bleed