Difference between revisions of "Change wishbone bushes"
| Line 26: | Line 26: | ||
Polyurethane bushes are shown being fitted using this procedure and I have explained the different steps required for fitting OEM, polyurethene and nylatron bushes where appropriate. | Polyurethane bushes are shown being fitted using this procedure and I have explained the different steps required for fitting OEM, polyurethene and nylatron bushes where appropriate. | ||
| + | |||
| + | |||
Periodic maintenance is required for polyurethene bushes. If the grease dries out then the sleeves will become scored and the inside of the bushes will start to break up. | Periodic maintenance is required for polyurethene bushes. If the grease dries out then the sleeves will become scored and the inside of the bushes will start to break up. | ||
Revision as of 17:02, 11 October 2008
This procedure details how to change the nearside upper and lower wishbone bushes on an S2 K-series Lotus Elise. An identical procedure is used to replace the offside front wishbone bushes and most of the principles apply when changing the rear upper and lower wishbone bushes.
The wishbones on the S1 Elise are very similar. The main differences are:-
S2 front wishbones are approximately 8mm longer per side and the bottom front wishbones have different damper mounting points.
The damper mounting points are in the same place on the rear wishbones, but the handbrake cable restraint is different.
So this procedure can also be used for the S1.
Several types of wishbone bushes can be fitted to the Lotus Elise:-
- OEM - Good ride quality, ideal for normal road, fast road and track use. The central steel sleeve is bonded to the rubber so it does not pivot around it freely.
- Polyurethene - Good ride quality, ideal for normal road, fast road and track use. The central sleeve rotates freely within the bush.
- Nylatron - Firm ride quality and not recommended for normal road use, ideal for fast road and track use. The central sleeve rotates freely within the bush.
- Spherical Joints - Harsh ride quality and recommended for track use only. These are not bushes, but close tolerance stainless steel bearings, commonly known as Rose Joints and need to be welded into the wishbones. These are not suitable as DIY replacements.
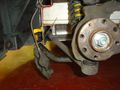
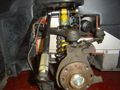
OEM wishbone bushes do not require periodic maintenance. Maintaining polyurethene and nylatron bushes is much easier than fitting them. The wishbones do not need to be completely removed from the car if you need to re-grease the sleeves. All wishbones can be removed from the chassis by just taking out the wishbone bolts and sliding the wishbones out. All other suspension and brake components can remain in place. Only the brake pipe clamps need to be removed and care must be taken to ensure that the brake pipes are not under strain when maintaining the bushes.
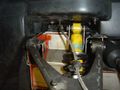
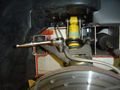
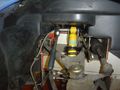
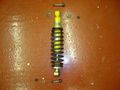
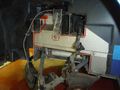
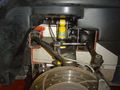
This photograph shows polyurethene bushes being maintained in the front upper wishbone with all other components undisturbed, apart from the brake pipe clamp.

Polyurethane bushes are shown being fitted using this procedure and I have explained the different steps required for fitting OEM, polyurethene and nylatron bushes where appropriate.
Periodic maintenance is required for polyurethene bushes. If the grease dries out then the sleeves will become scored and the inside of the bushes will start to break up.
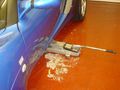
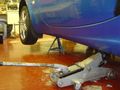
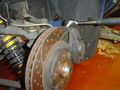
Here are a couple of photographs showing a sleeve and it's bush that have not been regreased for 35,000 miles.


Procedure
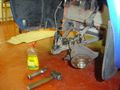
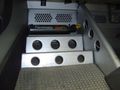
1. Remove the front undertray.
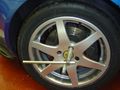
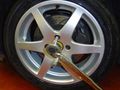
2. Loosen the bolts/nuts on the front road wheel.
3. Lift the car using the rear jacking point.
4. Place a fixed support under the front jacking point and lower the jack.
5. Remove the road wheel and then the brake pipe clamp.
6. Remove the brake caliper.
7. Remove the brake disc and cable tie the caliper out of the way. Ensure the brake pipe is not under any strain.
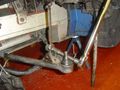
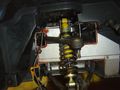
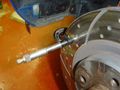
8a. Remove the damper.
8b. Damper removed.
9. Remove the drop link from the lower wishbone.
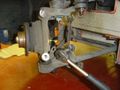
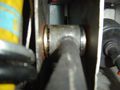
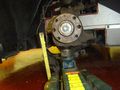
10. Remove the upper and lower ball joint nuts.
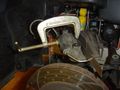
11. Remove the upper and lower ball joints from the hub carrier. I prefer to use a fork splitter, but there is a high probability of damaging the ball joint dust covers. Some people prefer to use a scissor type splitter for this step.
12. The ball joints are both removed from the hub carrier. If you apply some lubricant to the ball joint dust cover when using a fork splitter it can prevent the dust cover from splitting.
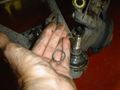
13. The retaining springs always come off the dust covers when using a fork splitter, but they are easy to put back on if lubricant has been used.
14a. Remove the upper wishbone. There are four shims for both the front and the rear bushes. Make a note of where they are positioned as the number of shims placed either side of the bush set the castor angle.
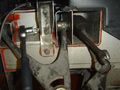
14b. Remove the upper wishbone continued.
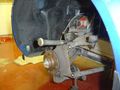
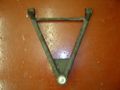
15a. The upper wishbone has been removed.
15b. This photograph shows the upper wishbone off the car.
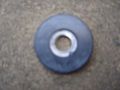
Snubber washer.


If you are fitting nylatron or polyurethane bushes you will not be able to refit the snubber washer without modifying it, so you will either need to remove the rubber from the faces of the shim or replace it with a standard large diameter shim. The snubber washer is not designed to be used with aftermarket bushes because the flat of the washer will not make proper contact with the sleeve of the wishbone. This will result in the sleeve not being clamped up tight.
It is worth using new shims when replacing wishbone bushes.
Part numbers for replacement shims:-
- A111C0080F (Qty 8) - Shim, castor adjustment, small
- A111C0077F (Qty 6) - Shim, castor adjustment
- A111C0081F (Qty 2) - Snubber washer, rubber coated upper wishbone
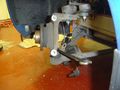
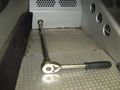
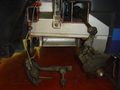
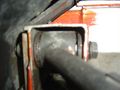
16a. Remove the lower wishbone. If you are working on your own you will find that it is impossible to remove the rear lower wishbone bolt. To overcome this problem I cable tie a ring spanner to the lower wishbone so that I can remove the bolt from inside the footwell without an assistant.
16b. If you are working on the nearside and you have a passenger foot rest you will need to remove it first and then you can access the wishbone bolt.
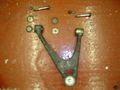
16c. Lower wishbone removed from the car.
17. Both wishbones have been removed from the car.
18a. If you are removing a polyurethane bush you will need to tap out the stainless steel sleeve first. I use a slightly smaller diameter sleeve to tap out the bush sleeve. The same process can be applied if you are removing nylatron bush sleeves that have become tight. Do NOT do this if you are removing an OEM bush.
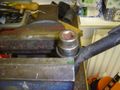
18b. The polyurethane bush can be tapped out easily using a 7/8 inch socket. I have removed nylatron bushes by tapping out the bottom bush using a screwdriver through the centre hole from the top bush, but the bush is not reusable with this method as the screwdriver damages the bush. It is NOT possible to remove an OEM bush by using either of these methods.
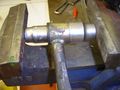
18c. I have added this photograph to show how an OEM bush can be removed from the wishbone. This photograph is an indication of how to remove an OEM bush as the one shown is polyurethane and CANNOT be removed by this method.


The top hat is much thinner on an OEM bush so the 7/8 inch socket on the left can break the top hat and push the bush through the wishbone easily. The 11/8 inch socket on the right will allow the bush to be pressed out of the wishbone by about 1 inch.
The assembly will then need to be removed from the vice and reinserted as in step 18b. The 7/8 inch socket can be used to tap out the remainder of the bush. The OEM bush is NOT reusable.
Different methods are used to press in the bushes dependant upon whether OEM, nylatron or polyurethane bushes are being used. In this procedure I have re-fitted polyurethane bushes which are reusable and can be inserted by hand. Nylatron and OEM bushes need to be pressed in to fit. I have never fitted OEM bushes but pressing it should be possible using a heavy duty bench vice and suitable lubricant. Nylatron bushes can definitely be pressed in using a bench vice.
It is important that the bushes are inserted into the wishbones in the correct way. The drawing below shows which way to insert both OEM and polyurethane bushes into the front upper and lower wishbones. You will see that the top wishbone bushes are inserted from the outside and the lower wishbone bushes are inserted from the inside of the wishbones. The same method applies to the rear wishbones. Nylatron bushes are designed differently and two bushes are used for each joint; one bush inserted from either end.
Copper grease needs to be applied to the sleeves on polyurethene bushes during assembly to ensure the sleeves rotate freely in the bushes but it is not recommended for nylatron. Molybdenum grease is the recommended lubricant for nylatron bushes and they will probably need to be reamed after they are pressed in to ensure the sleeve rotates freely in the bush. The tolerance of the wishbone means the two bushes will not always line up exactly when they are inserted from opposite ends. This means the sleeve will not rotate freely and they will tend to bind when in use if they are not fettled.

I was not happy with my polyurethane bush installation for the front upper wishbones and I have subsequently made a modification by replacing the small diameter shims that are used on the top rear bushes with the large diameter shims used for the front top wishbone bush. I have found that the small shims penetrate into the polyurethane bushes when the car is driven, like this:-

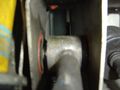
This photograph shows how the front upper rear wishbone bush had moved after the car was driven. Both rear shims had penetrated the bush which is now misaligned.
This photograph shows both rear shims embedded into the polyurethene bush.

This photograph shows both shims removed from the bush and you can see that the inner sleeve has been pushed forward.

This is how I have subsequently fitted the shims on the upper front wishbones:-

When the bushes have been fitted, the wishbones need to be re-attached to the car. The reassembly procedure is more or less the reverse of disassembly.
It can be very difficult to get the castor shims back in on the upper front wishbone assembly. It is even more difficult if you are fitting nylatron bushes as you cannot compress the top hats of the bushes. You can superglue the shims together before re-assembly, but this does not work very well if you are re-using old shims because their faces will have become rusty. I fit the shims as closely as possible by tapping them in gently trying not to break the superglue then I use a tapered drift to align the centre holes so the wishbone bolt fits. Do not be tempted to use excessive force to drive the wishbone bolt in as this will result in the bolt thread becoming damaged. If you are re-fitting the small diameter shims you will find they are much harder to fit than the large diameter shims and if you use excessive force the small shims will distort and you will not be able to pass the wishbone bolt through them.
Once again, because this is important. If you are fitting nylatron or polyurethane bushes you will not be able to refit the snubber washer without modifying it, so you will either need to remove the rubber from the faces of the shim or replace it with a standard large diameter shim. The snubber washer is not designed to be used with aftermarket bushes because the flat of the washer will not make proper contact with the sleeve of the wishbone. This will result in the sleeve not being clamped up tight.
It is worth using new shims when replacing wishbone bushes.
Snubber washer.
If you are fitting nylatron or polyurethane bushes then you can torque tighten all of the wishbone bolts without having to fully re-build the assembly.
If you are fitting OEM bushes then all of the components must be fitted loosely. The bolts cannot be torque tightened at this stage because the suspension needs to be loaded and sitting at normal ride height otherwise the bushes will try to rip themselves apart during use as they will be tightened at the wrong orientation.
Lotus recommend smearing grease on the wishbone bolt shanks before re-assembly when fitting OEM bushes and do not get any grease on the bolt threads. This is not necessary when fitting nylatron or polyurethene bushes because the sleeves do not rotate around the bolt. Both the bolt and sleeves remain fixed and the bushes rotate around the sleeves.
Step 19. Torque tighten the upper wishbone bolts to 45Nm after fitting polyurethane or nylatron bushes. Both front and rear are easily accessible.
When fitting nylatron bushes you must ensure that when the bolts have been torque tightened each wishbone drops under its own weight. If you need to apply any force to lower the wishbone then the sleeves are too tight in the bushes and the wishbone will have to be removed and further reaming will be required to ensure the sleeves are not too tight in the bush. This is important because the handling of the car may be affected if the sleeves are too tight as the wishbones will have a tendancy to drag. Also there will be a tendancy for the bushes to rotate in the wishbone instead of the sleeves which will polish and start to wear out the wishbone. But more importantly, badly fitted nylatron bushes are dangerous because if the sleeves bind in the bushes the wishbone bolts can become loose because the nuts will try to unwind themselves when the suspension raises and lowers in use. If you see the bushes rotating in the wishbone then you must not continue assembing the suspension.

19a. Remember, you must loosely fit OEM bushes at this stage and assemble the suspension completely then load it to the normal ride height before torque tightening the wishbone bolts.
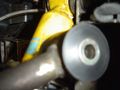
19b. This photoraph is a close up of the upper front wishbone bush fitted with a polyurethene bush after it has been torque tightened.
19c. I have used large diameter shims for the upper rear wishbone and they are much easier to fit than the small diameter shims. Also they will not embed themselves in the polyurethene bush.
20a. Refit the lower wishbone. The front nut and bolt are easily accessible. If you are working on your own you will find that it is impossible to torque tighten the lower rear wishbone bolt. To overcome this problem I cable tie a ring spanner to the lower wishbone so that I can torque tighten the bolt from inside the foot well without an assistant.
20b. The rear lower wishbone bolt can be torque tightened to 45Nm from inside the footwell.
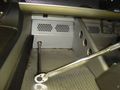
21. If you are working on the nearside you can replace the passenger foot rest.
22. Torque tighten the drop link to 45NM.
23. You can loosely fit the damper at this stage. I find it easier to fit now rather than later because the hub carrier is not in the way. Ensure that you grease the top hat washers where they come into contact with the damper. The bolts cannot be torque tightened at this point because the suspension needs to be loaded and sitting at normal ride height otherwise the damper bushes will try to rip themselves apart during use as they will be tightened at the wrong orientation.
24. The hub assembly can now be refitted. The suspension needs to be loaded by placing a jack under the hub carrier and jacked to normal ride height. Both upper and lower ball joints can be torque tightened to 55Nm although you will not be able to use a torque wrench on the lower ball joint nut if you only have a basic tool kit, in which case you will have to estimate the correct torque using a ring spanner.
25. The damper can now be torque tightened to 45Nm and if you have fitted OEM wishbone bushes all of the wishbone bolts can be torque tightened to 45Nm at this stage.
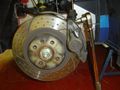
26. Refit the brake disc. You may find that you will need to slacken off one of the brake pads if your disc has developed a lip. I use a clamp and an old steel rule on the face of the pad to spread the load.
27. It is always a good idea to measure the thickness of your brake disc at regular intervals to ensure it is still within tolerance.
28. Refit the brake caliper and torque tighten it to 45Nm.
29. Refit the brake pipe clamp.

30. Refit the front under tray unless you are about to start on the other side of the car.
31. Refit the road wheel and nip the wheel bolts/nuts up. Check to ensure there is no play in any of the suspension components by trying to rock the wheel from side to side by holding it at a quarter to three.
32. Lower the car to the ground and torque up the road wheel bolts to 105Nm on an S2 or the wheel nuts to 80-85Nm on an S1. Press the brake pedal several times to get the pedal feel back.


As this is major suspension work it is advisable to check and adjust the suspension geometry. See http://wiki.seloc.org/index.php/Geo_Setups
The diagram below shows which way the OEM bushes should be inserted into the wishbones. Note that there are 3 different part numbers and they are the same for both S1 & S2.

These part numbers have been superceded by the new part numbers shown below:-
Revised wishbone bush part numbers
- Front Suspension
- Upper wishbone rear pivot bush A116C0035F
- Lower wishbone/upper wishbone front pivot bushes A116C0068F
- Rear Suspension
- Lower wishbone front pivot short bushes A116C0067
- Lower wishbone rear/upper wishbone bushes A116C0068F