Cobra Alarm battery upgrade
This Wiki is to help you guys (and gals) sort out that pesky Cobra 6422 alarm issues and battey problems because of them!
Removing Sounder

First of all you will need to remove the sounder, which is under the dash on the opposite side of the steering wheel, you will need:
- Make sure you un-immobilise the alarm BEFORE disconnecting the sounder!!
- Assume the lotus position in passenger side or get a child in there.
- M10 ratchet spanner (ratchet optional if you're patient, note that the bolts only have to be loosened, not removed completely)
- Side cutters (or a dab hand with a thin screwdriver to loosen the cable tie)
- (Earplugs if the car is immobilised and you disconnect the siren connector)
Now that you have got out of the car after banging your head on the cant rail, ripping your trousers on the door pin, walk inside with the sounder and have a cup of tea (or a Beer!)
Dissasembly of Case
For dissasembly of the sounder you will need:
- Sharp knife (plasters once you cut yourself!)
- Philips screwdriver number 2
- Soldering Iron
- Solder sucker (if you have one)
- Some solder
Now the dissasembly
- Remove the heatshrink around the cable onto the sounder box with a knife (can get away without doing this, but the wire will be very tight to push through, and there may even be some sealant gumming it up)
- Undo the screws that hold the sounder together and gently pull the sounder apart pushing the wire through the case
Inspecting
At this point you should be able to decide on whether you need a new battey pack or not, if it is corroding on the ends, I would, at that point send a U2U to Nokesy and order a new battery at roughly £30 (inc VAT) including postage on an individual battery.
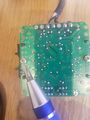
- Below there are some photos of Good Vs Bad PCB's (bad images not uploaded yet).
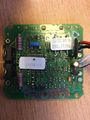
Bad Top
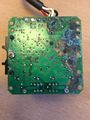
Bad Bottom


If it is like the bad one, go on to "Cleaning", if not go to "Disassembly to fit battery"
Cleaning
- Detach all cables from the circuit board and pull out any chips inserted into it. Take note of where each one goes so that they can be properly reinserted after cleaning.
- Pour a quarter-cup of baking soda into a small bowl and add 1 to 2 tablespoons of water until the mixture forms a thick paste.
- Insert a toothbrush into the baking soda paste and apply it onto the corroded parts of the circuit board. Scrub the circuit board gently with the toothbrush to loosen some of the corrosion.
- Allow the paste mixture to sit on the circuit board for 20 to 30 minutes. The paste mixture will dry during this time, which is normal.
- Rinse the circuit board off in clean water to remove all traces of the baking soda.
- Spray the entire surface of the circuit board with a standard household cleaner that does not contain phosphates (Mr Muscle Kitchen Cleaner). Allow the cleaner to sit for 10 to 15 seconds, then scrub the surface of the circuit board with the toothbrush. You don't need to scrub very hard, since you already cleaned it once with the toothbrush.
- Rinse the circuit board again in clean tap water and dry the board using a lint-free towel. Use a blotting motion when drying so as not to damage any of the small components.
- Preheat an oven to 170 degrees, then turn it off and place the circuit board inside. Allow the board to remain in the oven for two to three hours to remove all moisture.
- Reinsert all chips into the circuit board and reattach all cables.
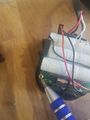
Disassembly to fit battery
To be written and photo's added!
disassembly 1
disassembly 2
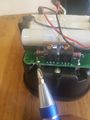
disassembly 3
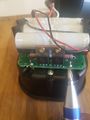
disassembly 4
disassembly 5
disassembly 6
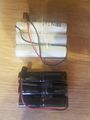
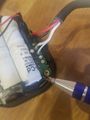
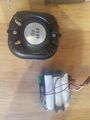
battery pack - old vs new
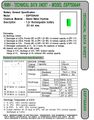
new battery pack specs


Re-Assembly
This is reverse of the "Disassembly" obviously, just take care not to trap wires in the screw locations
- Push the sounder housing together and gently pull the wire through the case, then insert the two screws and tighten them up.
- If you have fitted new heatshrink, then heat up the heatshrink with a suitable tool, ie heat gun, hairdryer or a flaming device like a lighter.. (Be careful not to melt the wires!)
Refitting Sounder to car
Tools you will need:
- Assume the lotus (again) position in passenger side of get a child in there.
- M10 ratchet spanner
- Cable tie
- Side cutters (probably not for reassembly?
TOP TIP - Don't forget that when you mount the siren back into the car, you should mount it with the battery facing downwards, so that if the battery does leak, then it will leak onto the plastic housing and not onto the pcb.
Now that you have got out of the car after banging your head on the cant rail, ripping your trousers on the door pin again, walk inside and celebrate with a cup of tea (or a Beer in my case!)
~more to follow as I get chance~
Components
If the batteries have leaked then one of the first things they dissolve is the surge-protection varistor. The varistor material itself probably won't be damaged but the plastic casing will go quickly and the wire connectors are likely to detach. Luckily these are standard S14K14 auto varistors and widely available.