Difference between revisions of "Fitting a head unit"
(Created page with "==How to fit a new head unit== You'll need *Flat head screwdriver *Head unit 'kets' ==Remove the old unit== Firstly remove the plastic surround from around the head unit, if...") |
m |
||
| Line 13: | Line 13: | ||
<gallery> | <gallery> | ||
| − | Image: | + | Image:Headunit1.jpg|Head unit cage |
| − | Image: | + | Image:Headunit2.jpg|Head unit fitted in cage |
| − | Image: | + | Image:Headunit3.JPG|Cage side view |
| − | Image: | + | Image:Headunit4.JPG|Keys in cage |
| − | Image: | + | Image:Headunit5.JPG|Keys in cage |
| − | Image: | + | Image:Headunit6.JPG|Keys in cage |
| − | Image: | + | Image:Headunit7.JPG|ISO Head unit connector |
</gallery> | </gallery> | ||
{{clr}} | {{clr}} | ||
| Line 30: | Line 30: | ||
<gallery> | <gallery> | ||
| − | Image: | + | Image:Headunit8.jpg|Keys in old headunit |
| − | Image: | + | Image:Headunit9.jpg|Head unit fitted in cage |
| − | Image: | + | Image:Headunit10.JPG|Removing old head unit |
| − | Image: | + | Image:Headunit11.JPG|Back of head unit loom |
| − | Image: | + | Image:Headunit12.JPG|Car ISO connector |
| − | Image: | + | Image:Headunit13.JPG|Keys in cage |
| − | Image: | + | Image:Headunit14.JPG|ISO Head unit Loom |
| − | Image: | + | Image:Headunit15.JPG|Old cage removed, light crushed |
| − | Image: | + | Image:Headunit16.JPG|Old cage reshaped, good as new |
</gallery> | </gallery> | ||
{{clr}} | {{clr}} | ||
| Line 47: | Line 47: | ||
Make sure you get the cage the right way round, the lip should be on your side on the cage. Pop the cables through the cage and then gently push down as many of the cage tages down, this holds the cage in the car. I used a screw driver to do this, once your happy it is secure slide the new headunit in after connecting the ISO loom togeather. Make sure not to snag the cables. | Make sure you get the cage the right way round, the lip should be on your side on the cage. Pop the cables through the cage and then gently push down as many of the cage tages down, this holds the cage in the car. I used a screw driver to do this, once your happy it is secure slide the new headunit in after connecting the ISO loom togeather. Make sure not to snag the cables. | ||
| − | [[image: | + | [[image:headunit13.jpg|left|Cage tages]] |
{{clr}} | {{clr}} | ||
| − | [[image: | + | [[image:headunit14.jpg|left|Job done!]] |
{{clr}} | {{clr}} | ||
[[Category:Electrical]] | [[Category:Electrical]] | ||
Revision as of 22:27, 8 June 2011
How to fit a new head unit
You'll need
- Flat head screwdriver
- Head unit 'kets'
Remove the old unit
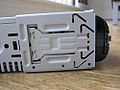
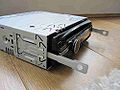
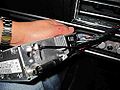
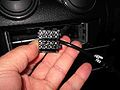
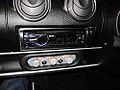
Firstly remove the plastic surround from around the head unit, if it has one, my oem blankput head unit did not. Pop in the head unit keys and gently remove the head unit, below is a set of pictures to show you how the keys slot into the cage and allow you to remove the head unit.
- Headunit1.jpg
Head unit cage
- Headunit2.jpg
Head unit fitted in cage
Cage side view
Keys in cage
Keys in cage
Keys in cage
- Headunit7.JPG
ISO Head unit connector


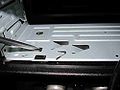
Remove the old head unit cage
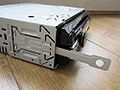
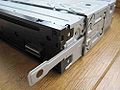
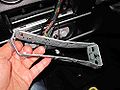
Not all new head units will come with a cage, it will depend on your model, also if the cage fitted is from the same brand you wont need to change it over. The old cage will need to be gently 'crushed' so that you can remove it from the cars head unit hole, if you do it gently the cage can be bent back to shape after you have removed it, like in my picutres in the bellow gallery.
- Headunit8.jpg
Keys in old headunit
- Headunit9.jpg
Head unit fitted in cage
Removing old head unit
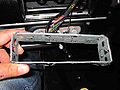
Back of head unit loom
Car ISO connector
Keys in cage
ISO Head unit Loom
Old cage removed, light crushed
- Headunit16.JPG
Old cage reshaped, good as new


Fitting the new head unit
Make sure you get the cage the right way round, the lip should be on your side on the cage. Pop the cables through the cage and then gently push down as many of the cage tages down, this holds the cage in the car. I used a screw driver to do this, once your happy it is secure slide the new headunit in after connecting the ISO loom togeather. Make sure not to snag the cables.