Difference between revisions of "Jacking points"
Jump to navigation
Jump to search
m |
m |
||
| Line 1: | Line 1: | ||
[[Image:Jacking.JPG]] | [[Image:Jacking.JPG]] | ||
| + | |||
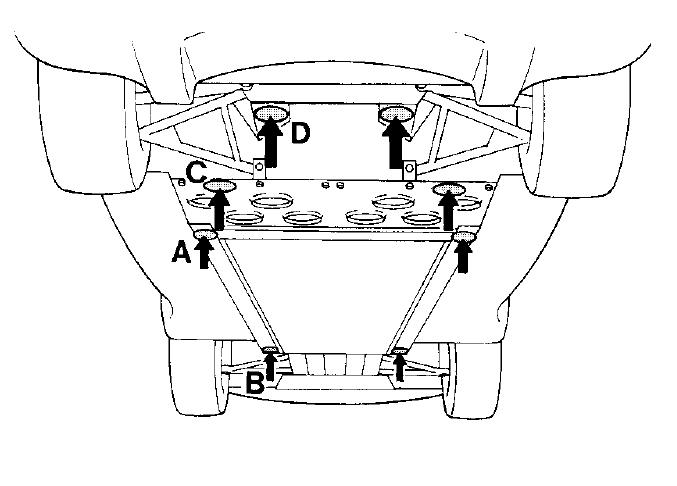
| + | A | ||
| + | |||
| + | marks the single point per side jacking point, marked with a blue jacking point sticker on the underside of the car. This jacking point will allow you to raise both wheels on one side of the car at the same time. | ||
| + | |||
| + | B | ||
| + | |||
| + | marks a jacking point that should be used when the car is raised on a 4 point lift, in conjunction with the C point (below) | ||
| + | |||
| + | C | ||
| + | |||
| + | marks a jacking point, in the fuel tank bay shear panel, whcih should be used in conjunction with point B (above) when raising the car on a 4 point lift. This jacking point cannot be used without removing the undertray. | ||
| + | |||
| + | D | ||
| + | |||
| + | marks a jacking point that may be user to raise the rear of the car. This jacking point cannot be used without removing the undertray. | ||
Revision as of 15:48, 5 September 2006
A
marks the single point per side jacking point, marked with a blue jacking point sticker on the underside of the car. This jacking point will allow you to raise both wheels on one side of the car at the same time.
B
marks a jacking point that should be used when the car is raised on a 4 point lift, in conjunction with the C point (below)
C
marks a jacking point, in the fuel tank bay shear panel, whcih should be used in conjunction with point B (above) when raising the car on a 4 point lift. This jacking point cannot be used without removing the undertray.
D
marks a jacking point that may be user to raise the rear of the car. This jacking point cannot be used without removing the undertray.
