Difference between revisions of "Remove S2 front clamshell"
m |
|||
| (35 intermediate revisions by 8 users not shown) | |||
| Line 1: | Line 1: | ||
[[Image:Front_clamshell_removed.jpg|thumb|left|111R Clamshell removed and sitting on grass!]] | [[Image:Front_clamshell_removed.jpg|thumb|left|111R Clamshell removed and sitting on grass!]] | ||
| − | |||
| − | |||
The front clamshell is a bonded assembly of several glass fibre composite mouldings incorporating both front wings, the front access aperture, radiator air intake and headlamp housings. The clamshell is secured to the windscreen frame, radiator mounting panel and other panels using threaded fasteners for ease of removal and to facilitate service access and body repair. | The front clamshell is a bonded assembly of several glass fibre composite mouldings incorporating both front wings, the front access aperture, radiator air intake and headlamp housings. The clamshell is secured to the windscreen frame, radiator mounting panel and other panels using threaded fasteners for ease of removal and to facilitate service access and body repair. | ||
| Line 9: | Line 7: | ||
The procedure is relatively simple given the fact your dismantling the front of your car. Only a few basic tools are required but a slow, methodical approach is highly recommended. | The procedure is relatively simple given the fact your dismantling the front of your car. Only a few basic tools are required but a slow, methodical approach is highly recommended. | ||
| + | {{clr}} | ||
| + | |||
==Procedure== | ==Procedure== | ||
| − | + | '''1. Remove both [[Access panel|front body access panels]]''' | |
| − | + | ||
| − | + | '''2. Remove both front wheelarch liners''' | |
| + | <gallery> | ||
| + | Image:Remove front clamshell step 2b.jpg|Nearside wheelarch liner has a couple of electrical components bolted to it | ||
| + | Image:Remove front clamshell step 2c.jpg|Just loosen the liner on the nearside | ||
| + | </gallery> | ||
| + | |||
| + | *Before you can do this the car needs to be raised and supported on the [[jacking points#Front|two front jacking points]]. | ||
| + | *It is not necessary to completely remove the nearside liner. It has a relay and fuse box bolted to it and these would need to be removed first (they are not on a clip like the offside). Easier to just looses its fixing bolts for access to the clamshell securing bolts. | ||
| + | |||
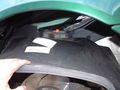
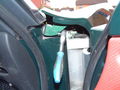
| + | '''3. [[Door hinge cover panel|Remove both door hinge cover panels]]''' | ||
| + | <gallery> | ||
| + | Image:Remove front clamshell step 3a.jpg|Don't obscure the panels lower bolt access holes | ||
| + | Image:Remove front clamshell step 3b.jpg|Amazing how much crap gathers within the panels | ||
| + | </gallery> | ||
| + | |||
| + | *If you use boxes of paper to support the car make sure the access holes for the panel are not obscured! | ||
| + | *It is not absolutely necessary to remove these panels. All you really need to do is remove the foremost, and slacken the rearmost, of the two screws securing the door hinge cover panel to the clamshell. | ||
| + | |||
| + | '''4. Via each door aperture, remove the single fixing securing a bracket at the top rear corner of the clamshell to the base of the windscreen pillar''' | ||
| + | <gallery> | ||
| + | Image:Remove front clamshell step 4a.jpg|Easy access for the ratchet on this one | ||
| + | Image:Remove front clamshell step 4b.jpg|The bolt has a 5mm Hex head or possibly 5mm Star Head | ||
| + | </gallery> | ||
| + | |||
| + | '''5. Remove the fixing at each side securing the clamshell to the bottom of the windscreen frame, and the two nuts securing the clamshell spine to the wiper motor bracket extension''' | ||
| + | <gallery> | ||
| + | Image:Remove front clamshell step 5a.jpg|Perhaps the easiest bolts to remove in the whole job! | ||
| + | Image:Remove front clamshell step 5b.jpg|Slightly harder to access these bolts but still very manageable | ||
| + | Image:Remove front clamshell step 5c.jpg|There are two 10mm bolts and washers to remove here | ||
| + | </gallery> | ||
| + | |||
| + | '''6. Remove the single fixing at the bottom front of each wheelarch, securing the clamshell to the radiator panel extension''' | ||
| + | <gallery> | ||
| + | Image:Remove front clamshell step 6a.jpg|Easy access with the ratchet and 8mm socket | ||
| + | Image:Remove front clamshell step 6b.jpg|Note the large washer used on this fixing | ||
| + | </gallery> | ||
| + | |||
| + | '''7. [[Remove the headlamp cover]]/mask assembly from each side. Remove the clamshell fixing at the front of each headlamp housing. Release the headlamp harnesses, and feed through the clamshell hole''' | ||
| + | <gallery> | ||
| + | Image:Remove front clamshell step 7a.jpg|Remove the thee, 5mm hex head, bolts from within the wheelarch securing the mask assembly | ||
| + | Image:Remove front clamshell step 7b.jpg|Note the top both has a washer to spread the load | ||
| + | Image:Remove front clamshell step 7c.jpg|5mm hex head again with short extension bar | ||
| + | Image:Remove front clamshell step 7d.jpg|These are the same bolts as used in step 5 | ||
| + | Image:Remove front clamshell step 7e.jpg|Force the rubber grommet and wires back through the clamshell | ||
| + | Image:Remove front clamshell step 7f.jpg|Just leave them dangling within the wheelarch | ||
| + | </gallery> | ||
| + | |||
| + | '''8. Beneath the nose, release the screws fixing the front lower edge of the clamshell to the alloy undertray''' | ||
| + | <gallery> | ||
| + | Image:Remove the front undertray step 1.jpg|Use a 8mm socket for removing the three bolts | ||
| + | </gallery> | ||
| + | * I went further and actually [[remove the front undertray|removed the front undertray]]. It's not necessary for removal but you'll struggle to put the clam back on with the front undertry still in place. | ||
| − | + | '''9. Lift the clamshell from the car. Note any spacing washers or shims fitted at any fixing point''' | |
| + | <gallery> | ||
| + | Image:Remove front clamshell step 9a.jpg|What it looks like | ||
| + | Image:Remove front clamshell step 9b.jpg|The clamshell off the car | ||
| + | </gallery> | ||
| + | *Some additional actions required before attempting to lift the clamshell from the car not listed in the original instructions. | ||
| + | *Unplug the wires going to the alarm switches on both front access cover panels. | ||
| + | *Remove and unplug both indicators from the clamshell. | ||
| − | |||
The plastic screws sometimes will not come out so just carefully pry them out rather than unscrew (if they don't unscrew that is). You may need to replace some of these. | The plastic screws sometimes will not come out so just carefully pry them out rather than unscrew (if they don't unscrew that is). You may need to replace some of these. | ||
| − | |||
Just take your time and think about what you are doing and it will be fine. | Just take your time and think about what you are doing and it will be fine. | ||
| + | |||
| + | ---Notes/differences for the 2007-on Elise "S"--- | ||
| + | |||
| + | 1. No electrical boxes on the clam (ergo, easier to pull the whel lining out to make more space to work) | ||
| + | |||
| + | 2. Most fittings were for an 8mm or 10mm socket | ||
| + | |||
| + | 3. Not necessary to remove the door hinge cover panels but its very easy to do so | ||
| + | |||
| + | 4. The 07 model (and possibly models thereafter), have a different headlamp arrangment to the one in the wiki. In the 07 "s", there are 3x17mm nuts and one 8mm nut to remove. You then disconnect the plugs, and push the whole unit out of the clam, resting it back in place when removed. | ||
| + | |||
| + | 5. In addition to the single 10mm fixing at the bottom front of the clam, there is a 5mm Hex head nut underneath the bottom of the headlight unit. | ||
| + | |||
| + | |||
==Top Tips== | ==Top Tips== | ||
| + | *Remove driving lights. With them in place the clam can get hung up on the lights as the opening tapers to a smaller size. Can damage/crack the clam when removing. | ||
*Never lift the clamshell from the car by yourself, you’ll crack it. Always get someone else to help and lift via the wheel arches | *Never lift the clamshell from the car by yourself, you’ll crack it. Always get someone else to help and lift via the wheel arches | ||
*The awkward bolts are those just behind the wheels that require the inner wheel arch to be pulled out to get access. | *The awkward bolts are those just behind the wheels that require the inner wheel arch to be pulled out to get access. | ||
*Watch for the adjustment rivets between clamshell and mounting points (around the lid-aperture). Put them back where they were for alignment. | *Watch for the adjustment rivets between clamshell and mounting points (around the lid-aperture). Put them back where they were for alignment. | ||
*When you get them back in at the end, don't push the rawlnuts through the holes, they will stay rolling around in the sill forever ! | *When you get them back in at the end, don't push the rawlnuts through the holes, they will stay rolling around in the sill forever ! | ||
| − | + | *Before refitting, [[remove the front undertray]] to make it easier to align the clam without having to worry about getting it 'under' the aluminium tray. | |
| − | + | *Watch the towing bar eye doesn't get caught on the plastic grills. | |
| + | *This picture shows all of the clam attachments to help with which bolts go where when reassembling. Note that the numbers do NOT correspond with the steps above. | ||
| + | [[Image:S2_Front_Clam_Attachments_small.jpg]] | ||
==Whilst She's Off== | ==Whilst She's Off== | ||
| − | + | Other jobs whilst the clam is off: | |
| + | * [[resistor pack|replace or relocate the cabin blower resistor pack]] | ||
| + | * [[replace the radiator & cooling fans]] | ||
| + | * [[replace the horn]] | ||
| + | * replace all standard bolts & washers with stainless steel. Visit Speedy Fasteners [http://www.speedyfasteners.com Speedy Fasteners Web Site] or [http://stores.ebay.co.uk/Speedy-Fasteners Speedy Fasteners eBay Site]. | ||
| + | * replace hoses | ||
| + | * replace towing arm | ||
| + | * cut down tights and cover air intake pipes to prevent debris blowing into the car | ||
==External Links== | ==External Links== | ||
| Line 42: | Line 122: | ||
http://freespace.virgin.net/adrian.rose/clamnotes.htm | http://freespace.virgin.net/adrian.rose/clamnotes.htm | ||
| + | |||
| + | [[Category:Body]] | ||
| + | [[Category:DIY]] | ||
| + | [[Category:Lotus Elise]] | ||
| + | [[Category:S2]] | ||
Latest revision as of 00:20, 10 July 2019

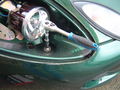
The front clamshell is a bonded assembly of several glass fibre composite mouldings incorporating both front wings, the front access aperture, radiator air intake and headlamp housings. The clamshell is secured to the windscreen frame, radiator mounting panel and other panels using threaded fasteners for ease of removal and to facilitate service access and body repair.
This article provides a step-by-step procedure to facilitate in the removal of the front clamshell to enable maintenance work to be carried out.
The time required is very dependant upon your competence with a spanner and how rusty the bolts are holding the clamshell on. However, SELOC members have commented on timescales of under half an hour!
The procedure is relatively simple given the fact your dismantling the front of your car. Only a few basic tools are required but a slow, methodical approach is highly recommended.
Procedure
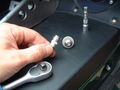
1. Remove both front body access panels
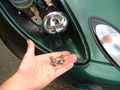
2. Remove both front wheelarch liners

Nearside wheelarch liner has a couple of electrical components bolted to it
Just loosen the liner on the nearside


- Before you can do this the car needs to be raised and supported on the two front jacking points.
- It is not necessary to completely remove the nearside liner. It has a relay and fuse box bolted to it and these would need to be removed first (they are not on a clip like the offside). Easier to just looses its fixing bolts for access to the clamshell securing bolts.
3. Remove both door hinge cover panels
Don't obscure the panels lower bolt access holes
Amazing how much crap gathers within the panels


- If you use boxes of paper to support the car make sure the access holes for the panel are not obscured!
- It is not absolutely necessary to remove these panels. All you really need to do is remove the foremost, and slacken the rearmost, of the two screws securing the door hinge cover panel to the clamshell.
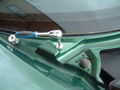
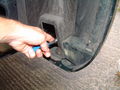
4. Via each door aperture, remove the single fixing securing a bracket at the top rear corner of the clamshell to the base of the windscreen pillar
Easy access for the ratchet on this one
The bolt has a 5mm Hex head or possibly 5mm Star Head


5. Remove the fixing at each side securing the clamshell to the bottom of the windscreen frame, and the two nuts securing the clamshell spine to the wiper motor bracket extension
Perhaps the easiest bolts to remove in the whole job!
Slightly harder to access these bolts but still very manageable
There are two 10mm bolts and washers to remove here


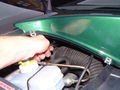
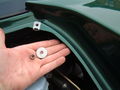
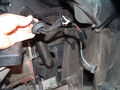
6. Remove the single fixing at the bottom front of each wheelarch, securing the clamshell to the radiator panel extension
Easy access with the ratchet and 8mm socket
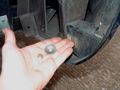
Note the large washer used on this fixing


7. Remove the headlamp cover/mask assembly from each side. Remove the clamshell fixing at the front of each headlamp housing. Release the headlamp harnesses, and feed through the clamshell hole
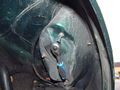
Remove the thee, 5mm hex head, bolts from within the wheelarch securing the mask assembly
Note the top both has a washer to spread the load
5mm hex head again with short extension bar
These are the same bolts as used in step 5
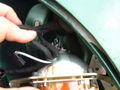
Force the rubber grommet and wires back through the clamshell
Just leave them dangling within the wheelarch


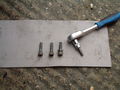
8. Beneath the nose, release the screws fixing the front lower edge of the clamshell to the alloy undertray
Use a 8mm socket for removing the three bolts

- I went further and actually removed the front undertray. It's not necessary for removal but you'll struggle to put the clam back on with the front undertry still in place.
9. Lift the clamshell from the car. Note any spacing washers or shims fitted at any fixing point
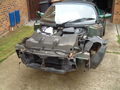
What it looks like
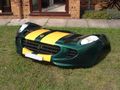
The clamshell off the car


- Some additional actions required before attempting to lift the clamshell from the car not listed in the original instructions.
- Unplug the wires going to the alarm switches on both front access cover panels.
- Remove and unplug both indicators from the clamshell.
The plastic screws sometimes will not come out so just carefully pry them out rather than unscrew (if they don't unscrew that is). You may need to replace some of these.
Just take your time and think about what you are doing and it will be fine.
---Notes/differences for the 2007-on Elise "S"---
1. No electrical boxes on the clam (ergo, easier to pull the whel lining out to make more space to work)
2. Most fittings were for an 8mm or 10mm socket
3. Not necessary to remove the door hinge cover panels but its very easy to do so
4. The 07 model (and possibly models thereafter), have a different headlamp arrangment to the one in the wiki. In the 07 "s", there are 3x17mm nuts and one 8mm nut to remove. You then disconnect the plugs, and push the whole unit out of the clam, resting it back in place when removed.
5. In addition to the single 10mm fixing at the bottom front of the clam, there is a 5mm Hex head nut underneath the bottom of the headlight unit.
Top Tips
- Remove driving lights. With them in place the clam can get hung up on the lights as the opening tapers to a smaller size. Can damage/crack the clam when removing.
- Never lift the clamshell from the car by yourself, you’ll crack it. Always get someone else to help and lift via the wheel arches
- The awkward bolts are those just behind the wheels that require the inner wheel arch to be pulled out to get access.
- Watch for the adjustment rivets between clamshell and mounting points (around the lid-aperture). Put them back where they were for alignment.
- When you get them back in at the end, don't push the rawlnuts through the holes, they will stay rolling around in the sill forever !
- Before refitting, remove the front undertray to make it easier to align the clam without having to worry about getting it 'under' the aluminium tray.
- Watch the towing bar eye doesn't get caught on the plastic grills.
- This picture shows all of the clam attachments to help with which bolts go where when reassembling. Note that the numbers do NOT correspond with the steps above.

Whilst She's Off
Other jobs whilst the clam is off:
- replace or relocate the cabin blower resistor pack
- replace the radiator & cooling fans
- replace the horn
- replace all standard bolts & washers with stainless steel. Visit Speedy Fasteners Speedy Fasteners Web Site or Speedy Fasteners eBay Site.
- replace hoses
- replace towing arm
- cut down tights and cover air intake pipes to prevent debris blowing into the car
External Links
http://www.sandsmuseum.com/cars/elise/experience/maintenance/frontclam/clamremoval.html