Difference between revisions of "Remove the undertray"
Jump to navigation
Jump to search
| Line 1: | Line 1: | ||
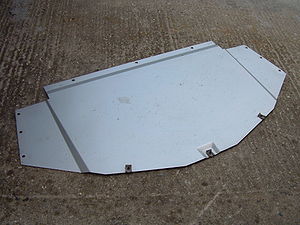
| − | [[ | + | [[Image:Remove the front undertray step 4.jpg|thumb|left|Topside of front undertray from Elise S2]] |
The front undertray needs to be removed for a variety of reasons such as to [[replace the anti-roll bar]], | The front undertray needs to be removed for a variety of reasons such as to [[replace the anti-roll bar]], | ||
| + | |||
| + | This undertray is very important as it brings rigidity to the whole front of the car. | ||
{{clr}} | {{clr}} | ||
| − | ==Procedure== | + | == Procedure == |
<gallery> | <gallery> | ||
Image:Remove the front undertray step 1.jpg|Remove the three screws (8mm socket) securing the undertray to the front clamshell | Image:Remove the front undertray step 1.jpg|Remove the three screws (8mm socket) securing the undertray to the front clamshell | ||
| − | Image:Remove the front undertray step 2.jpg| | + | Image:Remove the front undertray step 2.jpg|This shows the rear lip securing the undertray. |
Image:Remove the front undertray step 3.jpg|Remove the nine screws (8mm socket) securing the undertray to the chassis | Image:Remove the front undertray step 3.jpg|Remove the nine screws (8mm socket) securing the undertray to the chassis | ||
Image:Remove the front undertray step 4.jpg|Now slide the undertray forward, so the rear edge drops out of the lip, and then backwards to remove from the car | Image:Remove the front undertray step 4.jpg|Now slide the undertray forward, so the rear edge drops out of the lip, and then backwards to remove from the car | ||
</gallery> | </gallery> | ||
| + | |||
| + | * The rear three screws are secured with [http://www.loctite.com/int_henkel/loctite_uk/index.cfm Loctite]. | ||
| + | |||
| + | == Refitting == | ||
| + | Not easy to refit on your own, in fact, also impossible. | ||
| + | |||
| + | # From below, slide the undertray inside the clamshell. | ||
| + | #* Make sure it's the right way up! | ||
| + | # Key the rear of the undertray into the lip. | ||
| + | # Replace all 12 screws. | ||
Revision as of 21:04, 9 September 2006
The front undertray needs to be removed for a variety of reasons such as to replace the anti-roll bar,
This undertray is very important as it brings rigidity to the whole front of the car.
Procedure
- The rear three screws are secured with Loctite.
Refitting
Not easy to refit on your own, in fact, also impossible.
- From below, slide the undertray inside the clamshell.
- Make sure it's the right way up!
- Key the rear of the undertray into the lip.
- Replace all 12 screws.


