Difference between revisions of "Remove the undertray"
Jump to navigation
Jump to search
m |
|||
| (2 intermediate revisions by one other user not shown) | |||
| Line 1: | Line 1: | ||
| + | {{Infobox Timetools | ||
| + | |time = 5mins | ||
| + | |tools = 8mm Socket | ||
| + | }} | ||
| + | |||
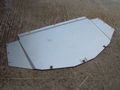
[[Image:Remove the front undertray step 4.jpg|thumb|left|Topside of front undertray from Elise S2]] | [[Image:Remove the front undertray step 4.jpg|thumb|left|Topside of front undertray from Elise S2]] | ||
The front undertray needs to be removed for a variety of reasons such as to [[replace the anti-roll bar]], | The front undertray needs to be removed for a variety of reasons such as to [[replace the anti-roll bar]], | ||
| Line 14: | Line 19: | ||
== Refitting == | == Refitting == | ||
| − | Not easy to refit | + | Not easy to refit without positioning yourself under the car. |
# From below, slide the undertray inside the clamshell. | # From below, slide the undertray inside the clamshell. | ||
| Line 23: | Line 28: | ||
[[Category:DIY]] | [[Category:DIY]] | ||
| + | [[Category:Body]] | ||
| + | [[Category:Lotus Elise]] | ||
| + | [[Category:S2]] | ||
Revision as of 14:42, 17 April 2007
| Time & Tools | |
| Time: | 5mins |
|---|---|
| Tools: | 8mm Socket |

The front undertray needs to be removed for a variety of reasons such as to replace the anti-roll bar,
This undertray is very important as it brings rigidity to the whole front of the car.
Procedure
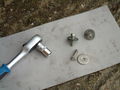
Remove the three screws (8mm socket) securing the undertray to the front clamshell
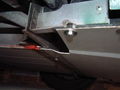
This shows the rear lip securing the undertray.
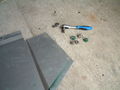
Remove the nine screws (8mm socket) securing the undertray to the chassis
Now slide the undertray forward, so the rear edge drops out of the lip, and then backwards to remove from the car


Refitting
Not easy to refit without positioning yourself under the car.
- From below, slide the undertray inside the clamshell.
- Make sure it's the right way up!
- Key the rear of the undertray into the lip.
- Replace all 12 screws.
- The rear three screws are secured with Loctite.