Resistor pack
The resistor pack is a very simple device which allows multiple fan speed settings from the same nominal 12V input. It has three 12V inputs and a single output, which is the motor feed.
Unfortunately due to the position Lotus have located the resister pack it is prone to high corrosion leading to eventual failure. The majority of failures are with the electrical crimp connections on the resistor pack and not the internals of the pack itself. Either way it needs to be replaced to restore full fan functionality again.
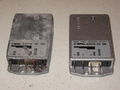
Old and new resistor pack. Note corrosion on motor feed.
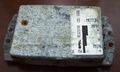
Some old packs look worse than others!

Motor feed gone high resistance, due to corrosion, and burnt out.
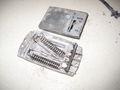
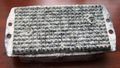
Resister pack taken apart. It's just a crude coil assembly giving resistance.


Any loss of single, multiple or all fan speed controls indicates resistor pack failure. You may loose a single fan speed setting earlier than another, but the most common connection to fail first is the motor feed leading to an abrupt loss of all speeds. You may also notice a burning smell inside the car because as the connections corrode they go 'high resistance' melting and burning the plastic shrouding.
Dealers may suggest this fix requires them to remove S2 front clamshell, but the following guide will show how it's possible to replace the pack through the passenger service panel on Rover engine cars only. Toyota engined cars need the clam removed due to the Brake Servo in the way of the heater/resistor pack, so cannot be accessed from the front service panels.
Lotus have released a modification kit which relocates the resistor pack inside the heater matrix, avoiding future corrosion, but this will require the removing the front clamshell.
- Resistor pack part number: A117P6000S
- Resistor pack with Modification kit part number: A120P0148S
DIY Replacement via service panel (non a/c only)
1. Remove obstructions above heater unit


Remove front access panels, radiator shroud panels and washer bottle. You might need to remove the heater pipes and jubilee clips as circled, though try it and see if they're in the way. There is one pipe each side and a bit of coolant will come out, not a lot. Make sure car isn't running!


As viewed from passenger side front wheel, detach white plug to heater flap, unscrew and remove the aluminium retaining bracket and unclip heater from blower.
2. Separate fan blower from heater unit

Pull the fan blower (near passenger side wheel) away from the heater. Stand up heater in the well so the hole is facing up. Very fiddley. Its at this point you'll discover whether disconnecting the heater pipes will give you some more room. You might also find that the wiring behind the radiator is also getting in the way - cut the two cable ties that hold it in place and then re-attach later.
3. Rotate fan blower unit

Heater now standing up (at top). Rotate blower (at bottom) around so that the resistor pack is facing up. Rotate towards the nearside front wheel (its further to rotate but theres less for it to foul on). Again, very fiddley
4. Replace resister pack

Resistor pack is attached with two screws (one you cant get at without removing the wiring). You might need to cut the wiring from the existing mass of molten/corroded connectors and attach new red female crimps. You might be able to salvage the existing shrouded female crimps if you simply cut/snap off the entire male connector from the old resistor pack, soak the crimp in plusgas/wd40 and then extract the remains of the male connector with snipe nose pliers. Once replaced rewire as shown. For additional peace of mind, consider a liberal application of grease over the connectors to prevent/delay future corrosion. Additionally, consider drilling 2 x 6mm holes in the bottom of the tub (1 at front, 1 at back, 6cm from either edge) beneath the blower to provide some drainage (as per lotus service bulletin).
Installation of Lotus Exige S2 heater fan fix : Cars with Aircon
Requires : 1 x Heater fan resistor replacement package (Elise S2) (A120P0148S)
Time : Around six hours to complete this job. Clamshell removal is the starting point.
Basic Steps :
- Discharge the aircon system from service point (requires removal of right rear air intake duct behind door).
- Remove front clamshell, water cover, wiper motor bracket and fuse box.
- Loosen wiring loom and disconnect HVAC thermostat and fan motor.
- Remove large air hose / duct from outlet of heater maitrix (top) to car vents.
- Remove air con hoses to and from expansion valve (located on top /rear of heater matrix)
- Gently bend the brake hose from master cylinder up and out of the way.
- Remove vacuum hose from servo (pull out the rubber stopper from servo case with hose)
- Remove water hoses into heater matrix (gently, the hoses will feel welded on but the connecting pipes are only packed into the top of the box with silicon sealant).
- Once clear as below, you should be able to unclip the heater assembly from the fan and withdraw the heater and evaporator unit diagonally in one piece.
- Remove the heater fan unit from the car. It is not unusal to find the floor of this chamber, flooded, we will drill holes later to fix this.
- Remove silver resistor block from fan unit and discard.
- This is a good time to apply 12v direct to fan motor to ensure that motor is operational before you go to all the trouble of re-installing a defective one.
- Installation of the lotus modification kit per other instructions on this page and the technical service bulletin that comes with the kit. Assemble the heater fan and modified HVAC unit together and test for fit.
- Drill drainage holes into the 4 corners of the front HVAC chamber if you have not already done so.
Installation is the reverse. First locate the heater fan into oen end of the HVAC chamber. Then install the heater unit - NOTE : there is a small a/c drainage hose that needs to be reconnected to the bottom of the heater matrix whilst inserting the unit into the car.
Finally, clip the heater and fan assembly together in situ, reconnect all hoses for water and check for leaks.
Repressurise aircon and check for leaks (mine leaked at the mounting point where the aircon pipe from the sill connects to the front pipework).
Finally reinstall clamshell and other components per the service manual.

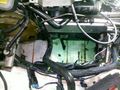
Clamshell off
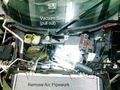
Pipework
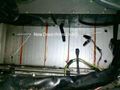
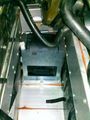
Flooded

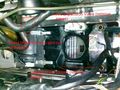
Resistor block modification - fan plate installed

assembled heater matrix and new resistor pack
Holes in HVAC chamber drilled
Heater Fan in place
Kit installed and mounted into HVAC chamber


Installing Lotus modification kit
Ugraded resistor pack kit, which includes two plates (heater matrix and blower) with one having the new resistor pack hidden on the back. Pack also has jumper cable, replacement protective material and rivets. Front Clam needs to be removed to fit this.
EDIT: The image below seems to show the foam stuck to the wrong side of the fan blower plate. Reading the TSB for this install suggests that it goes with the recesses parts over the studs on the reverse side, to seal the plate to the plastic blower unit.


