Smaller Rear View Mirror
If you drive a lot of twisty country roads you may have found that the JUMBO sized OEM rear view mirror gets in the way, obscuring a lot of the view out of the windscreen.
Daewoo mirror

A cheap alternative is to fit the mirror from a daewoo matiz (funny wee 3 cylinder shopping trolly, i'd guess most big scrappys would have a few crashed ones. - my local breaker in Glasgow had 5 today.

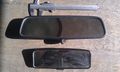
The pic shows the new one in place above and the old one below in comparison. - it doesn't look like an enormous difference in size, but it makes a BIG difference when you're driving the car!
This mod works for S1s and early S2s. These rear view mirrors have their ball joints in the centre of the back of the mirror. The mod does not work for 111Rs and S2 exiges. These have their ball joints on the top of the mirror. I don't know if it works for later K-engined S2s.
Instructions :
1 - remove lotus mirror, by sliding the whole thing (including its stalk) upwards towards the top of the windscreen. - it just slides up leaving a small flat mounting plate in place on the windscreen.
2 - remove the mirror from the stalk by popping the "ball and socket" joint out of joint, - just angle it too far in any direction forcably.
3 - find a Daewoo Matiz in a scrappy. - don't bother trying to remove the stalk and all from the windscreen (i couldn't manage), just dislocate the ball and socket joint in the same way. Just take the mirror leaving the stalk behind.
4 - put the new mirror face down on something soft like your seat, put the ball on the end of your Lotus stalk into the socket of the Daewoo mirror and shove downwards HARD untill it clicks into place.
5 - slide the whole thing back onto the windscreen mounting.
Bingo!
Mine cost me all of £3!!! It works a treat. Much improved visibility, and you retain the lever on the bottom to "dip" the mirror.
Notes
It seems the s1 mirror was changed at some stage - my '98 s1 has a small matiz-sized mirror fitted as standard.
The "big" OEM mirrors are ~235mm wide at widest point, the "small" OEM mirrors are about 205mm - measure yours first before you go rooting about in a scrap yard!
Other options: Child view mirrors
Another option is a stick-on mirror from halfords, easy to fit and also quite cheap.
Also try the one available from Mothercare!! Looks neater and ?better vision.
http://www.mothercare.com/gp/product/B000MCWY3M/ref=ts_1_3/026-7029686-0202023?ie=UTF8&mcb=core
Golf 2 mirror
Addition by Friso: There is some confusion about which kind of mirror is fitted to which cars, I suppose... At least my 2004 S2 111S had a GM mirror with the ball joint on top of the mirror.
Anyway: I've found a Golf 2 mirror to fit quite nicely. This mirror is even smaller than a Deawoo Matiz mirror and, more importantly, it fits on cars that have mirrors which have their ball joint on top.
GM and VW comparison.

VW mirror in-situ.


Instructions:
- Remove lotus mirror, by sliding the whole thing (including its stalk) DOWNWARDS. - it just slides down leaving a small mounting plate in place on the windscreen.
- Remove the mirror from the stalk by popping the "ball and socket" joint out of joint. I'd say lubricate it and pull straight out. (I don't know for certain, because my mirror just fell off its stalk.)
- Find a small mirror with it's ball joint on top in a scrappy. In my case I found a Golf 2 with a nice small mirror. I removed the stalk and mirror and separated them at home, using some WD40. I pulled straight out.
- Push the old stalk in the new mirror. I checked the size of both joints first. I'd say most of these joints are roughly the same size, but better safe than sorry.
- Slide the whole thing back onto the windscreen mounting.
Done!