Difference between revisions of "Track rod end"
Digimap2000 (talk | contribs) |
Digimap2000 (talk | contribs) |
||
| Line 6: | Line 6: | ||
'''Removal''' | '''Removal''' | ||
| − | Loosen the locknuts on the steering | + | Loosen the locknuts on the steering tie rod whilst the track rod end is still attached at the steering arm, this will stop it flopping around. A couple of spanners are all that's needed to back off the two locknuts one at a time. With the tie rod lock nuts released tackle the ball joint connecting it to the steering arm. |
Give the exposed thread below the nut a quick spray with lube. If you're really lucky the nut will undo all the way with no drama, more likely it'll go a few turns then start spinning the ball joint inside it's housing. Don't attempt any of the pry bar techniques on you tube, don't try jacking onto anything, the easy technique is a ratchet strap around the track rod end and lower wishbone. Doesn't have to be all that tight to stop the joint spinning and you can remove the locknut. | Give the exposed thread below the nut a quick spray with lube. If you're really lucky the nut will undo all the way with no drama, more likely it'll go a few turns then start spinning the ball joint inside it's housing. Don't attempt any of the pry bar techniques on you tube, don't try jacking onto anything, the easy technique is a ratchet strap around the track rod end and lower wishbone. Doesn't have to be all that tight to stop the joint spinning and you can remove the locknut. | ||
| − | Now put the locknut back on a few turns and tap with rubber mallet to release the joint. Remove the track rod counting the exact number of turns. | + | Now put the locknut back on a few turns and tap with rubber mallet to release the joint. Remove the track rod end counting the exact number of turns. |
'''Refitting''' | '''Refitting''' | ||
| − | Screw the track rod end back | + | Screw the track rod end back onto the tie rod with the same number of turns as it took to come off. |
| − | Reconnect the track rod end | + | Reconnect the track rod end down through the steering arm, you might need the ratchet strap again to stop the joint spinning. |
| − | Nip up the lock nuts against the | + | Nip up the tie rod lock nuts against the the track rod end. |
Revision as of 22:26, 8 May 2016
Track rod end
Removal
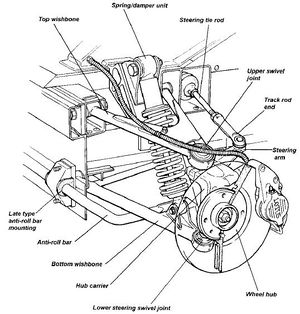
Loosen the locknuts on the steering tie rod whilst the track rod end is still attached at the steering arm, this will stop it flopping around. A couple of spanners are all that's needed to back off the two locknuts one at a time. With the tie rod lock nuts released tackle the ball joint connecting it to the steering arm.
Give the exposed thread below the nut a quick spray with lube. If you're really lucky the nut will undo all the way with no drama, more likely it'll go a few turns then start spinning the ball joint inside it's housing. Don't attempt any of the pry bar techniques on you tube, don't try jacking onto anything, the easy technique is a ratchet strap around the track rod end and lower wishbone. Doesn't have to be all that tight to stop the joint spinning and you can remove the locknut.
Now put the locknut back on a few turns and tap with rubber mallet to release the joint. Remove the track rod end counting the exact number of turns.
Refitting
Screw the track rod end back onto the tie rod with the same number of turns as it took to come off.
Reconnect the track rod end down through the steering arm, you might need the ratchet strap again to stop the joint spinning.
Nip up the tie rod lock nuts against the the track rod end.
