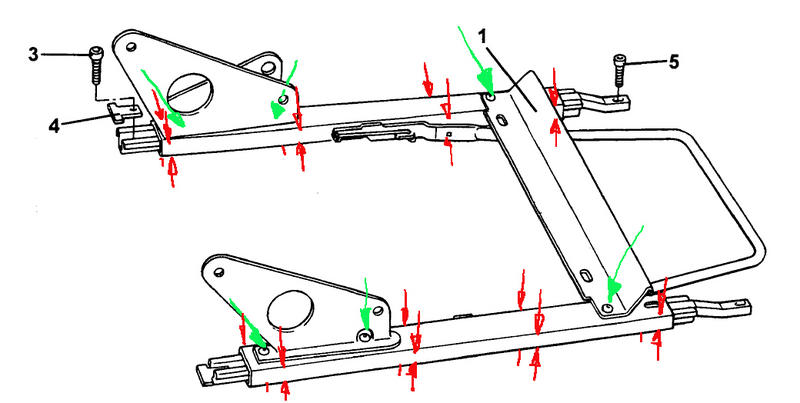
Seat frame adjustment
OK, not being one to admit defeat easily, I had the driver's seat out today to see what could be done to alleviate the slackness and noises in the seat runner mechanism. Once I'd taken the seat out and separated the runner from the seat, two things were very apparent:
- Every cap head screw holding the assembly together was loose (green arrows in diagram below). You might find that the four small hex-head set screws holding the cranked front mounts to the lower runner part are loose too. In my case they weren't, but I vaguely remember having to tighten them up ar some point in the past
- There was a lot of play in the upper and lower halves of the runner mechanism.
Fixing #1 is simple, although you might need to modify an allen key to do it (see point 3 below). To fix #2, here's what I did....
- Remove the cross beam holding the two runners together by undoing two cap head screws. Make a note of which holes the cross bar is bolted through - there are two positions on both sides. Strangely, mine was in the forward position on the right hand runner, and the rearward on the left hand runner. Given that all the holes lines up, I left it that way, even though it looks odd off the car.
- Release the two spring pins holding the adjuster bar into the runners. Then finagle the adjuster bar off each runner. Make sure you keep track of the trajectory the spring pin takes as it pings off the runner - it'll save hours of scrabbling about on your hands and knees later :)
- Undo the seat brackets on the rear of each runner by udoing two cap head screws per side. Make a note of which bracket came off which runner. One bracket has it's holes drilled so that it is offset on the runner when bolted up. For the right hand bracket, you may need to chop the end off an appropriate allen key in order to get it onto the screw - it'll be obvious why when you get it apart.
- Now that you have two virgin runners, you'll need some LM grease and a decent bench vice. Put the runners in the vice across the points marked with red arrows in the diagrams below, and tighten progressively and evenly along the length of the runner, on both sides. DO NOT GO TOO MAD ON THE FIRST ATTEMPT. Remove from the vice and check for movement. You are aiming for a slightly stiff running fit, with no slack between the upper and lower parts of the runner. It took me 4 or five goes, doing the vice up progressively tighter each time, to get to a good running fit.
- Once you've goth the fit right, pack the bearing space (red circle in 2nd diagram) with as much grease as you can squeeze in at both ends, slide it back and forth to get the bearings coated in grease - this will stop them rolling around in the runner and making that annoying "roll-ting" sound as you slow down and move off.
- Reassembly is the opposite of dismantling, as they say - all pretty simple.
Once I'd tightened everything back up and reinstalled the seat, around 90% of the interior rattles disappeared. The seat is pretty much rock-solid in the car and best of all, no "roll-ting" sound as I drive off.
Don't listen to people who say it can't be adjusted - Although the thing is obviously designed with a finite life, hopefully I'll get another 5 years or so out of it without having to cough up £80+ for the privilege

