Difference between revisions of "Replacing the throttle cable"
(Created page with " This guide relates to the '''S1 Elise''', other cars may differ. This is a time consuming operation, estimate 3 to 4 hours, its not that difficult but it is aquward. New fa...") |
|||
| (10 intermediate revisions by the same user not shown) | |||
| Line 3: | Line 3: | ||
This is a time consuming operation, estimate 3 to 4 hours, its not that difficult but it is aquward. | This is a time consuming operation, estimate 3 to 4 hours, its not that difficult but it is aquward. | ||
| + | |||
| + | I reccomend you have some ball ended allen keys (to remove the handbrake assembly if you need to) and a 1/4 inch socket set to get at the bolts under the gear leaver. | ||
New factory throttle cables seem to be longer than the original Lotus ones but there is enough adjustment to take up the slack induced (just). | New factory throttle cables seem to be longer than the original Lotus ones but there is enough adjustment to take up the slack induced (just). | ||
| − | [[File:Throttle Cable Length]] | + | [[File:Throttle Cable Length.jpg|300px|circa 1999 compared to 2019 production genuine throttle cables]] |
==Disassembly== | ==Disassembly== | ||
| Line 28: | Line 30: | ||
* clean up the linkage plate (probably a mess), lightly grease its pivots, and adjust the central fixing bolt so it moves freely with little play. | * clean up the linkage plate (probably a mess), lightly grease its pivots, and adjust the central fixing bolt so it moves freely with little play. | ||
* pull out the old throttle cable from the back of the car. If you are unlucky you may need to release the handbrake mechnism from the floor a little to allow the cable to slide through. | * pull out the old throttle cable from the back of the car. If you are unlucky you may need to release the handbrake mechnism from the floor a little to allow the cable to slide through. | ||
| − | |||
==Modifications== | ==Modifications== | ||
| − | I replaced the plastic push on the linkage plate with a brass one ( | + | I replaced the plastic push on the linkage plate with a brass one ([http://www.sandercock.com/elisebushinstructions.htm Sandercock bush]) This helps a little but doesn't make that much difference to the pedal feel IMHO, however it does have the advantage that it never needs to be replaced! |
I am now on my third throttle cable, despite keeping them lubricated regularly, so I decided (stealing the idea from a SELOC member [citation needed]) to re-route my cable away from the exhaust. I believe (I have no proof) that the heat from the exhaust denatures the plastic liner in the cable and this is what causes the cable to stick. | I am now on my third throttle cable, despite keeping them lubricated regularly, so I decided (stealing the idea from a SELOC member [citation needed]) to re-route my cable away from the exhaust. I believe (I have no proof) that the heat from the exhaust denatures the plastic liner in the cable and this is what causes the cable to stick. | ||
| − | The route I chose is to to run the cable around the offside end of the engine, inside the large alloy extrusion that the engine attaches to, it then curves down to the sheer plate and continues as before. I relocated the nylon P clip, drilling a small hole in the sheer plate, to | + | The route I chose is to to run the cable around the offside end of the engine, inside the large alloy extrusion that the engine attaches to, it then curves down to the sheer plate and continues as before. I relocated the nylon P clip, drilling a small hole in the sheer plate, to stop the cable from rattling on the undertray. |
| + | |||
| + | <gallery widths=500px heights=300px> | ||
| + | File:Throttle Cable New Route 1.jpg|New cable route, looking up past alternator belt | ||
| + | File:Throttle Cable New Route 2.jpg|New cable route, looking up at sheer plate | ||
| + | </gallery> | ||
| − | [[ | + | To compare here is the standard throttle cable routing, links to a third party site: [https://www.flickr.com/photos/noisymini/32599189017/in/album-72157669042016609/ cable routing, wide shot] [https://www.flickr.com/photos/noisymini/40575500333/in/album-72157669042016609/ cable routing, narrow shot]. Notice how close the throttle cable runs to the downpipe. |
If you decide to use this new route you will need to drill the sheer panel for the P clip and find an M2.5 (I think) nut and washer to fit the P-Clip's bolt. | If you decide to use this new route you will need to drill the sheer panel for the P clip and find an M2.5 (I think) nut and washer to fit the P-Clip's bolt. | ||
| − | My original throttle cable passed under the handbrake mechanism | + | My original throttle cable passed under the handbrake mechanism, I think this is just an artefact of the order in which the car was assembled. If you want to put it back this way you will have to cut (and later replace) several cable ties, unbolt the handbrake from its brackets to get the cable through. I didn't bother and simply ran the cable alongside the handbrake, on the passenger side. It then passes under the gear change leaver before passing up the footwell divider as before. |
| + | |||
| + | New throttle cables are supplied dry and I feel they should be lubricated before use. | ||
| + | |||
| + | I was advised by a supplier of motorbike cables advised me never to use WD40 on cables as it can make the nylon liners swell and grip the cable. I was surprised at this but I just follow his advice - always use "Duck oil" and a Motorcycle cable oiler. | ||
| + | |||
| + | To get the cable oiler to seal onto the engine end of the cable I always wrap a bit of insulation tape around the end of the cable adjuster and also a bit around the inner wire. If you get this right the seal on the cable is pretty good and the aerosol can drive the oil down the cable qith little leakage. | ||
| + | |||
| + | [[File:Throttle Cable Oiling.jpg]] | ||
==Reassembly== | ==Reassembly== | ||
| Line 48: | Line 62: | ||
I have always started from the engine end. | I have always started from the engine end. | ||
* attach the throttle cable to the throttle cab and adjust the cable for the minimum slack (stops the tail of the inner flapping about as you try to thread it back through the car. | * attach the throttle cable to the throttle cab and adjust the cable for the minimum slack (stops the tail of the inner flapping about as you try to thread it back through the car. | ||
| − | * pass the cable back under (or beside if | + | * pass the cable back under (or beside if following the modified route) the engine. |
| − | * if you are keeping the | + | * if you are keeping the standard cable routing, ensure the silver heatshield sits under the engine and especially where the cable passes close the exhaust pipe. |
| + | * If you are using the modified route, use the silver heatshield to protect the cable as it passes through the aluminium extrusion, and ensure it covers the cable up to the rear bulkhead/sheer plate. | ||
* poke the end of the cable through the small hole next to the gear cables - this may take a few attempts. | * poke the end of the cable through the small hole next to the gear cables - this may take a few attempts. | ||
| − | * thread the cable under (this is the time consuming bit) or around the handbrake as you chose. | + | * thread the cable under (this is the time consuming bit) or, if your are lazy, around the handbrake as you chose. |
| − | * re-attach the cable to the throttle linkage plate | + | * re-attach the cable to the throttle linkage plate and clip the cable abutments in place. |
| − | * when replacing the central divider make sure it passes on the correct sides of the various flanges that hold it | + | * when replacing the central divider make sure it passes on the correct sides of the various flanges that hold it. witness marks on the divider should indicate where contact was made before. |
| − | * replace the handbrake cover and gear leaver cover and knob | + | * replace the handbrake cover and gear leaver cover, and gear knob |
* replace the undertray | * replace the undertray | ||
| − | Before you start the car get someone to check the cable adjustment with you. There should be a tiny amount of slack in the cable | + | Before you start the car get someone to check the cable adjustment with you. |
| + | There should be a tiny amount of slack in the cable at idle, and with your foot on the floor the throttle should be wide open. | ||
| − | Just to be extra sure (should not be necessary) do the 5 stamp reset | + | Just to be extra sure (this should not be necessary) do the 5 stamp reset. Turn on the ignition, press fully and release the throttle 5 times, then turn off the ignition and wait until the engine management light goes out. |
Latest revision as of 22:05, 4 November 2019
This guide relates to the S1 Elise, other cars may differ.
This is a time consuming operation, estimate 3 to 4 hours, its not that difficult but it is aquward.
I reccomend you have some ball ended allen keys (to remove the handbrake assembly if you need to) and a 1/4 inch socket set to get at the bolts under the gear leaver.
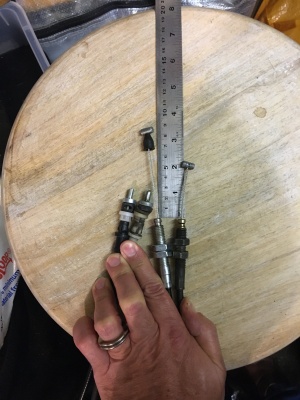
New factory throttle cables seem to be longer than the original Lotus ones but there is enough adjustment to take up the slack induced (just).
Disassembly
- disconnect the Throttle cable from the engine by loosening the adjuster and unclipping the cable from the cam on the throttle
- If you have a 111S you may need to loosen the clip that holds the throttle cable to the inlet plenum to detach the cable.
- Raise the rear of the car on jacks or ramps and remove the rear undertray, not free the cable under the engine:
- remote the large P clip holding the throttle cable to the base of the sump
- remove the small nylon P clip holding the throttle cable to the sheer plate in front of the engine.
- Now sit in the drivers seat.
- remove the plastic trim screws on either side of the gear leaver cowling - one is inside the pocket.
- Remove the gear knob
- lift the gear leaver cowling over the gear leaver
- remove the trim screw at the back of the handbrake cover (under the ultrasonic alarm housing).
- wriggle up the handbrake leaver trim and pull it (gently) over the handbrake handle - it does fit and mine didn't break, it seems to be more flexible that you might expect but it is a bit scray. I used a screwdriver to help prise the handbrake trim over the handle.
- remove the four plastic trim screws holding the footwell divider in place - two are at the top of the divider and you will need to be head-first under the dash to do this.
- remove the footwell divider
- remove the throttle linkage plate under the dashboard - two pozi P2 screws.
- pop off one of the ball and socket joints to the throttle pedal so you can free the plate.
- Cut the nipple off the throttle cable. It is much easier to get the old cable out if you just cut it.
- remove the cable abutments (plastic mouldings) from the plate (the new cable has new abutments) - most easily done by squeezing them with a pair of long nosed pliers.
- clean up the linkage plate (probably a mess), lightly grease its pivots, and adjust the central fixing bolt so it moves freely with little play.
- pull out the old throttle cable from the back of the car. If you are unlucky you may need to release the handbrake mechnism from the floor a little to allow the cable to slide through.
Modifications
I replaced the plastic push on the linkage plate with a brass one (Sandercock bush) This helps a little but doesn't make that much difference to the pedal feel IMHO, however it does have the advantage that it never needs to be replaced!
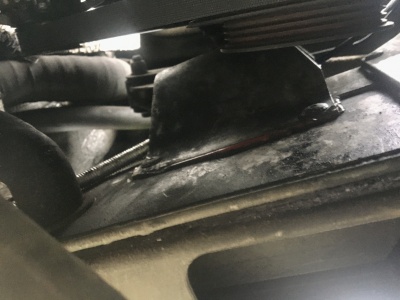
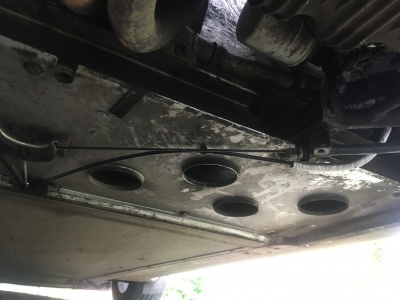
I am now on my third throttle cable, despite keeping them lubricated regularly, so I decided (stealing the idea from a SELOC member [citation needed]) to re-route my cable away from the exhaust. I believe (I have no proof) that the heat from the exhaust denatures the plastic liner in the cable and this is what causes the cable to stick.
The route I chose is to to run the cable around the offside end of the engine, inside the large alloy extrusion that the engine attaches to, it then curves down to the sheer plate and continues as before. I relocated the nylon P clip, drilling a small hole in the sheer plate, to stop the cable from rattling on the undertray.
To compare here is the standard throttle cable routing, links to a third party site: cable routing, wide shot cable routing, narrow shot. Notice how close the throttle cable runs to the downpipe.
If you decide to use this new route you will need to drill the sheer panel for the P clip and find an M2.5 (I think) nut and washer to fit the P-Clip's bolt.
My original throttle cable passed under the handbrake mechanism, I think this is just an artefact of the order in which the car was assembled. If you want to put it back this way you will have to cut (and later replace) several cable ties, unbolt the handbrake from its brackets to get the cable through. I didn't bother and simply ran the cable alongside the handbrake, on the passenger side. It then passes under the gear change leaver before passing up the footwell divider as before.
New throttle cables are supplied dry and I feel they should be lubricated before use.
I was advised by a supplier of motorbike cables advised me never to use WD40 on cables as it can make the nylon liners swell and grip the cable. I was surprised at this but I just follow his advice - always use "Duck oil" and a Motorcycle cable oiler.
To get the cable oiler to seal onto the engine end of the cable I always wrap a bit of insulation tape around the end of the cable adjuster and also a bit around the inner wire. If you get this right the seal on the cable is pretty good and the aerosol can drive the oil down the cable qith little leakage.
File:Throttle Cable Oiling.jpg
Reassembly
I have always started from the engine end.
- attach the throttle cable to the throttle cab and adjust the cable for the minimum slack (stops the tail of the inner flapping about as you try to thread it back through the car.
- pass the cable back under (or beside if following the modified route) the engine.
- if you are keeping the standard cable routing, ensure the silver heatshield sits under the engine and especially where the cable passes close the exhaust pipe.
- If you are using the modified route, use the silver heatshield to protect the cable as it passes through the aluminium extrusion, and ensure it covers the cable up to the rear bulkhead/sheer plate.
- poke the end of the cable through the small hole next to the gear cables - this may take a few attempts.
- thread the cable under (this is the time consuming bit) or, if your are lazy, around the handbrake as you chose.
- re-attach the cable to the throttle linkage plate and clip the cable abutments in place.
- when replacing the central divider make sure it passes on the correct sides of the various flanges that hold it. witness marks on the divider should indicate where contact was made before.
- replace the handbrake cover and gear leaver cover, and gear knob
- replace the undertray
Before you start the car get someone to check the cable adjustment with you. There should be a tiny amount of slack in the cable at idle, and with your foot on the floor the throttle should be wide open.
Just to be extra sure (this should not be necessary) do the 5 stamp reset. Turn on the ignition, press fully and release the throttle 5 times, then turn off the ignition and wait until the engine management light goes out.


