Difference between revisions of "Fibreglass repair"
m (→Safety) |
|||
| (19 intermediate revisions by 5 users not shown) | |||
| Line 1: | Line 1: | ||
| − | === | + | ===Fibreglass repair=== |
| − | Elise and Exige clams are made of glass | + | |
| + | Elise and Exige clams are made of glass fibre and polyester resin. Lotus have used two methods, in the S1 and S2 Exige the glass fibre is hand laid and in the S2 Elise they have employed a system that injects polyester resin and glass fibre into a mould and the sections are then assembled at Hethel. The hand laid clams are slightly thicker, heavier but stronger than the clams the use the injected method. | ||
| + | |||
| + | ===Gel coat=== | ||
| Line 7: | Line 10: | ||
| − | |||
| − | + | ===Safety=== | |
| + | |||
| + | When working with glass fibre it is best to use a dust mask and eye protection, whilst preparing the area for repair and working with the material (due to the possible long term health effects of fibre inhalation). | ||
| + | The glass fibres and resins come together to form a strong, light composite material. | ||
| − | |||
| − | '''Glass | + | '''Glass fibre''' |
comes in several forms which are used for different purposes: | comes in several forms which are used for different purposes: | ||
| − | + | Tissue | |
| − | |||
| − | |||
| − | + | Chopped strand matting | |
| + | Woven | ||
'''Resins''' | '''Resins''' | ||
| Line 33: | Line 36: | ||
epoxy | epoxy | ||
| − | higher toughness | + | higher toughness than polyester |
additional reinforcement | additional reinforcement | ||
| − | + | aluminium mesh | |
| + | ===Repair thickness=== | ||
| − | |||
| + | '''Masking off the undamaged area''' | ||
| − | |||
mask off using plastic bin bags secured to the body with masking tape. Mask off an area much larger than you think, resin is very messy and if it gets on the paint it will cause damage. | mask off using plastic bin bags secured to the body with masking tape. Mask off an area much larger than you think, resin is very messy and if it gets on the paint it will cause damage. | ||
| − | |||
| + | ===Surface preparation=== | ||
| + | |||
| + | The first step it to try and maximise the access to the site you are attempting to repair. Some repairs can only be performed with the clam removed. | ||
| − | + | [[Remove S2 front clamshell]] | |
| − | |||
| − | The area that has been damaged may extend further than the surface damage would suggest. The area around the damage needs to be removed. The fastest way is to use an electric grinding tool such as a dremmel so carefully file back the broken | + | The area that has been damaged may extend further than the surface damage would suggest. The area around the damage needs to be removed. The fastest way is to use an electric grinding tool such as a dremmel so carefully file back the broken fibre glass. A shallow wedged edge should be created around the damage to give a larger surface for the repair to bond to. |
chemicals | chemicals | ||
| Line 62: | Line 66: | ||
| − | Working in confined areas such inside the boot can be | + | Working in confined areas such inside the boot can be awkward. One method to make life easier is to prepare the fibreglass and resin on top of a sandwich bag on a flat surface and then use it like a glove to transfer apply the fibreglass and then to smooth it into position. |
| + | |||
| + | ===Finishing=== | ||
| + | |||
| + | |||
| + | |||
| + | |||
| + | ===A walk through of a repair=== | ||
| + | |||
| + | |||
| + | The First step is being able to get behind the damaged area (if possible). | ||
| + | |||
| + | |||
| + | Then Drill out the end of each crack to stop it propagating | ||
| + | (It is still debated if this needs to be done or not) | ||
| + | '''Please Add Info''' | ||
| + | |||
| + | [[image:drillholes.jpg|thumb|left|Click me to view larger]] | ||
| + | {{clr}} | ||
| + | |||
| + | Then use a dremmel to remove all the badly damaged and 'powdered' fibreglass, and to 'V' out the track of each crack from the outside. | ||
| + | |||
| + | |||
| + | |||
| + | [[image:dremmelcracks.jpg|thumb|left|Click me to view larger]] | ||
| + | {{clr}} | ||
| + | |||
| + | |||
| + | Then with the dremmel again (or with a grinder) rub down a few inches around the inside of the cracks. | ||
| + | |||
| + | |||
| + | [[image:sanddown.jpg|thumb|left|Click me to view larger]] | ||
| + | {{clr}} | ||
| + | |||
| + | |||
| + | Now use your polyester resin and chopped strand mat and repair on the inside. Build up a few layers of mat and resin. This is the strength of the repair. | ||
| + | |||
| + | For any areas of significant fibreglass loss (such as the front "chin" spoilers and some jacking damage to my nearside sill) it may be worth strengthening the repair with strips of aluminium +/- aluminium mesh, worked in between layers of matting. These strips of aluminium (about 1" wide) should be bent to shape, and then screwed into place (clamping wet matting before it sets) using countersunk screws in from the outside of the clam. The screw heads can then be completely covered with resin from the outside, leaving them invisible once filled and painted. | ||
| + | |||
| + | |||
| + | |||
| + | [[image:resin.jpg|thumb|left|This was about 3 layers in total]] | ||
| + | {{clr}} | ||
| + | Then with the inside repair done start on the outside. | ||
| + | Building up layers of CSM matting wherever possible, and fibreglass tissue everywhere else, get a couple of layers into all the 'V' shaped channels you dremmeled earlier. | ||
| + | Now comes a lot of sanding to bring it all down so there were no bits of resin left proud. | ||
| + | [[image:sanddown2.jpg|thumb|left|Click me to view larger]] | ||
| + | {{clr}} | ||
| − | + | Leave the final filling with putty and sanding to the body shop | |
| + | ===See Also=== | ||
| + | http://forums.seloc.org/t/114868 | ||
| + | http://forums.seloc.org/t/102885 | ||
| + | http://forums.seloc.org/t/32837 | ||
| − | + | http://forums.seloc.org/t/89620 | |
| − | + | [[Category:Body]] | |
Latest revision as of 21:09, 20 February 2008
Fibreglass repair
Elise and Exige clams are made of glass fibre and polyester resin. Lotus have used two methods, in the S1 and S2 Exige the glass fibre is hand laid and in the S2 Elise they have employed a system that injects polyester resin and glass fibre into a mould and the sections are then assembled at Hethel. The hand laid clams are slightly thicker, heavier but stronger than the clams the use the injected method.
Gel coat
XXX unsure on repair implication
Safety
When working with glass fibre it is best to use a dust mask and eye protection, whilst preparing the area for repair and working with the material (due to the possible long term health effects of fibre inhalation).
The glass fibres and resins come together to form a strong, light composite material.
Glass fibre
comes in several forms which are used for different purposes:
Tissue
Chopped strand matting
Woven
Resins
several resin bases are used
polyesters
epoxy higher toughness than polyester
additional reinforcement
aluminium mesh
Repair thickness
Masking off the undamaged area
mask off using plastic bin bags secured to the body with masking tape. Mask off an area much larger than you think, resin is very messy and if it gets on the paint it will cause damage.
Surface preparation
The first step it to try and maximise the access to the site you are attempting to repair. Some repairs can only be performed with the clam removed.
The area that has been damaged may extend further than the surface damage would suggest. The area around the damage needs to be removed. The fastest way is to use an electric grinding tool such as a dremmel so carefully file back the broken fibre glass. A shallow wedged edge should be created around the damage to give a larger surface for the repair to bond to.
chemicals acetone
Working in confined areas such inside the boot can be awkward. One method to make life easier is to prepare the fibreglass and resin on top of a sandwich bag on a flat surface and then use it like a glove to transfer apply the fibreglass and then to smooth it into position.
Finishing
A walk through of a repair
The First step is being able to get behind the damaged area (if possible).
Then Drill out the end of each crack to stop it propagating
(It is still debated if this needs to be done or not)
Please Add Info
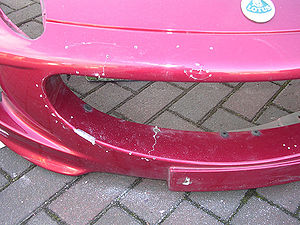
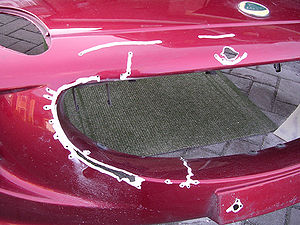
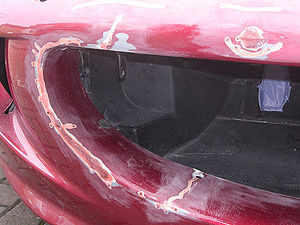
Then use a dremmel to remove all the badly damaged and 'powdered' fibreglass, and to 'V' out the track of each crack from the outside.
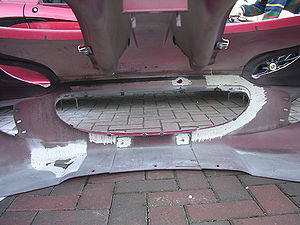
Then with the dremmel again (or with a grinder) rub down a few inches around the inside of the cracks.
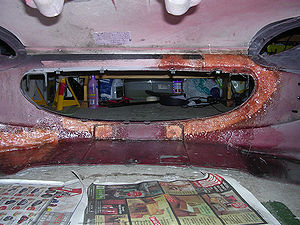
Now use your polyester resin and chopped strand mat and repair on the inside. Build up a few layers of mat and resin. This is the strength of the repair.
For any areas of significant fibreglass loss (such as the front "chin" spoilers and some jacking damage to my nearside sill) it may be worth strengthening the repair with strips of aluminium +/- aluminium mesh, worked in between layers of matting. These strips of aluminium (about 1" wide) should be bent to shape, and then screwed into place (clamping wet matting before it sets) using countersunk screws in from the outside of the clam. The screw heads can then be completely covered with resin from the outside, leaving them invisible once filled and painted.
Then with the inside repair done start on the outside. Building up layers of CSM matting wherever possible, and fibreglass tissue everywhere else, get a couple of layers into all the 'V' shaped channels you dremmeled earlier.
Now comes a lot of sanding to bring it all down so there were no bits of resin left proud.
Leave the final filling with putty and sanding to the body shop
See Also
http://forums.seloc.org/t/114868
http://forums.seloc.org/t/102885
