Difference between revisions of "Heater Matrix"
(Add infobox) |
Lithopsian (talk | contribs) (new link for EP matrix, although currently out of stock) |
||
| (26 intermediate revisions by 7 users not shown) | |||
| Line 1: | Line 1: | ||
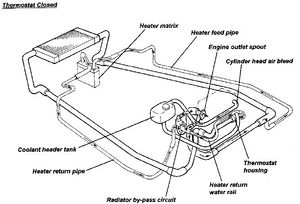
| − | + | [[Image:Thermostat closed.JPG|thumb|right|Cooling system showing the location of the matrix just behind the radiator]] | |
| − | The heater matrix is a small radiator through which the [[coolant]] runs and warms the air which enters the cabin. On the S1, it is located on the driver's side, near the battery. The heater matrix is mounted vertically to the side of the blower fan unit. | + | The heater matrix is a small radiator through which the [[coolant]] runs and warms the air which enters the cabin. On the S1, it is located on the driver's side, near the [[battery]]. The heater matrix is mounted vertically to the side of the blower fan unit. |
When the matrix fails, coolant leaks out of it's pipes and into the heater system, resulting in a fine mist entering the cabin through the ventilation system and misting up the windscreen. With a badly failed matrix, a micro-climate can form in the passenger footwell with mist rising and falling whilst driving. | When the matrix fails, coolant leaks out of it's pipes and into the heater system, resulting in a fine mist entering the cabin through the ventilation system and misting up the windscreen. With a badly failed matrix, a micro-climate can form in the passenger footwell with mist rising and falling whilst driving. | ||
| + | |||
| + | A replacement heater matrix can be purchased from [https://www.eliseparts.com/shop/heating-ventilation/s1-elise-exige-heater-matrix-a111p6011f/ EliseParts] (part no AW38506, manufactured by KL Automotive, 01827 300 100). | ||
| + | |||
| + | Alernatively a pattern part for the S1 heater matrix matrix can be obtained from http://www.demisterman.co.uk/ (The matrix also is identical to that used on the TX2 London black cab) | ||
| + | |||
| + | elise-shop.com has developed a [http://www.elise-shop.com/heater-matrix-standard-or-upgraded-elise-exige-p-446.html high capacity heater matrix] which has 30% more capacity, but same shape, yet thicker than the original heater matrix. | ||
== Replacing the heater matrix == | == Replacing the heater matrix == | ||
| − | [[Image: | + | {{Infobox Timetools|time=4 - 6 hours|tools=Torx T10 screwdriver, socket set, telescopic magnetic device, glue for the plastic matrix cover, new heater matrix}} |
| + | |||
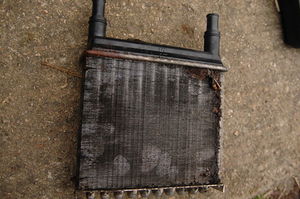
| + | [[Image:1999EliseHeaterMatrix.JPG|thumb|left|Photo of an old failing heater matrix from a late 1999 S1 Elise. Note the bending of the matrix elements where the rivets were driven into the side of the plastic case.]] | ||
| + | |||
This is a tricky job due to the location of the matrix and the position of the screws holding it in place. | This is a tricky job due to the location of the matrix and the position of the screws holding it in place. | ||
| − | First, [[Replace the coolant|empty the system of coolant]]. This can be done by first unscrewing the coolant reservoir tank cap, then removing the drivers-side wheelarch liner ([[Remove the wheels|remove the wheel]] first!) and undo the radiator feed hose. Drain into a bucket and dispose of safely. The radiator hose and wheelarch liner can be refitted as this side of the car doesn't need to be accessed again. | + | First, [[Replace the coolant|empty the system of coolant]]. This can be done by first unscrewing the coolant reservoir tank cap, then removing the drivers-side wheelarch liner ([[Remove the wheels|remove the wheel]] first!) and undo the [[radiator]] feed hose. Drain into a bucket and dispose of safely. The radiator hose and wheelarch liner can be refitted as this side of the car doesn't need to be accessed again. Some people have reported successfully replacing the matrix without draining the system of coolant by clamping the feed and return hoses before disconnecting them from the matrix and then filling the new matrix with coolant via a funnel. |
Next remove the plastic radiator cowl/surround with a Torx T10 screwdriver and [[Battery#S1_Fitting|remove the battery]]. | Next remove the plastic radiator cowl/surround with a Torx T10 screwdriver and [[Battery#S1_Fitting|remove the battery]]. | ||
=== Removing the matrix unit === | === Removing the matrix unit === | ||
| + | |||
| + | Some vehicles have the matrix/blower assembly held together by an rubber band as shown in the workshop manual. Other vehicles have the two held together by a metal bracket and nut on both the top and bottom. These instructions describe removal of the matrix when the matrix/blower assembly are held together with the metal bracket. | ||
It may be possible to bust the two rivets on one side of the matrix cover to allow the matrix to be removed without unscrewing the matrix/blower assembly. If this is possible, it will significantly reduce the disassembly/assembly time. If not, follow the procedures below: | It may be possible to bust the two rivets on one side of the matrix cover to allow the matrix to be removed without unscrewing the matrix/blower assembly. If this is possible, it will significantly reduce the disassembly/assembly time. If not, follow the procedures below: | ||
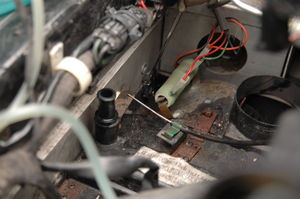
| − | The matrix/blower assembly is held in place by 4 screws. Remove the metal | + | [[Image:1999EliseMatrixBlowerAssembly.jpg|thumb|right|This model has a single green ceramic terminal block and a metal bracket and nut holding the matrix case to the blower case. Earlier S1 models varied. |
| + | |||
| + | You can see a spanner to the left of the green ceramic block removing one of the bolts holding the blower to the chassis. ]] | ||
| + | The matrix/blower assembly is held in place by 4 screws. Remove the metal [http://www.eliseparts.com/products/show/84/166/flexible-heater-ducting/ flexible heater ducting] and the hoses into and out of the matrix itself. One of the screws is just inside the outlet from the blower where the hose attached. Two are into the bulkhead below the radiator behind the cylindrical green ceramic terminal block. And the fourth is closer to the battery again into the bulkhead below the radiator. It's easiest if you remove the green ceramic terminal block - it's simply held on by the metal at each end which can be squeezed together and pulled out of the center of the green cylinder. Early Elise models had 3 cylindrical terminal blocks mounted on the blower. Later models had just one. | ||
| + | |||
| + | The wire which controls the hot/cold flap sits on top of the assembly. It cannot be removed while the cable is held by the spring clip and the flap arm is attached. Either lever off the surprisingly strong sprung metal clip or remove the attachment on top of the flap lever, and then the S-shaped end of the wire can be removed from the control armature. The flap lever is held on with a #10 UNF grub screw (3/32" allen key) and if this is not rusted solid then the arm itself will be corroded on to the flap. | ||
| − | The | + | Once the matrix/blower assembly is free, it may still not be possible to get the unit out of the vehicle. The [http://www.eliseparts.com/products/show/61/182/heater-blower-fan/ blower] is connected to the matrix by a metal strip and nut both on the top and the bottom of the assembly. As the matrix/blower assembly is now free and has a certain degree of rotation within the car, the matrix can be separated from the blower by undoing the nut and rotating the metal strip about 30 degrees. The metal strip on the bottom of the assembly is identical. The nuts are prone to rounding or shearing, in which case you will need to drill-out the rivet instead. |
| − | + | With the matrix separated from the blower, you can now remove the matrix from the car. To aid removal, you may need to: | |
| − | + | * Rotate the matrix around and extract it upside down | |
| + | * Remove the front services compartment latch and alarm sensor | ||
| + | * Remove the battery clamp and slide the battery as far out of the way as possible | ||
| + | * Unclip all wiring beside the radiator and pull it on top of the radiator | ||
The matrix unit is held within a plastic case which is riveted and can be glued on the bottom. Take care to remove the rivets without damaging the plastic too much - you only need to remove one pair of rivets as this will allow the plastic to bend enough to remove the matrix. | The matrix unit is held within a plastic case which is riveted and can be glued on the bottom. Take care to remove the rivets without damaging the plastic too much - you only need to remove one pair of rivets as this will allow the plastic to bend enough to remove the matrix. | ||
| + | |||
| + | === Repainting the metalwork === | ||
| + | |||
| + | Whilst you have the matrix assembly out you may want to repaint it. The rivets must be drilled out to remove the brackets and blower fan. The parts can then be stripped and repainted. POR15 is recommended for this as Hammerite is rather smelly and will make the hot air supply equally smelly for several months. [[Image:Heater Components.jpeg|thumb|left|Repainted heater matrix parts]] | ||
| + | |||
| + | === Blower motor === | ||
| + | The blower motor is manufactured by Gate, part number MP5620/HW1. They are available from Transport Heating Services, OX29 0YG, 01993 849 522, their part number J1512, at approx £100 each (Sept 2012). Stocks are limited as gate has moved its manufacturing to China. (No longer available Feb 2015). | ||
| + | |||
| + | Some people have had success with getting the motor repaired, check the SELOC archives. | ||
| + | |||
| + | A simikar blower motor is fitted to Land Rover's notably the Defender from about 1988 up to roughly 1996. Lot's lying about in scrapyards! | ||
| + | |||
| + | More info on this alternative motor is here:- | ||
| + | |||
| + | http://wiki.seloc.org/a/Heater_Motor,_S1,_Alternative | ||
| + | |||
| + | === Fan speed control resistors === | ||
| + | |||
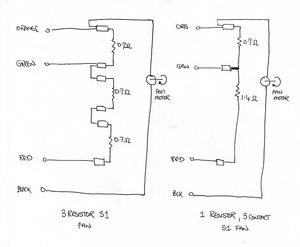
| + | S1 heaters have either one or three large green ceramic resistors which are switched in to regulate the speed of the blower fan. If these are damaged it may be possible to replace them with off-the-shelf electronic parts based on the schematic. [[Image:Heater-resistors-schematic.jpg|thumb|right|Resistor schematic]] | ||
=== Reassembling the matrix unit === | === Reassembling the matrix unit === | ||
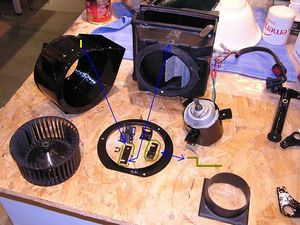
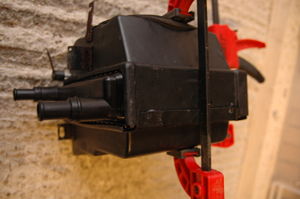
| + | [[Image:S1BlowerMatrixAssembly.jpg|thumb|left|Photo showing the blower/matrix assembly removed from the vehicle and clamped while being glued. Originally it was held together with rivets and the holes for the rivets can still be seen.]] | ||
Clean out the inside of the plastic case before putting the new matrix inside and either riveting or glueing the case back together. | Clean out the inside of the plastic case before putting the new matrix inside and either riveting or glueing the case back together. | ||
| + | |||
| + | Take care to orientate the motor so the small hole in its case is facing the ground when it is fitted. Failure to do this will result in your motor filling with water when it rains (don't ask how I know). | ||
Re-assemble matrix/blower unit and then screw it back into the chassis - this may need two pairs of hands and a lot of patience due to the location of the screws. A telescopic magnetic device can be useful to retrieve dropped screws! Re-attach the green cylindrical terminal block, re-fit the hoses into the matrix and replace the battery. | Re-assemble matrix/blower unit and then screw it back into the chassis - this may need two pairs of hands and a lot of patience due to the location of the screws. A telescopic magnetic device can be useful to retrieve dropped screws! Re-attach the green cylindrical terminal block, re-fit the hoses into the matrix and replace the battery. | ||
| Line 36: | Line 77: | ||
=== Refilling with coolant === | === Refilling with coolant === | ||
| − | It may be easier not refitting the plastic radiator | + | It may be easier not refitting the plastic radiator cowl just yet as it is easier to get to the radiator bleed screw when bleeding the system. If any of the plastic fasteners were broken whilst removing the radiator cowl, more can be purchased from [http://www.elise-shop.com/index.php?main_page=product_info&products_id=382 Elise Shop]. |
Finally add coolant back into the header tank and follow the instructions in [[Bleed the cooling system]]. | Finally add coolant back into the header tank and follow the instructions in [[Bleed the cooling system]]. | ||
Latest revision as of 12:51, 25 May 2023
The heater matrix is a small radiator through which the coolant runs and warms the air which enters the cabin. On the S1, it is located on the driver's side, near the battery. The heater matrix is mounted vertically to the side of the blower fan unit.
When the matrix fails, coolant leaks out of it's pipes and into the heater system, resulting in a fine mist entering the cabin through the ventilation system and misting up the windscreen. With a badly failed matrix, a micro-climate can form in the passenger footwell with mist rising and falling whilst driving.
A replacement heater matrix can be purchased from EliseParts (part no AW38506, manufactured by KL Automotive, 01827 300 100).
Alernatively a pattern part for the S1 heater matrix matrix can be obtained from http://www.demisterman.co.uk/ (The matrix also is identical to that used on the TX2 London black cab)
elise-shop.com has developed a high capacity heater matrix which has 30% more capacity, but same shape, yet thicker than the original heater matrix.
Replacing the heater matrix
| Time & Tools | |
| Time: | 4 - 6 hours |
|---|---|
| Tools: | Torx T10 screwdriver, socket set, telescopic magnetic device, glue for the plastic matrix cover, new heater matrix |
This is a tricky job due to the location of the matrix and the position of the screws holding it in place.
First, empty the system of coolant. This can be done by first unscrewing the coolant reservoir tank cap, then removing the drivers-side wheelarch liner (remove the wheel first!) and undo the radiator feed hose. Drain into a bucket and dispose of safely. The radiator hose and wheelarch liner can be refitted as this side of the car doesn't need to be accessed again. Some people have reported successfully replacing the matrix without draining the system of coolant by clamping the feed and return hoses before disconnecting them from the matrix and then filling the new matrix with coolant via a funnel.
Next remove the plastic radiator cowl/surround with a Torx T10 screwdriver and remove the battery.
Removing the matrix unit
Some vehicles have the matrix/blower assembly held together by an rubber band as shown in the workshop manual. Other vehicles have the two held together by a metal bracket and nut on both the top and bottom. These instructions describe removal of the matrix when the matrix/blower assembly are held together with the metal bracket.
It may be possible to bust the two rivets on one side of the matrix cover to allow the matrix to be removed without unscrewing the matrix/blower assembly. If this is possible, it will significantly reduce the disassembly/assembly time. If not, follow the procedures below:
The matrix/blower assembly is held in place by 4 screws. Remove the metal flexible heater ducting and the hoses into and out of the matrix itself. One of the screws is just inside the outlet from the blower where the hose attached. Two are into the bulkhead below the radiator behind the cylindrical green ceramic terminal block. And the fourth is closer to the battery again into the bulkhead below the radiator. It's easiest if you remove the green ceramic terminal block - it's simply held on by the metal at each end which can be squeezed together and pulled out of the center of the green cylinder. Early Elise models had 3 cylindrical terminal blocks mounted on the blower. Later models had just one.
The wire which controls the hot/cold flap sits on top of the assembly. It cannot be removed while the cable is held by the spring clip and the flap arm is attached. Either lever off the surprisingly strong sprung metal clip or remove the attachment on top of the flap lever, and then the S-shaped end of the wire can be removed from the control armature. The flap lever is held on with a #10 UNF grub screw (3/32" allen key) and if this is not rusted solid then the arm itself will be corroded on to the flap.
Once the matrix/blower assembly is free, it may still not be possible to get the unit out of the vehicle. The blower is connected to the matrix by a metal strip and nut both on the top and the bottom of the assembly. As the matrix/blower assembly is now free and has a certain degree of rotation within the car, the matrix can be separated from the blower by undoing the nut and rotating the metal strip about 30 degrees. The metal strip on the bottom of the assembly is identical. The nuts are prone to rounding or shearing, in which case you will need to drill-out the rivet instead.
With the matrix separated from the blower, you can now remove the matrix from the car. To aid removal, you may need to:
- Rotate the matrix around and extract it upside down
- Remove the front services compartment latch and alarm sensor
- Remove the battery clamp and slide the battery as far out of the way as possible
- Unclip all wiring beside the radiator and pull it on top of the radiator
The matrix unit is held within a plastic case which is riveted and can be glued on the bottom. Take care to remove the rivets without damaging the plastic too much - you only need to remove one pair of rivets as this will allow the plastic to bend enough to remove the matrix.
Repainting the metalwork
Whilst you have the matrix assembly out you may want to repaint it. The rivets must be drilled out to remove the brackets and blower fan. The parts can then be stripped and repainted. POR15 is recommended for this as Hammerite is rather smelly and will make the hot air supply equally smelly for several months.
Blower motor
The blower motor is manufactured by Gate, part number MP5620/HW1. They are available from Transport Heating Services, OX29 0YG, 01993 849 522, their part number J1512, at approx £100 each (Sept 2012). Stocks are limited as gate has moved its manufacturing to China. (No longer available Feb 2015).
Some people have had success with getting the motor repaired, check the SELOC archives.
A simikar blower motor is fitted to Land Rover's notably the Defender from about 1988 up to roughly 1996. Lot's lying about in scrapyards!
More info on this alternative motor is here:-
http://wiki.seloc.org/a/Heater_Motor,_S1,_Alternative
Fan speed control resistors
S1 heaters have either one or three large green ceramic resistors which are switched in to regulate the speed of the blower fan. If these are damaged it may be possible to replace them with off-the-shelf electronic parts based on the schematic.
Reassembling the matrix unit
Clean out the inside of the plastic case before putting the new matrix inside and either riveting or glueing the case back together.
Take care to orientate the motor so the small hole in its case is facing the ground when it is fitted. Failure to do this will result in your motor filling with water when it rains (don't ask how I know).
Re-assemble matrix/blower unit and then screw it back into the chassis - this may need two pairs of hands and a lot of patience due to the location of the screws. A telescopic magnetic device can be useful to retrieve dropped screws! Re-attach the green cylindrical terminal block, re-fit the hoses into the matrix and replace the battery.
Refilling with coolant
It may be easier not refitting the plastic radiator cowl just yet as it is easier to get to the radiator bleed screw when bleeding the system. If any of the plastic fasteners were broken whilst removing the radiator cowl, more can be purchased from Elise Shop.
Finally add coolant back into the header tank and follow the instructions in Bleed the cooling system.
