Difference between revisions of "Remove the rear clamshell"
Basher111s (talk | contribs) |
Basher111s (talk | contribs) |
||
| Line 84: | Line 84: | ||
* Worth removing the edge finisher (rubber trim) around the air intake grills, they may be glued on and are attached to the rear clam and the sill panels. If they are glued and you try to remove the clam they will probably tear (although if they are glued you will probably have to replace anyway, part no A111U6034V). | * Worth removing the edge finisher (rubber trim) around the air intake grills, they may be glued on and are attached to the rear clam and the sill panels. If they are glued and you try to remove the clam they will probably tear (although if they are glued you will probably have to replace anyway, part no A111U6034V). | ||
| − | * Replace the standard zinc bolts & washers with quality Stainless Steel ones. Speedy Fasteners [http://www.speedyfasteners.com Speedy Fasteners] sell S1 and S2 clamshell kits. | + | * Replace the standard zinc bolts & washers with quality Stainless Steel ones. Speedy Fasteners [http://www.speedyfasteners.com Speedy Fasteners Web Site] or [http://www.ebay.co.uk/speedyfasteners Speedy Fasteners eBay Site] sell S1 and S2 clamshell kits. |
[[Category:Body]] | [[Category:Body]] | ||
Revision as of 14:29, 10 March 2013
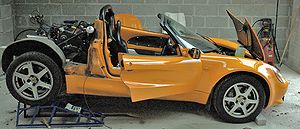
A few of us are removing rear clam currently
add remove some of this
if outside buy halfords small car cover £25
soft/hard top wil need to be off
drive or lift car up onto a 6" concrete blocks
disconnect battery black wire (nearest bulkhead)
Procedure
1. Remove roll over bar shroud from inside cabin 4 8mm bolts upwards remove rool bar black plastic clip things for softtop catches - undo 2 allen bolts long tail shroud undo allen bolt at each end lift off shroud - leaves sticky foam on rear clam - where do you buy some more?
2. Remove speaker trim panel it's only held in with 4 of those black plastic rivet things with heads that maul when you try to unscrew them so decided to remove passenger seat and passenger seat belt top mount to clam shell seat is only held in by 4 sownward allen bolts (as above) front 2 are easy to get to rear tunnel is ok if you have enough extensions rear near side only if you have a flexible extension,and the bolt is so tight it you need to rotate the seat too, to help it release ( you'll need to remove the bracket holding the lumbar bubble thing too - allen head ) ok then remove the trim panel undoing the speaker wires
all this for 3. Remove bolt each side going sideways into the clam
4. Remove engine cover 2 bolts each hinge with assorted washers unplug the aerial near the engine cover from inside cabin unscrew 2 nuts per hinge and remove hinge clamp brackets which hold down front of clam
5. Have a rest and remove carpet foam etc from within boot remove battery bracket 2 bolts 2 more clam bolts through floor battery side 3 clam bolts right side discover tyre weld above offside wheel arch
6. Remove 2 allen bolts holding ecu unit to boot partition leave ecu where it is
7. Remove n/s wheel ( jack car first) remove liner remove half dozen of those screw plastic rivet things remove one 8mm bolt just above shock absorber
lift liner over shock absorber - it's tight easerest of wheel arch liner out of space - its a good job its flexible - I found back end easiest to get out first and there's a clip holding some wires which you need to poke out from inside the wheel arch
this gives access to 2 bolts holding clam / air box tube/side grill towards front of wheel arch - there may be 'C' shims here! from inside liner pull battery wires through clam with grommit same for rear lightcluter wires - undo connector in boot refit wheel lower jack
8. Do same for o/s wheel after removing the liner undo the 8 screws holding the petrol filler aluminium ring aand press the filler cap gently - it should unstick and move slighly inside clam
9. I found it easier to Remove the rear undertray
10. Remove a pozi screw each side holding the grille around the exhaust
11. You will need to unbolt the exhaust silencer hanger which is bolted to the clam near the N/S/R wheel
11. Remove one more bolt each side at this point screwing sideways into the clam
lift off the clam
refit by reversing the above procedure :)
Top tips
- Worth removing the edge finisher (rubber trim) around the air intake grills, they may be glued on and are attached to the rear clam and the sill panels. If they are glued and you try to remove the clam they will probably tear (although if they are glued you will probably have to replace anyway, part no A111U6034V).
- Replace the standard zinc bolts & washers with quality Stainless Steel ones. Speedy Fasteners Speedy Fasteners Web Site or Speedy Fasteners eBay Site sell S1 and S2 clamshell kits.
