Difference between revisions of "Light Switches (Elise/Exige S1)"
| Line 63: | Line 63: | ||
These are from from a 205N | These are from from a 205N | ||
*6553 20 : rear fog light | *6553 20 : rear fog light | ||
| − | *6553 21 : hazard flasher ( | + | *6553 21 : hazard flasher (some hazards are red, some black, I believe this number to be the black version based on a purchased brand new part) |
*6553 22 : rear window heating (demister) | *6553 22 : rear window heating (demister) | ||
*6553 24 : fog lights | *6553 24 : fog lights | ||
*6553 25 : refridgerating (?) AC cooling | *6553 25 : refridgerating (?) AC cooling | ||
*6553 38 : heating seat | *6553 38 : heating seat | ||
| − | *6553 39 : heating pump | + | *6553 39 : heating pump |
https://arc.seloc.org/viewthread.php?tid=345477 | https://arc.seloc.org/viewthread.php?tid=345477 | ||
Revision as of 10:02, 31 March 2022
This page should contain info pulled from forum threads around S1 light switches. It is very much a work in progress at present.
Source
switches are from 205 / 106, may be 306 (internals the same need to swap whole of cover) ?, but never seen the main light one they're made by TRW, but I never found a cross ref list anywhere
when you get the switches it is easy to pull off the cap and swap over the icon, be very careful not to snap the lugs off the caps when you pull it apart,
Removal
the first time I took out the light switch housing I took off first both plastic covers surrounding the light switches and the one surrounding the heater controls, then the steering column cowling and and finally the stack itself off
That was the first time, now the only things I do to get out the light switches is:
take off both plastic surrounds (using something like a credit card or anything thats thin and plastic so not to scratch the paint), one for the light switches and the other thats surrounds the heater controls,
then unscrew the two philips screws that hold the dash top to the ali switch plate, followed by the two philips screws that hold the ali switch plate to the ali dash
s26.postimg.org/6iwtadjhl/dash3.png
then by using one of these spanners that are both hinged and have a ratchet
s26.postimg.org/z60ts1und/P1050480-_SMALL.jpg
you ONLY need to loosen the stack off sufficient to be able to wiggle off the ali dash top off, it’s the way I’ve been getting the light switches off ever since my first attempt, but if you feel more comfortable taking off the everything then thats fine too
once you have all that off, the switches can be seen in full, don’t be tempted to just pull on the cap of the switch as all you’ll be doing if you’re luck is pull of the cap leaving the full switch still in position and if not so lucky, you’ll have snapped off the lugs holding the cap on the switch
s26.postimg.org/6fwxt7fhl/switch_1.png
so once you can see the back of the switches prise them apart at the point of the arrow
s26.postimg.org/e9xjelnah/P1180889-_SMALL-.jpg
then from behind you can start to squees the holding lugs on the switch to push it forward and out of the ali holder
it is a lot easer than my writing makes it out to be, the female part are all colour coded (well mine are) and the wiring is just long enough for the right location, so shouldn’t make an error re finding them in the right location
Correct Order
From steering wheel out;
- Side light switch
- Head light switch
- Fog light switch
- Hazard lights switch
- Spare dummy switch
Switch Schematics
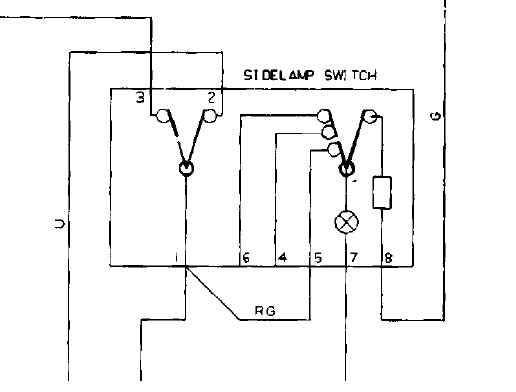
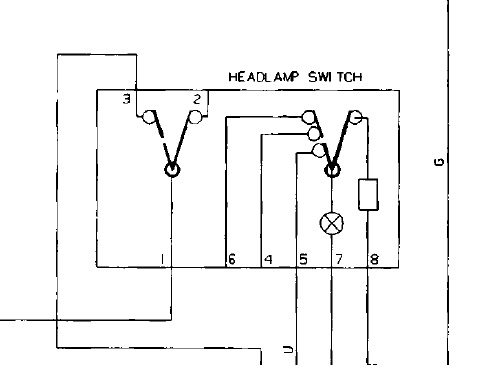
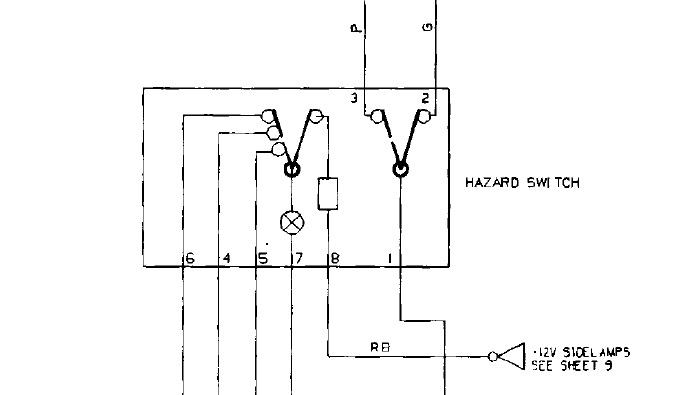
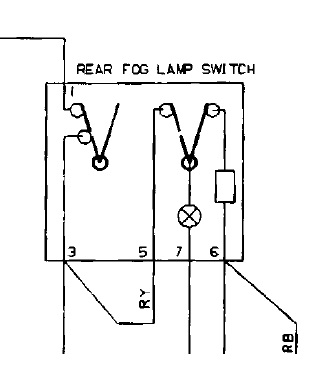
From the schematics, headlight, sidelight and hazard switch are the same internally, fog is different. The hazard schematic is drawn back to front but the connections are the same.
Interchangeable
Sidelight == Headlight == Hazard
Fog == Heated screen
Peugeot part numbers
These are from from a 205N
- 6553 20 : rear fog light
- 6553 21 : hazard flasher (some hazards are red, some black, I believe this number to be the black version based on a purchased brand new part)
- 6553 22 : rear window heating (demister)
- 6553 24 : fog lights
- 6553 25 : refridgerating (?) AC cooling
- 6553 38 : heating seat
- 6553 39 : heating pump
https://arc.seloc.org/viewthread.php?tid=345477 https://arc.seloc.org/viewthread.php?tid=374720
Useful Videos
Here are a few videos by Stefan3 showing disassembly/testing of switches.


