Uncategorised files
Jump to navigation
Jump to search
Showing below up to 500 results in range #1 to #500.
View (previous 500 | next 500) (20 | 50 | 100 | 250 | 500)
 000004.jpg 320 × 160; 5 KB
 0011.JPG 448 × 336; 24 KB
 001369.jpg 320 × 128; 4 KB
 01accesspanel.jpg 1,408 × 1,056; 143 KB
 01resistorchange.jpg 500 × 375; 58 KB
 02resistorchange.jpg 500 × 375; 40 KB
 03resistorchange.jpg 500 × 667; 84 KB
 04052009082.jpg 1,024 × 768; 102 KB
 04resistorchange.jpg 1,408 × 1,056; 132 KB
 0502.JPG 2,048 × 1,536; 694 KB
 05resistorchange.jpg 500 × 375; 61 KB
 06resistorchange.jpg 500 × 667; 92 KB
 07resistorchange.jpg 500 × 375; 42 KB
 10. Lower Ball Joint Split From Hub Carrier.JPG 600 × 450; 46 KB
 100000.JPG 640 × 474; 101 KB
 1012-011-Braid-FR-S1-Felgensatz-Elise-Mk1-1.jpg 2,016 × 1,512; 841 KB
 10 Remove Upper & Lower Ball Joint Nuts.JPG 600 × 450; 45 KB
 11. Steering Wheel Set To Full Lock.JPG 600 × 450; 45 KB
 111F1-t.jpg 333 × 145; 5 KB
 111RSE2-t.jpg 333 × 145; 5 KB
 111R and S2 Exige ITG Maxogen.jpg 650 × 291; 51 KB
 111R and S2 Exige ITG Panel Filter.gif 400 × 400; 52 KB
 111S2bularfullperformancesystem.jpg 500 × 405; 91 KB
 111Sprotypelargesilencertwin3inchdtm.jpg 600 × 265; 136 KB
 111rforge.jpg 400 × 394; 24 KB
 111rserv2.JPG 790 × 799; 103 KB
 111rwheel.jpg 181 × 258; 9 KB
 11 Remove Both Ball Joints.JPG 600 × 450; 46 KB
 12. Ball Joint Removal Tool Assembled.JPG 600 × 450; 48 KB
 12 Hub Carrier Removed.JPG 600 × 450; 50 KB
 12spoke.jpg 640 × 467; 52 KB
 13. Removing Ball Joint.JPG 600 × 450; 46 KB
 13 The spring Clips Usually Come Off the Balljoint Rubber.JPG 650 × 488; 42 KB
 14. Ball Joint Removed.JPG 600 × 450; 48 KB
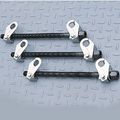
 14a Remove the Upper Wishbone 1.JPG 600 × 450; 46 KB
 14b Remove The Upper Wishbone 2.JPG 600 × 450; 49 KB
 15. Greasing New Ball Joint Rubber.JPG 600 × 450; 47 KB
 154 0.jpg 200 × 109; 4 KB
 155 0.jpg 200 × 126; 4 KB
 15a Upper Wishbone Removed 1.JPG 650 × 488; 40 KB
 15b Upper Wishbone Removed 2.JPG 600 × 450; 43 KB
 15c Upper Wishbone.JPG 600 × 450; 44 KB
 16. Fitting New Ball Joint.JPG 580 × 435; 47 KB
 16a Remove Lower Wishbone 1.JPG 650 × 488; 39 KB
 16b Remove Lower Wishbone 2.JPG 650 × 488; 50 KB
 16c Lower Wishbone.JPG 650 × 488; 39 KB
 17. Ball Joint Assembly Tool.JPG 600 × 450; 44 KB
 17 Both Wishbones Removed.JPG 650 × 488; 40 KB
 18. Ball Joint Fitted.JPG 600 × 450; 46 KB
 18a Remove Sleeve from Polybush.JPG 600 × 450; 46 KB
 18b Remove Polybush From Wishbone.JPG 600 × 450; 45 KB
 18c Remove Standard Bush From Wishbone.JPG 650 × 488; 49 KB
 19. Removing Lower Shock Mount.JPG 580 × 435; 47 KB
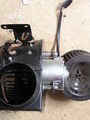
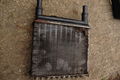 1999EliseHeaterMatrix.JPG 800 × 531; 304 KB
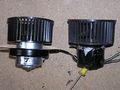
 1999EliseMatrixBlowerAssembly.jpg 800 × 531; 182 KB
 19 Torque Upper Wishbone.JPG 600 × 450; 48 KB
 19b Upper Front Wishbone Bush Fitted.JPG 650 × 488; 35 KB
 19c Upper Rear Wishbone Bush Fitted.JPG 650 × 488; 32 KB
 19d Upper Rear Wishbone Bush showing Both Shims Embedded.JPG 650 × 488; 36 KB
 19e Upper Rear Wishbone Bush Showing Embedded Shims Removed.JPG 650 × 488; 32 KB
 19f Upper Rear Wishbone Bush Fitted With Large Diameter Shims.JPG 650 × 488; 35 KB
 19g Upper Wishbone Removed Without Removing Ball Joint.JPG 600 × 450; 44 KB
 19h Snubber Washer.JPG 650 × 488; 28 KB
 1 Orange 1 Clear.JPG 649 × 487; 87 KB
 1 Remove Front Under Tray.JPG 650 × 488; 46 KB
 2. Measuring Lower Wishbone Height.JPG 600 × 450; 32 KB
 20. Removing Upper Shock Mount.JPG 600 × 450; 48 KB
 2000 (10).JPG 1,536 × 2,048; 673 KB
 2000 (16).JPG 2,048 × 1,536; 615 KB
 2000 (18).JPG 2,048 × 1,536; 635 KB
 2000 (20).JPG 2,048 × 1,536; 665 KB
 2000 (25).JPG 1,536 × 2,048; 673 KB
 2000 (28).JPG 2,048 × 1,536; 591 KB
 2000 (33).JPG 2,048 × 1,536; 709 KB
 2000 (33) 2.jpg 2,048 × 1,536; 745 KB
 2000 (34).JPG 1,536 × 2,048; 646 KB
 2000 (37).JPG 2,048 × 1,536; 647 KB
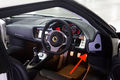 2010-Lotus-Evora-Interior.jpg 400 × 267; 34 KB
 20140618 105321846 iOS.jpg 2,048 × 2,048; 987 KB
 20140618 105358597 iOS.jpg 2,048 × 2,048; 561 KB
 20140618 105408169 iOS.jpg 2,048 × 2,048; 533 KB
 20140618 105424077 iOS.jpg 2,048 × 2,048; 456 KB
 20140618 105444031 iOS.jpg 2,048 × 2,048; 645 KB
 20140618 105456923 iOS.jpg 2,048 × 2,048; 699 KB
 20140618 105543034 iOS.jpg 2,048 × 2,048; 547 KB
 20140618 105613739 iOS.jpg 2,048 × 2,048; 426 KB
 20140618 110013275 iOS.jpg 2,048 × 2,048; 1.09 MB
 20140618 111608247 iOS.jpg 1,536 × 2,048; 556 KB
 20140618 111800770 iOS.jpg 1,536 × 2,048; 494 KB
 20140618 111947952 iOS.jpg 2,048 × 2,048; 693 KB
 20140618 112027191 iOS.jpg 2,048 × 2,048; 685 KB
 20140618 112054580 iOS.jpg 2,048 × 2,048; 684 KB
 20150402 164843.jpg 816 × 459; 137 KB
 20210727 180133a.jpg 2,267 × 1,431; 470 KB
 20LT4855s.jpg 265 × 265; 14 KB
 20a Torque Lower Wishbone 1.JPG 650 × 488; 50 KB
 20b Torque Lower Wishbone 2.JPG 650 × 488; 48 KB
 21. Shock Assembly Removed.JPG 600 × 450; 43 KB
 211.jpg 51 × 38; 2 KB
 21 Replace Passenger Footrest.JPG 650 × 488; 47 KB
 22. Removing Spring From Damper.JPG 580 × 435; 48 KB
 220 1.jpg 200 × 133; 6 KB
 22 Torque Drop Link.JPG 550 × 413; 46 KB
 22mm Socket Marked.JPG 2,048 × 1,536; 681 KB
 23. Spring Removed From Damper.JPG 580 × 435; 46 KB
 230 1.jpg 200 × 133; 6 KB
 23 Loosley Fit Damper Assembly.JPG 650 × 488; 50 KB
 24. Spring Ready To Be Fitted To New Damper.JPG 600 × 450; 48 KB
 240r.jpg 470 × 593; 39 KB
 24 Fit Hub Assembly.JPG 600 × 450; 44 KB
 25. Fitting Spring To New Damper.JPG 580 × 435; 48 KB
 252.sm.jpg 150 × 112; 6 KB
 25 Torque Damper Assembly.JPG 550 × 413; 44 KB
 26. Spring Compressed On New Damper.JPG 580 × 435; 46 KB
 268.sm.jpg 150 × 112; 5 KB
 26 Slacken Off Brake Pad.JPG 600 × 450; 43 KB
 27. Spring Fitted To New Damper.JPG 580 × 435; 45 KB
 27 Measure Brake Disc Thickness.JPG 650 × 488; 46 KB
 28. Lowering Jack To Normal Ride Height.JPG 600 × 450; 47 KB
 28 Torque Brake Caliper.JPG 600 × 450; 45 KB
 29. Jacking Lower Wishbone To Ride Height.JPG 590 × 443; 45 KB
 29 Refit Brake Pipe Clamp.JPG 600 × 450; 48 KB
 2 Loosen Bolts on Road Wheel.JPG 650 × 488; 45 KB
 2bular111R6inchthrudiffuser.jpg 600 × 394; 72 KB
 2bular340RPerformanceSilencer.jpg 500 × 391; 131 KB
 2bularExigeSUltraSingleTip.jpg 481 × 276; 121 KB
 2bularGT3SingleTip.jpg 525 × 387; 194 KB
 2bularTrackDaysilencerStage2style.jpg 525 × 305; 160 KB
 2bularrepackablewithlargetailpipe.jpg 400 × 274; 101 KB
 2gr-fe.jpg 435 × 500; 187 KB
- Error creating thumbnail: File with dimensions greater than 12.5 MP3-11.jpg 5,919 × 3,952; 488 KB
 3-Eleven-430.jpg 2,623 × 1,505; 950 KB
 3-Eleven.jpg 2,048 × 1,363; 893 KB
 3. Loosening Road Wheel Bolts.JPG 600 × 450; 36 KB
 30. Tighteneing Lower Ball Joint.JPG 580 × 435; 46 KB
 3000 (26).JPG 2,048 × 1,536; 660 KB
 3000 (34).JPG 1,536 × 2,048; 662 KB
 30 Refit Front Undertray.JPG 650 × 488; 42 KB
 31. Damper And Lower Ball Joint Fitted.JPG 600 × 450; 42 KB
 31 Nip Up Road Wheel Bolts.JPG 650 × 488; 49 KB
 32. Measuring Brake DiscThickness.JPG 580 × 435; 49 KB
 32 Torque Road Wheel Bolts.JPG 600 × 450; 45 KB
 33. Refitting Brake Caliper.JPG 580 × 435; 46 KB
 34. Securing Brake Pipe.JPG 590 × 443; 46 KB
 340rtitanium.jpg 500 × 375; 144 KB
 35. Tightening Wheel Bolts.JPG 600 × 450; 38 KB
 369 0.jpg 120 × 74; 3 KB
 36 Torque Wheel Bolts.JPG 600 × 450; 46 KB
 37. Leaking Damper.JPG 600 × 450; 38 KB
 371 0.jpg 200 × 145; 6 KB
 38. Alternative Coil Spring Compressor.jpg 300 × 300; 13 KB
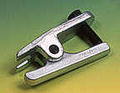 39. Scissor Type Ball Joint Splitter.jpg 144 × 112; 3 KB
 3B0955531.jpg 640 × 480; 46 KB
 3 Lift Car Using Rear Jacking Point.JPG 600 × 450; 43 KB
 4-pin-12V-automotive-relay.jpg 105 × 82; 2 KB
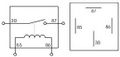 4-pin-automotive-relay-diagram.jpg 290 × 137; 6 KB
 4. Road Wheel Removed.JPG 600 × 450; 44 KB
 48nowedge.JPG 649 × 487; 49 KB
 48wedge.JPG 649 × 487; 61 KB
 48wedge2.JPG 649 × 487; 54 KB
 4 Use Fixed Support Under Front Jacking Point.JPG 600 × 450; 46 KB
 5. Removing Brake Pipe Clamp.JPG 580 × 435; 44 KB
 5 Remove Brake Pipe Clamp.JPG 600 × 450; 44 KB
 5spok.jpg 400 × 400; 47 KB
 5spoke.jpg 640 × 461; 57 KB
 6. Removing Front Brake Caliper.JPG 600 × 450; 45 KB
 6 Remove Brake Caliper.JPG 600 × 450; 49 KB
 6juj.jpg 1,224 × 1,632; 521 KB
 6spoke.jpg 184 × 236; 12 KB
 7. Securing Front Brake Caliper.JPG 600 × 450; 42 KB
 7 Remove Brake Disc.JPG 600 × 450; 45 KB
 8. Removing Lower Ball Joint Nut.JPG 600 × 450; 44 KB
 888s.JPG 150 × 179; 8 KB
 888s.jpg 150 × 179; 8 KB
 8a Remove Damper Assembly.JPG 600 × 450; 47 KB
 8b Damper Assembly Removed.JPG 600 × 450; 44 KB
 9. Splitting Lower Ball Joint.JPG 600 × 450; 43 KB
 910cutthrough.JPG 700 × 648; 76 KB
 910engine.JPG 500 × 358; 29 KB
 910understress.JPG 700 × 581; 47 KB
 9 Remove Drop Link.JPG 600 × 450; 46 KB
 A039 MED.jpg 120 × 87; 4 KB
 A048 MED.jpg 120 × 87; 3 KB
 A111J0128F.JPG 330 × 317; 13 KB
 A111J0141F.JPG 330 × 312; 13 KB
 A117G0138S.jpg 59 × 59; 3 KB
 A120G0048F.jpg 59 × 59; 3 KB
 A120G0052F.jpg 59 × 59; 3 KB
 A120G0065F.jpg 61 × 60; 3 KB
 A128G0005F.jpg 59 × 59; 3 KB
 ADO7.JPG 330 × 343; 11 KB
 ALS1J6002 3F.JPG 330 × 218; 7 KB
 AO38.JPG 284 × 260; 17 KB
 AO48.JPG 330 × 438; 17 KB
 AP600 Brake Fluid.jpg 500 × 375; 53 KB
 APBigBrakeCaliper.jpg 250 × 188; 8 KB
 APBigBrakeCaliper2.jpg 250 × 188; 34 KB
 AP Racing SP2000-14 clutch kit.jpg 640 × 480; 64 KB
 ATSM DTC schwarz.png 1,000 × 1,000; 712 KB
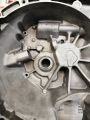
 A PG1 gearbox fitted with SAAB concentric clutch cylinder.jpg 1,155 × 866; 323 KB
 Accesspannel.JPG 806 × 1,210; 468 KB
 Accesspannel2.JPG 1,244 × 829; 460 KB
 Actuator cover.jpg 450 × 338; 19 KB
 Actuator diy cover.jpg 800 × 714; 308 KB
 Actuator diy cover fitted.jpg 1,024 × 768; 254 KB
 Actuator prized open.jpg 1,280 × 960; 351 KB
 Adjuster Cut Off Point.JPG 2,048 × 1,536; 328 KB
 Adjuster unscrewed.jpg 336 × 336; 34 KB
 Advan Neova.JPG 300 × 367; 33 KB
 Aero.jpg 216 × 194; 24 KB
 After1.JPG 650 × 433; 114 KB
 After2.JPG 650 × 433; 89 KB
 After drilling clutch house.jpg 631 × 841; 229 KB
 Air con 2.JPG 228 × 171; 20 KB
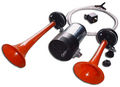 Airhorn.JPG 598 × 436; 32 KB
 AliRad.jpg 300 × 225; 51 KB
 Alias23 extended side sills gfwilliams.jpg 600 × 400; 112 KB
 Alias23 intake full pic web.jpg 1,000 × 667; 158 KB
 Alias23 lotus exige cup380 wing.jpg 600 × 400; 184 KB
 All aluminium hi pressure radiator.jpg 426 × 557; 46 KB
 All aluminium radiator.jpg 640 × 535; 69 KB
 Allen Key Crank Lock.JPG 2,048 × 1,536; 674 KB
 Alpine-CDE-111RM.jpg 800 × 256; 52 KB
 Alpine-INE-W710D.jpg 939 × 551; 179 KB
 Alpine-INE-W990BT.png 1,024 × 597; 710 KB
 Alpine-ivaw505r.jpg 600 × 600; 48 KB
 Alpine Ezi-DAB - Aerial.jpg 650 × 867; 89 KB
 Alpine Ezi-DAB - Unit in glovebox.jpg 650 × 867; 113 KB
 Alpine Ezi-DAB - Wiring Harness.jpg 650 × 867; 86 KB
 Alpine INE-W920R.jpg 1,600 × 1,200; 359 KB
 Alpine NVE-M300P.jpg 1,600 × 1,200; 314 KB
 Alternator.jpg 640 × 515; 48 KB
 Alternator1.jpg 436 × 653; 53 KB
 Alternator1a.jpg 1,600 × 1,200; 231 KB
 Alternator2.jpg 1,600 × 1,200; 231 KB
 Alternator3.jpg 1,600 × 1,200; 225 KB
 Alternator4.jpg 1,600 × 1,200; 228 KB
 AlternatorHeatshield.JPG 320 × 240; 82 KB
 AlternatorHeatshieldW.jpg 320 × 240; 82 KB
 Alternator Diagram.JPG 371 × 335; 27 KB
 Alternatorbelt.jpg 598 × 436; 18 KB
 Alunr dealer map.PNG 747 × 596; 217 KB
 Alxelstands.JPG 650 × 291; 31 KB
 Android-download-play-store.png 129 × 45; 9 KB
 Antennaconnection.jpg 729 × 972; 157 KB
 App Store Badge EN.jpg 145 × 50; 4 KB
 Arb1.jpg 640 × 467; 21 KB
 Arb2.jpg 480 × 288; 21 KB
 Arb3.jpg 489 × 247; 13 KB
 Arb4.jpg 538 × 564; 66 KB
 Arch Liner.JPG 649 × 487; 100 KB
 Assembled.jpg 448 × 336; 27 KB
 Auto Tensioner Setup.JPG 373 × 306; 39 KB
 Auto Tensioner Wire.JPG 1,536 × 2,048; 508 KB
 Autoglym Tar remover.jpg 1,912 × 3,912; 1.04 MB
 Avon-ZZR.jpg 266 × 300; 41 KB
 Avon-zzs.jpg 400 × 446; 87 KB
 BTB.jpg 239 × 100; 11 KB
 B points.jpg 914 × 365; 116 KB
 BackBoxAndCatSupportW.jpg 320 × 240; 88 KB
 Bad practice.jpg 512 × 384; 46 KB
 Badge.jpg 400 × 400; 50 KB
 Badge1.jpg 320 × 240; 12 KB
 Badge2.jpg 640 × 480; 29 KB
 Badge3.jpg 320 × 240; 68 KB
 Badge4.jpg 320 × 240; 10 KB
 Badge5.jpg 320 × 240; 16 KB
 Ball joint.jpg 800 × 573; 194 KB
 Bastuck S1.jpg 620 × 309; 30 KB
 Bastuck S2.jpg 620 × 308; 28 KB
 Battery1.JPG 250 × 146; 19 KB
 Battery3.JPG 214 × 222; 19 KB
 Battery4.JPG 250 × 213; 24 KB
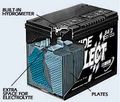
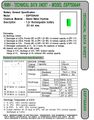 Battery Info.jpg 1,025 × 1,309; 562 KB
 Before drilling.jpg 632 × 843; 214 KB
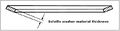 Belleville washer material thickness.JPG 653 × 170; 16 KB
 Bernard k series engine mount.jpg 450 × 433; 46 KB
 Bfg-g-force-profiler-m.jpg 270 × 240; 15 KB
 Bible.JPG 284 × 309; 20 KB
 Bicycle-cable-adjuster.jpg 100 × 80; 3 KB
 Bicycle-cable.jpg 179 × 159; 7 KB
 Big Nath R A B.JPG 530 × 398; 85 KB
 Big air pipe.jpg 1,280 × 960; 457 KB
 Big air pipe on floor.jpg 649 × 487; 147 KB
 Bild.jpg 180 × 114; 4 KB
 Bild2.jpg 180 × 134; 6 KB
 Bild3.jpg 180 × 128; 5 KB
 Bild4.jpg 180 × 135; 5 KB
 Bild5.jpg 180 × 135; 7 KB
 Blanked off inner rear light cluster.jpg 1,024 × 993; 172 KB
 Bleed screw.jpg 1,024 × 768; 145 KB
 Bleed screw in engine bay.jpg 649 × 487; 62 KB
 Blower 010.JPG 2,048 × 1,536; 697 KB
 Blower 020.JPG 2,048 × 1,536; 700 KB
 Blower 0200.JPG 1,536 × 2,048; 643 KB
 Blower 030.JPG 2,048 × 1,536; 683 KB
 Blower 040.JPG 2,048 × 1,536; 698 KB
 Blower 070.JPG 1,536 × 2,048; 717 KB
 Bls2g6003f.jpg 132 × 132; 4 KB
 Bls2g6006f.jpg 132 × 132; 3 KB
 BlueflameSlashCut.jpg 800 × 600; 101 KB
 Bluestuff.jpg 1,500 × 1,143; 107 KB
 Bocardo 1.jpg 1,549 × 1,037; 345 KB
 Bocardo 2.jpg 1,549 × 1,037; 315 KB
 Boltorder.JPG 427 × 268; 47 KB
 Bosch Aerotwin Wiper Blades.jpg 366 × 200; 9 KB
 Bosch alternator regulator f00m145269.JPG 640 × 428; 46 KB
 Bottom.jpg 3,552 × 2,000; 1.9 MB
 Bpoints2.JPG 650 × 433; 114 KB
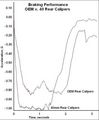
 BrakeDisc-BrakePad-Combi.gif 980 × 640; 79 KB
 Brake bleeder.jpg 300 × 494; 26 KB
 Brake light.jpg 1,024 × 683; 164 KB
 Brakebias.JPG 88 × 128; 6 KB
 Brakes mmc discs.jpg 600 × 450; 63 KB
 Brakeservice.JPG 650 × 376; 57 KB
 Brakeupgrade1.JPG 330 × 247; 11 KB
 Brakeupgrade2.JPG 330 × 189; 7 KB
 Brakeupgrade3.JPG 330 × 176; 5 KB
 Brembo Caliper 1.JPG 548 × 540; 54 KB
 Brembo Caliper 10.JPG 640 × 480; 52 KB
 Brembo Caliper 11.JPG 640 × 480; 48 KB
 Brembo Caliper 12.JPG 416 × 312; 21 KB
 Brembo Caliper 13.JPG 416 × 312; 25 KB
 Brembo Caliper 14.JPG 416 × 312; 13 KB
 Brembo Caliper 15.JPG 416 × 312; 23 KB
 Brembo Caliper 16.JPG 416 × 312; 16 KB
 Brembo Caliper 17.JPG 201 × 231; 8 KB
 Brembo Caliper 18.JPG 640 × 480; 40 KB
 Brembo Caliper 19.JPG 640 × 480; 58 KB
 Brembo Caliper 2.JPG 514 × 479; 30 KB
 Brembo Caliper 20.JPG 640 × 480; 51 KB
 Brembo Caliper 21.JPG 416 × 312; 18 KB
 Brembo Caliper 22.JPG 416 × 312; 14 KB
 Brembo Caliper 23.JPG 416 × 312; 16 KB
 Brembo Caliper 24.JPG 416 × 312; 16 KB
 Brembo Caliper 25.JPG 416 × 312; 16 KB
 Brembo Caliper 26.JPG 640 × 480; 52 KB
 Brembo Caliper 27.JPG 312 × 416; 21 KB
 Brembo Caliper 28.JPG 640 × 480; 31 KB
 Brembo Caliper 29.JPG 640 × 480; 44 KB
 Brembo Caliper 3.JPG 262 × 288; 11 KB
 Brembo Caliper 4.JPG 530 × 641; 37 KB
 Brembo Caliper 5.JPG 675 × 613; 78 KB
 Brembo Caliper 6.JPG 259 × 450; 15 KB
 Brembo Caliper 7.JPG 640 × 480; 44 KB
 Brembo Caliper 8.JPG 640 × 480; 47 KB
 Brembo Caliper 9.JPG 416 × 312; 20 KB
 Bridgestone-s01-xl.jpg 158 × 200; 5 KB
 Bridgestone potenza re050 l.jpg 200 × 322; 17 KB
 Britax IMG 20191109 104211.jpg 687 × 1,374; 116 KB
 Brokenbolt.JPG 421 × 643; 47 KB
 Bulbguide.JPG 390 × 1,250; 57 KB
 Bulbguide.jpg 390 × 1,100; 56 KB
 Button.jpg 100 × 89; 5 KB
 Bw1.jpg 649 × 487; 82 KB
 Bw2.jpg 487 × 649; 95 KB
 Bw3.jpg 649 × 487; 67 KB
 Bw4.jpg 649 × 487; 95 KB
 Bw5.jpg 649 × 487; 107 KB
 Bw6.jpg 649 × 487; 79 KB
 Bw7.jpg 649 × 487; 107 KB
 Bxwashbar.jpg 400 × 300; 36 KB
 CDE9872RM.jpg 530 × 204; 30 KB
 CDLModuleReplace-CDM.jpg 512 × 384; 31 KB
 CDLModuleReplace-EndTabs.jpg 512 × 384; 28 KB
 CDLModuleReplace1.jpg 640 × 480; 56 KB
 CDLModuleReplace2.jpg 640 × 480; 64 KB
 CDLModuleReplace3.jpg 640 × 480; 67 KB
 CDLModuleReplace4.jpg 640 × 480; 58 KB
 CDLModuleReplace5.jpg 640 × 480; 58 KB
 CDLModuleReplace6.jpg 640 × 480; 40 KB
 CR10-Flow-Formed.png 300 × 300; 102 KB
 CR10MattBlack.jpg 194 × 259; 9 KB
 Cable.jpg 512 × 384; 47 KB
 Cablefromluggage.jpg 816 × 612; 96 KB
 Cambelt1.jpg 800 × 600; 96 KB
 Cambelt10.jpg 800 × 600; 128 KB
 Cambelt11.jpg 800 × 600; 68 KB
 Cambelt12.jpg 600 × 800; 94 KB
 Cambelt2.jpg 800 × 600; 107 KB
 Cambelt3.jpg 1,536 × 2,048; 528 KB
 Cambelt4.jpg 800 × 600; 123 KB
 Cambelt5.jpg 2,048 × 1,536; 562 KB
 Cambelt6.jpg 2,048 × 1,536; 487 KB
 Cambelt7.jpg 800 × 600; 99 KB
 Cambelt8.jpg 800 × 600; 87 KB
 Cambelt9.jpg 600 × 800; 75 KB
 Camber.JPG 149 × 107; 4 KB
 Camhousing.JPG 700 × 785; 69 KB
 Car diagram.jpg 408 × 189; 20 KB
 Car void of heater unit.jpg 1,600 × 1,200; 711 KB
 Carbonultralightrace.jpg 396 × 215; 20 KB
 Carfusebox.JPG 311 × 374; 78 KB
 Carpet1.jpg 800 × 600; 97 KB
 Carpet2.jpg 800 × 600; 77 KB
 Carpet3.jpg 800 × 600; 101 KB
 Carpet4.jpg 800 × 600; 103 KB
 Carpet5.jpg 800 × 600; 102 KB
 Carpet6.jpg 800 × 600; 94 KB
 Carpet7.jpg 800 × 600; 87 KB
 Carpet8.jpg 800 × 600; 89 KB
 Carpet9.jpg 800 × 600; 93 KB
 Cas uk React Performance Dot 4 1l.jpg 245 × 606; 32 KB
 Castrol SRF Brake Fluid.jpg 122 × 250; 10 KB
 Castrol super dot brake fluid.jpg 180 × 144; 15 KB
 Catalytic coverter 1.jpg 457 × 319; 41 KB
 Ccwiki01.jpg 4,032 × 3,024; 4.54 MB
 Ccwiki02.jpg 3,024 × 4,032; 4.63 MB
 Ccwiki03.jpg 4,032 × 3,024; 4.18 MB
 Ccwiki04.jpg 4,032 × 3,024; 3.85 MB
 Ccwiki05.png 800 × 351; 221 KB
 Ccwiki06.jpg 4,032 × 3,024; 4.59 MB
 Ccwiki07.jpg 3,024 × 4,032; 5.08 MB
 Ccwiki08.png 801 × 600; 1,024 KB
 Ccwiki09.jpg 4,032 × 3,024; 4.64 MB
 Ccwiki10.jpg 4,032 × 3,024; 4.83 MB
 Ccwiki11.jpg 4,032 × 3,024; 4.76 MB
 Ccwiki12.jpg 4,032 × 3,024; 5.1 MB
 Ccwiki13.jpg 4,032 × 3,024; 4.48 MB
 Ccwiki14.jpg 4,032 × 3,024; 5.04 MB
 Ccwiki15.jpg 4,032 × 3,024; 3.9 MB
 Ccwiki15b.jpg 4,032 × 3,024; 4.11 MB
 Ccwiki16.jpg 3,024 × 4,032; 4.13 MB
 Ccwiki17.jpg 4,032 × 3,024; 4.44 MB
 Ccwiki18.jpg 4,032 × 3,024; 4.11 MB
 Ccwiki19.jpg 3,024 × 4,032; 4.19 MB
 Ccwiki20.jpg 4,032 × 3,024; 4.55 MB
 Ccwiki21.jpg 4,032 × 3,024; 4.7 MB
 Ccwiki22.jpg 4,032 × 3,024; 5.17 MB
 Ccwiki23.jpg 4,032 × 3,024; 4.83 MB
 Ccwiki24.png 884 × 271; 83 KB
 Ccwiki9b.jpg 4,032 × 3,024; 4.82 MB
 Cdrive.jpg 201 × 300; 21 KB
 Chasnumb1.jpg 723 × 576; 69 KB
 Chasnumb2.jpg 520 × 159; 19 KB
 Chassis.JPG 1,500 × 1,000; 191 KB
 Chassis development camber.png 363 × 116; 5 KB
 Chassis development castor.png 96 × 90; 916 bytes
 Chassis development toe.png 363 × 116; 7 KB
 Cigar lighter wiring.jpg 600 × 522; 29 KB
 Circuit-diagram.jpg 383 × 259; 17 KB
 ClamHeadlightBolts.jpg 1,008 × 567; 115 KB
 Clamshell off.jpg 360 × 336; 23 KB
 Clarke tiles.jpg 500 × 500; 104 KB
 Clarke tiles garage 1.jpg 800 × 600; 94 KB
 Clarke tiles garage 2.jpg 800 × 600; 99 KB
 Clarke tiles garage 3.jpg 800 × 600; 80 KB
 Clean 1.jpg 1,024 × 680; 192 KB
 Clear Indicators.JPG 649 × 487; 95 KB
 Cobra-battery.jpg 600 × 800; 48 KB
 Coil Kit.JPG 1,280 × 960; 526 KB
 Coilpack.jpg 650 × 433; 86 KB
 Compare.jpg 620 × 700; 51 KB
 Compomotive.JPG 231 × 107; 4 KB
 Compomotive.jpg 130 × 130; 15 KB
 Configurator with Premium Pack.jpg 865 × 608; 115 KB
 Configurator with Sports Pack Front.jpg 858 × 605; 193 KB
 Configurator with Sports Pack Rear.jpg 752 × 332; 123 KB
 Configurator without Premium Pack.jpg 865 × 608; 114 KB
 Configurator without Sports Pack Front.jpg 730 × 514; 187 KB
 Configurator without Sports Pack Rear.jpg 752 × 332; 123 KB
 Conti-sport-contact-2-m.jpg 270 × 240; 20 KB
 Coolant header tank.JPG 448 × 302; 38 KB
 Coppergrease.JPG 200 × 200; 6 KB
 Cord1.jpg 306 × 230; 17 KB
 Cord2.jpg 306 × 230; 17 KB
 Cord3.jpg 320 × 240; 49 KB
 Cord4.jpg 320 × 240; 48 KB
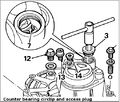 Counter bearing circlip wiki.JPG 510 × 432; 51 KB
 Counter shaft wiki.JPG 1,044 × 293; 46 KB
 Courtesy light switch.jpg 783 × 413; 87 KB
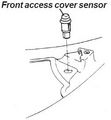 Coversensor.JPG 251 × 271; 9 KB
 CowlingOff.jpg 400 × 300; 94 KB
 Crank Pulley and Bolt.JPG 2,048 × 1,536; 710 KB
 Crashedexige.JPG 203 × 152; 17 KB
 Cup 260 wheel 1.jpg 650 × 435; 35 KB
 CuttingUndertrayW.jpg 320 × 240; 77 KB
 Cyclone.jpg 640 × 480; 255 KB
 DBA42355S2.jpg 193 × 300; 9 KB
 DBA5000.jpg 600 × 749; 71 KB
 DSC00746.JPG 1,679 × 1,259; 722 KB
 DSC00748.JPG 1,679 × 1,259; 589 KB
 DSC00751.JPG 1,679 × 1,259; 512 KB
 DSC01145.JPG 640 × 480; 39 KB
 DSC01145.jpg 640 × 480; 39 KB
 DSC01146.JPG 640 × 480; 38 KB
 DSC01176a.jpg 477 × 799; 51 KB
- Error creating thumbnail: File with dimensions greater than 12.5 MPDSC01480.JPG 5,472 × 3,648; 3.98 MB
 DSCF1073.jpg 428 × 336; 26 KB
 DYMAG.jpg 500 × 387; 32 KB
 D points.jpg 811 × 589; 224 KB
 DaewooMirror.jpg 400 × 300; 64 KB
 Daewoomatiz.jpg 868 × 480; 65 KB
 Damaged crankshaft rear oil seal.jpg 640 × 480; 40 KB
 Dan Gould.JPG 203 × 152; 14 KB
 Delphi.jpg 200 × 186; 7 KB
 Diagram distribution unit.jpg 650 × 434; 29 KB
 Diagram low level heater unit.jpg 650 × 422; 37 KB
 Diecast - A.B. Gee - 2003 Lotus Elise 111s (rhd) yellow - 1-18.jpg 512 × 335; 30 KB
 Diecast - AUTOart - Lotus Elise 111R - 1-43.jpg 528 × 239; 116 KB


.JPG)
.JPG)
.JPG)
.JPG)
.JPG)
.JPG)
.JPG)
_2.jpg)
.JPG)
.JPG)


.JPG)
.JPG)


_yellow_-_1-18.jpg)
