Remove the rear undertray: Difference between revisions
Jump to navigation
Jump to search
m Rear tray moved to Remove the rear undertray: Made into a "REMOVE THE" type article. |
m →S2 |
||
| Line 16: | Line 16: | ||
#Remove the 'GREEN' dotted bolt, also 8MM. | #Remove the 'GREEN' dotted bolt, also 8MM. | ||
#Finally remove the 'BLUE' doted Allen bolts. | #Finally remove the 'BLUE' doted Allen bolts. | ||
# Dont forget that the rear tray goes under the next tray down, not on top of. | |||
{{clr}} | {{clr}} | ||
Revision as of 14:04, 30 August 2006
| Time & Tools | |
| Time: | 10mins |
|---|---|
| Tools: | 5mm Allen Key, 8mm Socket, Wrench |
The rear undertray, or rear tray, needs to be removed for most jobs involving the exhaust system. It's a relatively simple job and can be done without needing to jack the car. There are in fact two rear undertrays (back and middle) which are bolted together (a third being the front undertray).
S1
How is this different?
S2

Recommended Removal order of the rear under tray bolts are: -
- Remove all the 'RED' doted bolts first, they are 8MM.
- Remove the 'GREEN' dotted bolt, also 8MM.
- Finally remove the 'BLUE' doted Allen bolts.
- Dont forget that the rear tray goes under the next tray down, not on top of.
-
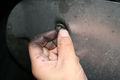 8MM Bolt removal, this is one of 12
 -
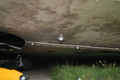
 All 8MM Bolts removed
 -
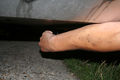
 one of the two back allen 5MM bolts
 -
 Removing of the 5MM allen bolts


