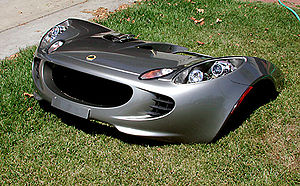
Remove S2 front clamshell
NOTE: This article is very under construction
The front clamshell is a bonded assembly of several glass fibre composite mouldings incorporating both front wings, the front access aperture, radiator air intake and headlamp housings. The clamshell is secured to the windscreen frame, radiator mounting panel and other panels using threaded fasteners for ease of removal and to facilitate service access and body repair.
This article provides a step-by-step procedure to facilitate in the removal of the front clamshell to enable maintenance work to be carried out.
The time required is very dependant upon your competence with a spanner and how rusty the bolts are holding the clamshell on. However, SELOC members have commented on timescales of under half an hour!
The procedure is relatively simple given the fact your dismantling the front of your car. Only a few basic tools are required but a slow, methodical approach is highly recommended.
Procedure
1. Remove both front body access panels
2. Remove both front wheelarch liners
- Before you can do this the car needs to be raised and supported on the two front jacking points.
- It is not necessary to completely remove the nearside liner. It has a relay and fuse box bolted to it and these would need to be removed first (they are not on a clip like the offside). Easier to just looses its fixing bolts for access to the clamshell securing bolts.
3. Remove both door hinge cover panels
- If you use boxes of paper to support the car make sure the access holes for the panel are not obscured!
- It is not absolutely necessary to remove these panels. All you really need to do is remove the foremost, and slacken the rearmost, of the two screws securing the door hinge cover panel to the clamshell.
4. Via each door aperture, remove the single fixing securing a bracket at the top rear corner of the clamshell to the base of the windscreen pillar
5. Remove the fixing at each side securing the clamshell to the bottom of the windscreen frame, and the two nuts securing the clamshell spine to the wiper motor bracket extension
6. Remove the single fixing at the bottom front of each wheelarch, securing the clamshell to the radiator panel extension
7. Remove the headlamp cover/mask assembly from each side. Remove the clamshell fixing at the front of each headlamp housing. Release the headlamp harnesses, and feed through the clamshell hole
8. Beneath the nose, release the screws fixing the front lower edge of the clamshell to the alloy undertray
9. List the clamshell from the car. Note any spacing washers or shims fitted at any fixing point
- Disconnect the lights and switches. This is simple there is a bit on each plug/socket to squash with your fingers and they will then pull apart easily.
The plastic screws sometimes will not come out so just carefully pry them out rather than unscrew (if they don't unscrew that is). You may need to replace some of these.
Just take your time and think about what you are doing and it will be fine.
Top Tips
- Never lift the clamshell from the car by yourself, you’ll crack it. Always get someone else to help and lift via the wheel arches
- The awkward bolts are those just behind the wheels that require the inner wheel arch to be pulled out to get access.
- Watch for the adjustment rivets between clamshell and mounting points (around the lid-aperture). Put them back where they were for alignment.
- When you get them back in at the end, don't push the rawlnuts through the holes, they will stay rolling around in the sill forever !
Whilst She's Off
There are a few other things that can be improved whilst the front clam is off, such as replace the radiator & cooling fans, replace the horn.
External Links
http://www.sandsmuseum.com/cars/elise/experience/maintenance/frontclam/clamremoval.html


