Difference between revisions of "Remove the rear undertray"
Jump to navigation
Jump to search
m (→S1) |
Basher111s (talk | contribs) |
||
| Line 29: | Line 29: | ||
Image:TRAY4.JPG|Removing the 5MM Allen bolts | Image:TRAY4.JPG|Removing the 5MM Allen bolts | ||
</gallery> | </gallery> | ||
| + | |||
| + | * It's worth replacing the standard zinc bolts & washers with quality Stainless Steel ones. Speedy Fasteners [http://www.speedyfasteners.com Speedy Fasteners Web Site] or [http://stores.ebay.co.uk/Speedy-Fasteners Speedy Fasteners eBay Site] sell full undertray kits which include all the clips and anti-rattle washers you need. | ||
[[Category:DIY]] | [[Category:DIY]] | ||
Latest revision as of 15:36, 10 March 2013
| Time & Tools | |
| Time: | 10mins |
|---|---|
| Tools: | 5mm Allen Key, 8mm Socket, Wrench |
The rear undertray, or rear tray, needs to be removed for most jobs involving the exhaust system. It's a relatively simple job and can be done without needing to jack the car. There are in fact two rear undertrays (back and middle) which are bolted together (a third being the front undertray).
S1
How is this different? It's not - use the same process as the S2.
S2
The rear undertray is actually two trays bolted together. Although it is only the rearmost of the two trays that need to be removed, it is sometimes simpler to remove both together.
Just the rearmost tray

Recommended Removal order of the rear under tray bolts are: -
- Remove all the 'RED' doted bolts first, they are 8MM.
- Remove the 'GREEN' dotted bolt, also 8MM.
- Finally remove the 'BLUE' doted Allen bolts.
- Don't forget when you replace the tray that the back tray goes under the middle tray, not on top of.
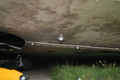
8MM bolt removal, this is one of 12

All 8MM bolts removed
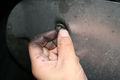
One of the two back Allen 5MM bolts
Removing the 5MM Allen bolts


- It's worth replacing the standard zinc bolts & washers with quality Stainless Steel ones. Speedy Fasteners Speedy Fasteners Web Site or Speedy Fasteners eBay Site sell full undertray kits which include all the clips and anti-rattle washers you need.